| When you type text in a document, it is displayed in a particular font. Each font consists of 256 alphabetic characters, numbers, and symbols that share a common design. By default the font used for text in a new Word document is Calibri, but you can change the font at any time. The available fonts vary from one computer to another, depending on the programs installed. Common fonts include Arial, Verdana, and Times New Roman. You can vary the look of a font by changing the following attributes: Almost every font comes in a range of font sizes, which are measured in points from the top of letters that have parts that stick up (ascenders), such as h, to the bottom of letters that have parts that drop down (descenders), such as p. A point is approximately 1/72 of an inch. Almost every font comes in a range of font styles. The most common are regular (or plain), italic, bold, and bold italic. Fonts can be enhanced by applying font effects, such as underlining, small capital letters (small caps), or shadows. A palette of harmonious font colors is available, and you can also specify custom colors. You can alter the character spacing by pushing characters apart or squeezing them together.
After you have selected an appropriate font for a document, you can use these attributes to achieve different effects. Although some attributes might cancel each other out, they are usually cumulative. For example, you might use a bold font in various sizes and various shades of green to make different heading levels stand out in a newsletter. Collectively, the font and its attributes are called character formatting. In this exercise, you will format the text in a document by changing its font, font style, size, color, and character spacing. USE the 02_Characters document. This practice file is located in the Chapter03 subfolder under SBS_Word2007. OPEN the 02_Characters document.
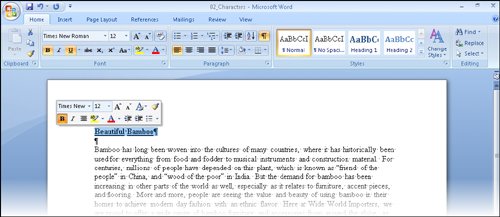
1. | In the Beautiful Bamboo heading, click anywhere in the word Beautiful.
| 2. | On the Home tab, in the Font group, click the Underline button.
Underline  Tip If you click the Underline arrow, you can choose a style from the Underline gallery. You can also change the underline color. The word containing the insertion point is now underlined. Notice that you did not have to select the entire word.
| 3. | In the same heading, click anywhere in the word Bamboo, and then on the Quick Access Toolbar, click the Repeat button.
Repeat  The last formatting command is repeated. Again, although you did not select the entire word, it is now underlined.
| 4. | In the selection area, click adjacent to Beautiful Bamboo to select the entire heading.
Word displays a Mini toolbar of buttons that you can use to quickly change the look of the selection.
| 5. | On the Mini toolbar, click the Bold button.
Bold  The heading is now bold. The active buttons on the Mini toolbar and in the Font group on the Home tab indicate the attributes that you applied to the selection.
 See Also For information about the use of character formatting, see the sidebar entitled "More About Case and Character Formatting" later in this chapter. | 6. | On the Mini toolbar, click the Format Painter button, and then click in the selection area adjacent to the Types of Bamboo heading.
Format Painter  Word "paints" the formatting of Beautiful Bamboo onto Types of Bamboo.
Tip The Format Painter button is also available in the Clipboard group on the Home tab. | 7. | Select Beautiful Bamboo, and then on the Home tab, in the Font group, click the Font arrow, scroll the list of available fonts, and then click Stencil.
Troubleshooting If Stencil is not available, select any heavy font that catches your attention. The heading at the top of the document now appears in the new font.
| 8. | In the Font group, click the Font Size arrow, and then in the list, click 26.
Font Size  The size of the heading text increases to 26 points.
Tip You can increase or decrease the font size in set increments by clicking the Grow Font and Shrink Font buttons in the Font group, or by clicking the same buttons on the Mini toolbar that appears when you select text. | 9. | Click the Font Dialog Box Launcher.
Dialog Box Launcher  The Font dialog box opens.
 | 10. | Click the Underline style arrow, and then in the list, click (none).
| 11. | Under Effects, select the Outline check box.
| 12. | Click the Character Spacing tab.
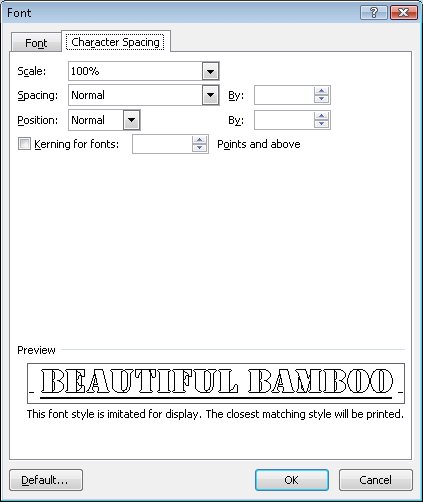 | 13. | Click the Spacing arrow, and then in the list, click Expanded.
| 14. | To the right, click the By up arrow until the spacing is expanded by 2 pt (points), and then click OK.
The selected text appears with an outline effect and with the spacing between the characters expanded by 2 points.
| 15. | On the Home tab, in the Font group, click the Clear Formatting button.
Clear Formatting  The formatting of the selected text is removed.
| 16. | On the Quick Access Toolbar, click the Undo button.
Undo  The formatting of the selected text is restored.
| 17. | In the last sentence of the second paragraph, select the words light green.
| 18. | On the Home tab, in the Font group, click the Font Color arrow, and then under Standard Colors in the palette, click the light green box.
Font Color  The selected words are now light green. (To see the color, clear the selection by clicking a blank area of the document.)
Tip If you want to apply the Font Color button's current color, you can simply click the button (not the arrow). | 19. | In the same sentence, select dark, rich shades of green, click the Font Color arrow, and then below the palette, click More Colors.
The Colors dialog box opens.
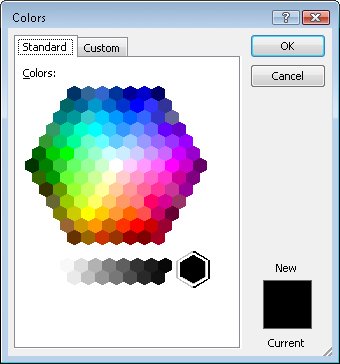 | 20. | In the Colors wheel on the Standard tab, click one of the dark green shades on the left, and then click OK.
The selection is now dark green.
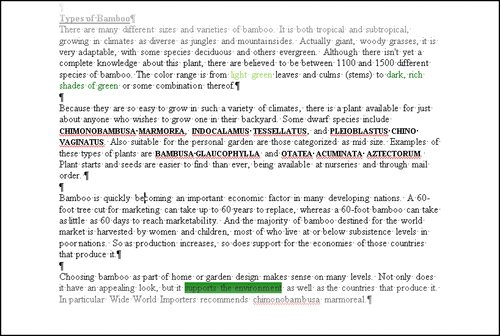
| 21. | Select the phrase supports the environment in the second sentence of the last paragraph. Then in the Font group, click the Highlight arrow, and under Recent Colors in the palette, click the green box.
Highlight  This is the same green that you selected in Step 20. After you select a custom color in one palette, it is available in all the palettes. The highlighted phrase now stands out from the rest of the text.
Tip If you click the Highlight button without first making a selection, the mouse pointer becomes a highlighter that you can drag across text. Click the Highlight button again or press Esc to turn off the highlighter. | 22. | In the paragraph that begins Because they are so easy to grow, select the bamboo species name chimonobambusa marmorea. Then hold down the  key while selecting indocalamus tessellatus, pleioblastus chino vaginatus, bambusa glaucophylla, and otatea acuminata aztectorum. key while selecting indocalamus tessellatus, pleioblastus chino vaginatus, bambusa glaucophylla, and otatea acuminata aztectorum.
| 23. | Click the Font Dialog Box Launcher.
| 24. | In the Font dialog box, click the Font tab, and under Effects, select the Small caps check box. Then click OK.
The lowercase letters in the species names now appear in small capital letters, making those names easy to find in the text.
| 25. | Click anywhere in the first species name. Then on the Home tab, in the Editing group, click the Select button, and click Select Text with Similar Formatting.
 All the species names that have been formatted in small caps are selected.
| 26. | In the Font group, click the Bold button, and then click away from the selection.
The species names are now both small caps and bold.
 |
CLOSE the 02_Characters document without saving your changes.
More About Case and Character Formatting The way you use case and character formatting in a document can influence its visual impact on your readers. Used judiciously, case and character formatting can make a plain document look attractive and professional, but excessive use can make it look amateurish and detract from the message. For example, using too many fonts in the same document is the mark of inexperience, so don't use more than two or three. Bear in mind that lowercase letters tend to recede, so using all uppercase letters (capitals) can be useful for titles and headings or for certain kinds of emphasis. However, large blocks of uppercase letters are tiring to the eye. Where do the terms uppercase and lowercase come from? Until the advent of computers, individual characters were assembled to form the words that would appear on a printed page. The characters were stored alphabetically in cases, with the capital letters in the upper case and the small letters in the lower case. |
Tip If you want to see a summary of the formatting applied to a selection, you can display the Style Inspector pane by clicking the Styles Dialog Box Launcher and then clicking the Style Inspector button (the middle button at the bottom of the Styles task pane). You can then click anywhere in the document to see a formatting summary of the word containing the insertion point. To see details about the formatting, you can click the Reveal Formatting button at the bottom of the Style Inspector pane to open the Reveal Formatting task pane.
|