Adding a Subform to a Form
A form can display information (fields) from one or more tables or queries. If you want to display fields from several tables or queries in one form, you have to give some thought to the relationships that must exist between those objects.
In this exercise, you will add a subform to an existing form.
Use the 07_AddSubform database. This practice file is located in the Chapter10 subfolder under SBS_Office2007.
Open the 07_AddSubform database. Then open the Categories form in Design view.
1. Drag the Form Footer section selector down about 1 inch to give yourself some room to work in the Details section of the form. It should be about 3 inches high.
2. On the Design tab, in the Controls group, make sure the Use Control Wizards button is active (orange). 
3. In the Controls group, click the Subform/Subreport button, and then drag diagonally to draw a rectangle in the lower portion of the Detail section. ![]()
A white object appears in the form, and the SubForm wizard starts.
| Tip | If prompted to do so, follow the instructions to install this wizard. |
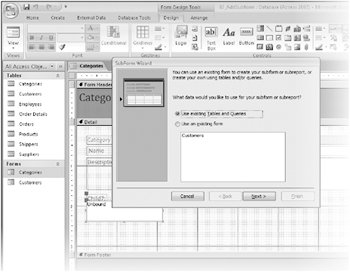
4. With the Use existing Tables and Queries option selected, click Next.
5. In the Tables/Queries list, click Table: Products.
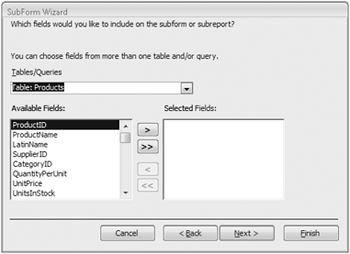
6. In the Available Fields list, double-click the ProductName, CategoryID, QuantityPerUnit, UnitPrice, and UnitsInStock fields to add them to the Selected Fields list. Then click Next.
Because the CategoryID field in the subform is related to the CategoryID field in the main form, the wizard selects Show Products For Each Record In Categories Using CategoryID as the Choose From A List option.
| Tip | If the wizard can’t figure out which fields are related, it selects the Define My Own option and displays list boxes in which you can specify the fields to be related. |
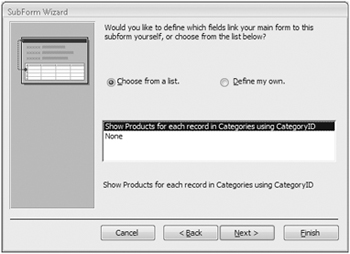
7. With the Define my own option selected, click Finish.
Access displays the Categories form in Design view, with an embedded Products subform. The size and location of the subform is determined by the size and location of the original rectangle you created in the form.
8. Adjust the size and location of the objects in your form as needed to view the entire subform.

9. Notice the layout of the subform in Design view, and then on the View toolbar in the lower-right corner of the Access program window, click the Form View button to switch views. ![]()
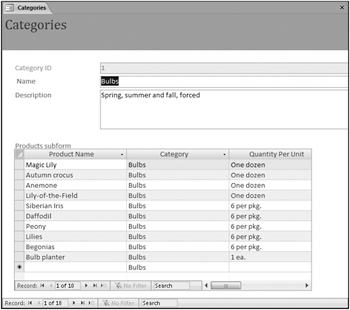
The format of the subform has totally changed. In Design view, it looks like a simple form, but in Form view, it looks like a datasheet.
10. Switch back to Design view, make any necessary size adjustments, and then open the Property Sheet pane if it isn’t already open.
11. Click the Form selector in the upper-left corner of the subform twice.
The first click selects the Products subform control, and the second click selects the form. A small black square appears on the selector.
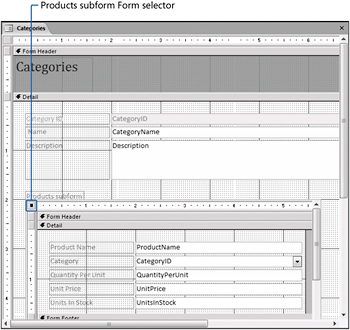
12. In the Property Sheet pane, on the Format tab, change the Record Selectors and Navigation Buttons properties to No.
While on this tab, notice the Default View property, which is set to Datasheet. You might want to return to this property and try the other options after finishing this exercise.
13. Close the Property Sheet pane, switch back to Form view, and then adjust the width of the columns by dragging the column dividers, until you can see all the fields.
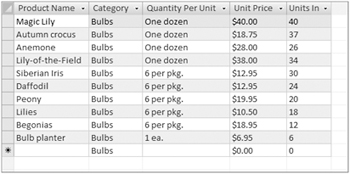
| Tip | You can quickly adjust the width of columns to fit their data by double-clicking the double arrow between column headings. |
14. Scroll through several categories by using the navigation buttons.
As each category appears at the top of the form, the products in that category are listed in the datasheet in the subform.
15. Click the First Record button to return to the first category (Bulbs). In the subform click Bulbs in the Category column to the right of the first product (Magic Lily). ![]()
The arrow at the right end of the box indicates that this is a combo box.
16. Click the arrow to display the list of categories, and then change the category to Cacti.
17. Click the Next Record navigation button to move to the Cacti category.
Magic Lily is now included in this category. ![]()
18. Display the category list to the right of Magic Lily and return it to the Bulbs category.
19. To prevent people from changing a product’s category, return to Design view, click the CategoryID text box control in the subform, and then press. ![]()
The CategoryID text box and its label no longer appear on the form.
| Important | You included the CategoryID field when the wizard created this subform because it is the field that relates the Categories and Products tables. The underlying Products table uses a combo box to display the name of the category instead of its ID number, so that combo box also appears in the subform. |
20. Save the form, switch back to Form view, and then adjust the width of the subform columns and the size of the Form window until you can clearly see the fields.
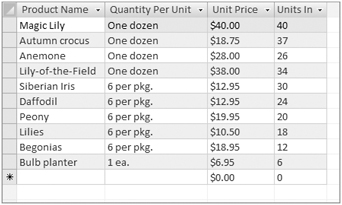
Close the 07_AddSubform database.
If you know when you create a form that you are going to add a subform, you can create the form and its subform by using the Form wizard. To do so:
-
On the Create tab, in the Forms group, click the More Forms button, and then in the list, click Form Wizard.
-
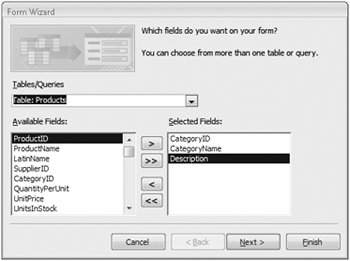
In the Form wizard, in the Tables/Queries list, click the table on which you want to base the form. Then click the Move All button to include all the table fields in the new form.
-
In the Tables/Queries list, click the table on which you want to base the subform.
-
In the Available Fields list, double-click the fields you want to include in the subform to move them to the Selected Fields list, and then click Next.
Troubleshooting If the relationship between the selected tables has not been defined, Access displays a message containing a link to the Relationships window. If this occurs, you will need to define the relationship and then re-start the wizard.
-
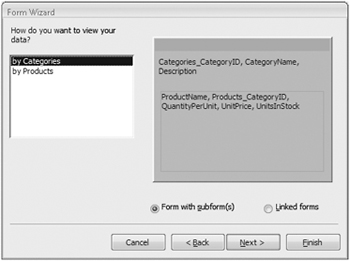
With your primary table and Form with subform(s) selected, click Next.
-
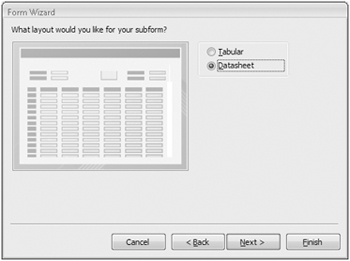
With Datasheet selected, click Next.
-
On the last page of the wizard, select a style and then click Finish.
The wizard creates and opens the form and subform.
You can edit the form created by the Form wizard to suit your needs.
If there is only one one-to-many relationship between the tables you want to include in the form, and that relationship has been defined in the Relationships window, the fastest way to create the form and its subform is by using the Form tool. Simply select the primary table then on the Create tab, in the Forms group, click Form.
The Form tool creates and displays a form and subform, each containing all fields of its source table.
EAN: 2147483647
Pages: 231