Refining Form Properties
As with tables, you can work with forms in multiple views. The two most common views are Form view, in which you view or enter data, and Design view, in which you add controls to the form or change the form’s properties or layout.
When you create a form by using the Form tool or the Form wizard, every field included on the form is represented by a text box control and its associated label control. A form like the one you created earlier in this chapter is linked, or bound, to the table it’s based on. Each text box is bound to a specific field in the table. The table is the record source, and the field is the control source. Each control has a number of properties, such as font, font size, alignment, fill color, and border. You can change the default values of these properties to improve the form’s appearance.
A form inherits some of its properties from the table on which it is based. For instance, text box names on the form match field names in the source table, text box labels match the Caption property of each field, and the width of each text box is determined by the Field Size property. However, the properties of a form are not bound to their source. After you have created a form you can change the properties of the fields independently in the table and on the form.
In this exercise, you will edit the properties of a form.
Use the 02_RefineProperties database. This practice file is located in the Chapter10 subfolder under SBS_Office2007.
Open the 02_RefineProperties database.
1. In the Navigation Pane, under Forms, right-click Customers, and then click Design View.
The Customers form opens in Design view.
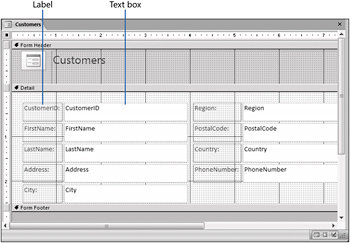
The form is arranged in a Stacked layout that limits the extent of changes you can make to the form.
2. Click the top border of the blue Form Footer header and drag the Form Footer down about three inches to enlarge the Detail grid.
3. Click the Detail section of the form above the Region label, and then drag to draw a rectangle through some portion of all the controls on the right side of the form to select them.
4. Drag the selected group of controls down and to the left, positioning them just below the City label, then click any blank section of the grid to release the selection.
5. On the Customers form, click the CustomerID label (not its text box).
6. On the Design contextual tab, in the Font group, click the Font arrow, and then in the list, click MS Sans Serif.
7. With the label still selected, click the Font Size arrow, and then in the list, click 8. The label text becomes slightly smaller.
8. If the Property Sheet pane is not visible, right-click the CustomerID text box (not its label), and then click Properties.
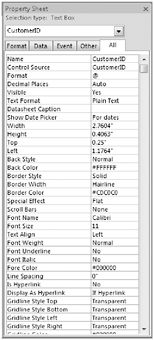
All the settings available in the Font group (plus a few more) are also available in the Property Sheet pane associated with each control. From this pane, you can display the properties of any object on the form, including the form itself.
You can display related types of properties by clicking the appropriate tab: Format, Data, Event, or Other, or display all properties by clicking the All tab.
9. In the Property Sheet pane, click the Format tab, scroll to the Font Name property, and change it to MS Sans Serif. Then set the Font Size property to 8, and the Font Weight property to Bold.
The CustomerID text in the form reflects your changes.
| Tip | You can change the width of a task pane by dragging its edge, and you can undock it so it floats in the program window by dragging it by the title bar. |
10. Click the arrow in the Property Sheet pane header, and then in the property list, click Label3 to select the label to the left of the FirstName text box.
11. Repeat Step 9 to change the font of the text in the FirstName label box. These different ways of selecting a control and changing its properties provide some flexibility and convenience, but it would be a bit tedious to make changes to a few dozen controls in a form. The next two steps provide a faster method.
12. Click anywhere in the Detail section of the form, and then drag diagonally to draw a rectangle through some portion of all the controls to select them.
| Tip | You can select all the controls in a form, including those in the header and footer, by pressing Ctrl+A. |
Small handles appear around the selected controls. In the Property Sheet pane, the Selection type changes to Multiple selection, and the Objects box is blank. Only the Format settings that are the same for all the selected controls are displayed. Because the changes you made in the previous steps are not shared by all the selected controls, the Font Name, Font Size, and Font Weight settings are now blank.
13. Repeat Step 9 to set the same Font Name, Font Size, and Font Weight properties for all the selected controls.
14. With all the controls still selected, on the Format tab of the Property Sheet pane, set the Back Style property to Normal.
The background of the labels is no longer transparent.
15. Click the Back Color property, and then click the ellipsis button that appears.![]()
The Color Builder opens.
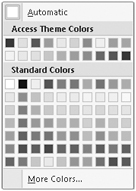
16. In the Color Builder, click the yellow square, and then press ![]() .
.
The background of all the controls changes to a bright yellow and the hexadecimal number representing this shade (#FFF200) appears in the Back Color property box.
| Tip | If the Color Builder doesn’t include a color you want to use, click More Colors at the bottom of the gallery, select a color on the Standard or Custom tab of the Colors dialog box, and then click OK to set the color and add it to the list of recent colors at the bottom of the gallery. |
17. In the Back Color property box, replace #FFF200 with #FFFFCC.
The background color changes to a pale yellow.
18. Set the Special Effect property to Shadowed, and the Border Color property to green.
19. In the form, click away from the selected controls to release the selection (in other words, to deselect the controls).
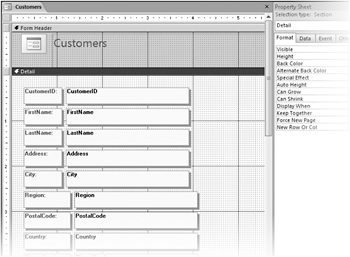
20. Click the FirstName label. In the Property Sheet pane, scroll up to the Caption property, change it from FirstName to Name, and then press ![]() .
.
21. Repeat Step 20 to change Phone Number to Phone.
| Tip | You can edit the Caption property of a label or the Control Source property of a text box by selecting it, clicking its text, and then editing the text as you would in any other Windows program. However, take care when editing the Control Source property, which defines where the content of the text box comes from. |
22. Drag through all the controls on the form to select them. On the Arrange tab, in the Control Layout group, click the Remove button.
Removing the Stacked layout gives you more options for arranging the controls.
23. Click away from the selected controls to release the selection.
24. Click the label to the left of LastName, and then press the![]() key.
key.
25. Select all the labels, but not their corresponding text boxes, by holding down the ![]() key as you click each of them or by dragging through just the labels. Then in the Property Sheet pane, set the Text Align property to Right.
key as you click each of them or by dragging through just the labels. Then in the Property Sheet pane, set the Text Align property to Right.
Now let’s size the bottom four label boxes to match the ones above, and line up their associated text boxes.
26. Select the bottom four labels, but not their text boxes, and change their width property to 0.8847”.
27. Select all the labels again. On the Arrange contextual tab, in the Size group, click the Size to Fit button to resize the labels to fit their contents, and then click anywhere in the form (but outside the controls) to release the selection.![]()
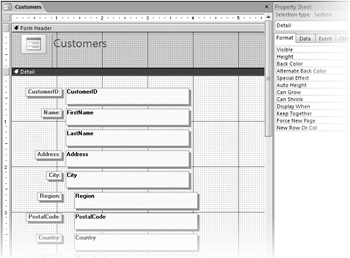
| Tip | The order in which you make formatting changes, such as the ones you just made, can have an impact on the results. If you don’t see the expected results, click the Undo button on the Quick Access Toolbar, or press Ctrl+Z, to step back through your changes. Then try again. |
28. Select all the text boxes (but not their corresponding labels), and in the Property Sheet pane, change the Left setting to 1.5” to line up the text boxes and insert space between them and the labels.
29. Change the Font Weight property to Normal, and then click anywhere in the form, but outside the controls, to deselect them.
30. On the Quick Access Toolbar, click the Save button to save the design of the Customers form.![]()
Close the 02_RefineProperties database.
| Tip | Unless you close the Property Sheet pane, it remains open until you close all open forms. |
EAN: 2147483647
Pages: 231