Formatting Table Information
Formatting a table to best convey its data is often a process of trial and error. With Word 2007, you can quickly get started by creating a quick table, a preformatted table with sample data that you can customize. You can then apply one of the table styles available on the Design contextual tab, which include a variety of borders, colors, and other attributes to give the table a professional look.
To customize the appearance of a quick table or a table you have created from scratch, you can use the buttons on the Design and Layout contextual tabs. You can also use buttons in the Paragraph group on the Home tab to change alignment and spacing. You can format the text by using the buttons in the Font group, just as you would to format any text in a Word document. You can also apply character formatting from the Styles gallery.
In this exercise, you will create a quick table and then apply a table style to it. You will then change some of the text attributes and modify the borders and shading in various cells to make the formatting suit the table’s data. There are no practice files for this exercise.
Be Sure To display non-printing characters before starting this exercise.
Open a new, blank document.
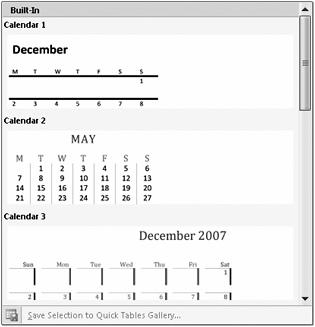
1. With the Zoom level at 100%, on the Insert tab, in the Tables group, click the Table button, and then point to Quick Tables.
The Quick Tables gallery opens.

2. Scroll through the gallery, noticing the types of tables that are available, and then click Matrix.
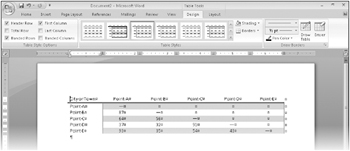
Word inserts the selected table and displays the Design contextual tab . Notice that the table data includes headings across the top and down the left column. Some of the cells are blank, and obviously have less importance than the cells that contain numbers. The table does not include summary data, such as totals.

3. On the Design tab, in the Table Style Options group, clear the Banded Rows check box.
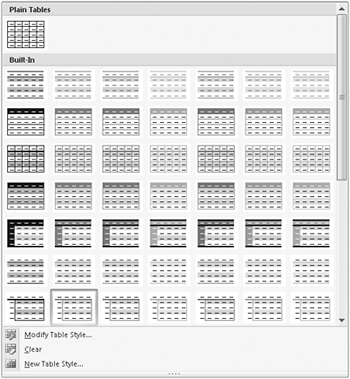
4. In the Table Styles group, point to each style in turn to see its live preview, and then click the More button.
Word displays the Table Styles gallery .

5. Explore all the styles in the gallery. When you finish exploring, click the Medium Shading 2 - Accent 2 thumbnail.
You need to modify this style a bit, but it is a good starting point.
6. Select all the white cells by dragging through them. Then in the Table Styles group, click the Borders arrow, and in the list, click All Borders. ![]()
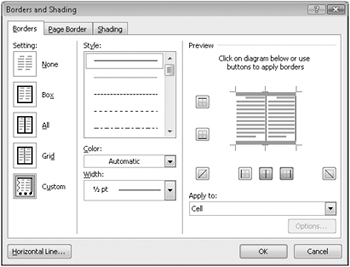
7. Select all the cells in the last row (Point E) by clicking to its left, and in the Table Styles group, in the Borders list, click Borders and Shading.
The Borders And Shading dialog box opens, displaying the borders applied to the selected cells. The thick gray borders in the Preview area indicate that different borders are applied to different cells in the selection.

8. In the Preview area, click the bottom border of the diagram twice to remove all bottom borders.
9. Click the Color arrow, and then under Theme Colors, click the black box (Black, Text 1).
10. Click the Width arrow, and then in the list, click 2 1/4 pt.
11. In the Preview area, click the bottom border of the diagram, and then click OK.
The table now has the same border at the top and bottom.
12. Select the empty cells in the Point A row. In the Table Styles group, click the Shading arrow, and then under Theme Colors, click the lightest burgundy box (Red, Accent 2, Lighter 80%).
13. Repeat Step 12 for all the remaining blank cells in the table.
14. Select the dash in the cell at the junction of the Point A column and the Point A row, hold down the key, and select the other four dashes.
15. On the Mini toolbar, click the Font Color arrow, and then under Standard Colors in the palette, click the bright Red box.
| Troubleshooting | If the Mini toolbar doesn’t appear, click the Font Color arrow in the Font group on the Home tab. |
16. Click outside the table to release the selection, and then in the Paragraph group, click the Show/Hide ¶ button to hide non-printing characters.
You can now judge how well the table displays its data.

Close the document without saving your changes.
EAN: 2147483647
Pages: 231