Attaching Files to Messages
A convenient way to distribute a file (such as a Microsoft Office Word document, Microsoft Office Excel spreadsheet, or Microsoft Office PowerPoint presentation) to other people is by attaching the file to an e-mail message. The message recipient can save the file to his or her hard disk, open the file from the message, or if he or she is using Outlook 2007, preview the file in the Reading Pane.
You can send a file as a regular attachment or-if your organization has a collaboration site built on Microsoft SharePoint products and technologies-as a shared attachment. When you send a shared attachment, Outlook creates a document workspace for the attached file and, rather than sending a copy of the file to each message recipient, sends an invitation to visit the workspace.
See Also For information about creating a shared workspace for a file attachment, see “Creating a Document Library from Outlook” in Chapter 10, “Collaborating with Other People.”
In this exercise, you will send a Word document and a PowerPoint presentation as attachments to an e-mail message.
Use the 03_Attaching document and the 03_Attaching presentation. These practice files are available in the Chapter18 subfolder under SBS_Office2007.
Be Sure To start Outlook and display the Inbox before beginning this exercise.
1. On the Standard toolbar, click the New Mail Message button. 
2. In the To box of the new message window, type your own e-mail address.
| Tip | If you completed the previous exercise, Outlook will display your e-mail address in a list as you begin typing. You can insert the address by pressing the Down Arrow key to select it (if necessary) and then pressing Enter. |
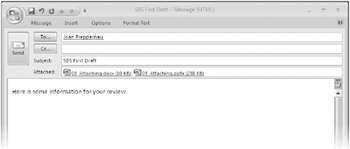
3. In the Subject box, type SBS First Draft.
4. In the content pane, type Here is some information for your review. Then press ![]() to move to the next line.
to move to the next line.
5. On the Message tab, in the Include group, click the Attach File button. 
| Tip | A larger version of the Attach File button is available in the Include group on the Insert tab. |
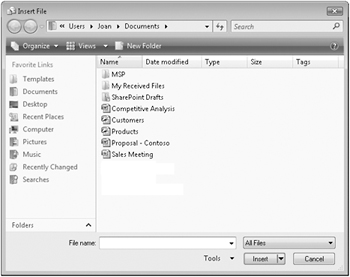
The Insert File dialog box opens, displaying the contents of your Documents folder.

6. Browse to the practice file folder for this chapter (Documents\MSP\SBS_Office2007\Chapter18), click the 03_Attaching document, hold down the ![]() key, click the 03_Attaching presentation, and then click Insert.
key, click the 03_Attaching presentation, and then click Insert.
| Troubleshooting | By default, Windows does not display file extensions in Explorer windows or dialog boxes. You can usually differentiate file types by their icons-for example, the Word icon precedes the 03_Attaching document name. However, the icon preceding a PowerPoint 2007 presentation is an image of the first slide in the presentation, and in the default Small Icons view, you will probably see only the slide background. You can display the file type by clicking Details on the Views list, or you can display larger icons by clicking Extra Large Icons, Large Icons, Medium Icons, or Tiles on the Views list. In these views, you can see that the PowerPoint icon appears in the lower-right corner of the icon image. If you want Windows to display file extensions, display a folder (such as your Documents folder) in Explorer, click Search And Folder Options on the Organize menu, and then on the View tab of the Folder Options dialog box, clear the Hide Extensions For Known File Types check box, and click Apply or OK. |
The files appears in the Attach box in the message header.

7. In the message header, click the Send button. 
Outlook closes the message window and sends the message. When you receive the message in your Inbox, leave it there for use in a later exercise.
You can send your own or someone else’s contact information from your address book to another Outlook user by attaching the contact’s Outlook business card to an e-mail message. The recipient can then save the contact information in his or her own address book.
To send a business card:
-
In the message window, on the Message tab, in the Include group, click the Insert Business Card button, and then in the list, click Other Business Cards.
Tip Business cards that you’ve previously sent appear in the Insert Business Card list. You can insert a card in the message by selecting it from the list.
-
In the Insert Business Card dialog box listing all your contacts, select the card or cards you want to send, and then click OK. If you have multiple address books, you can display a different address book in the dialog box by clicking it in the Look In list.
To select multiple sequential cards, click the first card, hold down the Shift key, and then press the Up Arrow or Down Arrow key to select additional cards. To select multiple non-sequential cards, click the first card, hold down the Ctrl key, click the next card, and so on.
The message recipient can add the contact to his or her main address book by dragging the business card from the received message to the Contacts module or by opening the card from the message and then clicking the Save & Close button.
| Tip | Readers of a previous edition of this book wrote to us asking how to create mail-merge e-mail messages from Outlook. This is actually a function of Word, rather than Outlook. For information about creating e-mail messages to multiple recipients by using mail-merge, refer to Microsoft Office Word 2007 Step by Step (ISBN 0-7356-2302-3) by Joyce Cox and Joan Preppernau (Microsoft Press, 2007). |
EAN: 2147483647
Pages: 231