Dial-Up Networking
| Windows XP can connect to a remote Windows network via modem. All file sharing, printing, and directory services are available just as if you were directly connected, including any Novell, OS/2, and UNIX file and print services provided on the network. Just dial up, open shared folders, transfer files, and email as if you were there, and disconnect when you're finished. The receiving end of Dial-Up Networking can be handled by the Remote Access Services (RAS) in Windows 200x/NT4 Server or by third-party remote connection hardware devices manufactured by networking companies such as Cisco and Lucent. Windows XP Professional and Home Edition come with a stripped-down version of RAS, so you can also set up your own Windows XP computer to receive a single incoming modem connection. You can do so, for example, to get access to your office computer and LAN from home, provided your company permits this access. I'll discuss incoming calls later in the chapter. First, though, let me tell you how to connect to a remote Windows network. Setting Up Dial-Up NetworkingTo create a dial-up connection to a remote network or computer, you need an installed modem. You learned how to install modems in Chapter 8, "Internet and TCP/IP Connection Options," so start there to install and configure your modem. You also must get or confirm the information shown in Table 18.1 with the remote network's or computer's manager.
Armed with this information, you're ready to create a dial-up connection to the remote network. To do so, just follow these steps:
When the properties dialog appears, review it to be sure that all settings are correct. The next section discusses the most important connection properties. Setting a Dial-Up Connection's PropertiesThere are two ways you can edit the properties for a dial-up connection from the Network Connections window: You can open the connection icon and click the Properties button, or you can right-click the icon and select Properties. The Dial-Up Connection's properties page has five tabs and a heap o' parameters. Most of the time, the default settings will work correctly, but you might need to change some of them. I'll walk you through the most important parameters.
GeneralOn the General tab of the Properties dialog (see Figure 18.2), you can set your choice of modems if you have more than one installed. You also can set telephone numbers and dialing rules. Figure 18.2. General Properties include dialing and modem settings.
The following are the significant parameters:
OptionsThe Options tab of the Properties dialog (see Figure 18.3) includes dialing options, choices for being prompted for phone number and passwords, and redialing settings. Figure 18.3. The Options tab includes dialing and prompting options.
The important options are as follows:
SecurityOn the Security tab, you can select which encryption methods are required or permitted when you're logging on to the remote connection server.
NOTE Shiva is shorthand for a user account/password verification system manufactured by Shiva Corporation (now owned by Intel). The Shiva system only validates a caller's right to connect to the modem; it doesn't grant rights to resources (like file servers) on the network. NetworkingThe Networking tab of the Properties dialog (see Figure 18.4) defines which network protocols and network services are connected through the dial-up connection. Figure 18.4. On the Networking tab, you can choose which network protocols and services are enabled for the dial-up connection. Check everything, and set the TCP/IP protocol's properties if necessary.
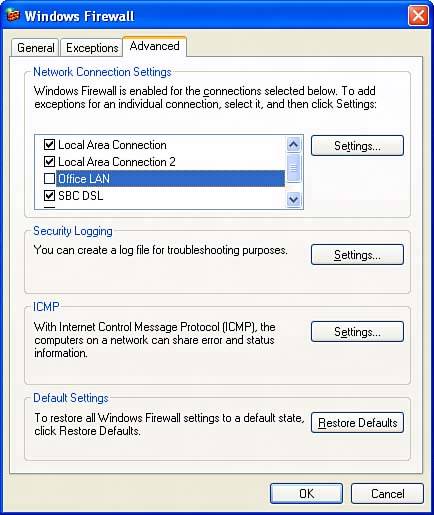
Usually, all protocols and services should be checked except File and Printer Sharing. This option should be disabled so remote network users cannot use your computer's shared folders and printers. If you really do want to let the remote network's users see them, check File and Printer Sharing. Normally, a Remote Access Server automatically assigns your connection the proper IP address, DNS addresses, and other TCP/IP settings through DHCP, so you don't need to alter the Internet Protocol properties. In the very unlikely event that the network administrator tells you that you must set TCP/IP parameters yourself, select Internet Protocol from the Components list, and click Properties. Enter the supplied IP address and DNS addresses there. AdvancedThe Advanced tab configures Internet Connection Sharing and the Windows Firewall. These utilities may not be needed when you're connecting to a remote network. If the network to which you're connecting is a safe, protected corporate network with its own firewall, you will probably want to disable Windows Firewall just for this particular dial-up connection. To do this, view the Advanced tab, click the Settings button, view the Windows Firewall's Advanced tab, and uncheck the dial-up connection that corresponds to your corporate network, as shown in Figure 18.5. Figure 18.5. If you are connecting to a secure corporate network, you can disable Windows Firewall for just this connection.
Finally, after you've finished making any changes to the connection's options, select OK. The connection icon is then installed in Network Connections for use anytime. Managing Dial-Up Connections from Multiple LocationsAs you've seen already, Windows lets you enter your current telephone area code and dialing prefix requirements so that it can make modem calls using the customs appropriate for your local phone system. This capability is great if you use a portable computer. For example, at home, you might be in area code 415. At the office, you might be in area code 707 and have to dial 9 to get an outside telephone line. When you're visiting Indianapolis, you're in area code 317 and might need to use a telephone company calling card when making long-distance calls. Windows offers great support for these variations by letting you define "locations," each with a separate local area code and dialing rules. When you use one of your Network Connections icons, as long as you've told Windows your current location, it can automatically apply the correct set of rules when making a dial-up connection.
However, if you use an ISP with access points in various cities, or your company has different access numbers in various regions, you'll find that this Locations system does not let you associate a different dial-up number with each location. It would be great if it did, but no such luck. If you want to use different "local" dial-up numbers for the various locations you visit with your computer, you must set up a separate Network Connections icon for each access number and use the appropriate icon when making a connection at each location. TIP Set up and test the first access number you need. Then, when you need to add a new access number, right-click the first one, select Create Copy, rename it, and change its telephone number. I name my icons based on the location of the local number: Office-Berkeley, Office-Seattle, and so on. When you travel and want to make a dial-up connection, select the appropriate dial-up icon, and set your location before you click Dial. TIP If you travel, you'll find that having your Internet Options set to dial a particular connection automatically is not a great idea. It would dial the chosen connection no matter where you were (and remember, if there's a 50-50 chance of things going wrong, 9 times out of 10 they will). So, if you travel with your computer, you might want to open Internet Explorer and click Tools, Internet Options. Select the Connections tab, and choose Never Dial a Connection. This way, you won't be blind-sided by an inadvertent call to Indiana while you're in India. Making a Dial-Up ConnectionMaking a remote network dial-up connection is no more difficult than connecting to the Internet. If you're a mobile user who moves between area codes, check your current location first, and then dial. Check Your Current LocationIf you've changed area codes or phone systems since the last time you made a modem connection, check your location setting by following these steps before dialing into the network:
Windows should now use the correct area code and dialing prefixes. Choose a Profile OptionIf your computer is a member of a Windows domain network that offers roaming user profiles, you can decide whether to connect using your current local profile or use your remote "roaming" profile. Your network manager will tell you if the network provides roaming profiles. You have two options for making the connection:
If you're not connecting to a Windows domain-type network, if you don't have a roaming profile, or if you don't need to use it, use the steps under "Connect to a Remote Network Without a Roaming Profile." If you have an account with a roaming profile on the remote network, and you want to have access to the My Documents folder and settings you use on that network, follow the steps under "Connect to a Remote Network with a Roaming Profile." Connect to a Remote Network Without a Roaming ProfileTo connect to a remote network using the profile you're already using in your own computer, make the connection directly, without logging out. Just follow these steps:
You can now use the remote network's resources, as discussed next. Connect to a Remote Network with a Roaming ProfileTo use the remote network under your user profile on that network, your computer must have been configured as a Domain member, as described in Chapter 16 under "Joining a Windows Domain Network". Then, you must log in using the remote connection, using these steps:
Windows then dials the remote network connection and logs in. After your profile settings have been copied, you're online and ready to use the network. NOTE If the connection fails because the telephone number was wrong, you may need to log on locally to change the number in the connections' properties dialog. CallbacksFor security purposes, some networks don't permit you to just call in; they want to call you, so you not only need the right login name and password, but you also must be at the right location to gain access to the network. This type of access also generates an audit trail through phone company records. When this type of security is in force, your network manager will contact you to arrange the predetermined telephone number to use to call you. You cannot access the network from any other location unless you arrange for call forwarding from the original number. Callbacks can also be used to make the remote host pay for a long phone call. Some businesses use callbacks so that employees can dial in from the field at the company's expense. When callbacks are in effect, you'll dial up the remote network as I described earlier, but as soon as the network accepts your password it will hang up. Within 30 seconds it will call back, and your modem will pick up the line and establish a connection. If your network manager says that callbacks are optional, you can tell Windows how you want to exercise the option. In Network Connections, select the Advanced menu, choose Dial-Up Preferences, and select the Callback tab. You can indicate that you want callbacks on or off, or that you want to be asked each time you make a connection. Using Remote Network ResourcesWhen you're connected, you can use network resources exactly as if you were on the network. My Network Places, shared folders, and network printers all function as if you were directly connected. The following are some tips for effective remote networking by modem:
Email and Network ConnectionsIf you use your computer with remote LANs as well as an ISP, you might need to be careful with the email programs you use. Most email programs don't make it easy for you to associate different mail servers with different connections. Although most email servers allow you to retrieve your mail from anywhere on the Internet, most are very picky about whom they let send email. Generally, to use an SMTP server to send mail out, you must be using a computer whose IP address is known by the server as belonging to its network. You can usually only send mail out through the server that serves your current connection. See if your favorite email program can configure separate "identities", each with associated incoming and outgoing servers. If you send mail, be sure you're using the identity that's set up to use the outgoing (SMTP) server that belongs to your current dial-up connection.
Monitoring and Ending a Dial-Up ConnectionWhile you're connected, note that the System Tray connection icon flashes to indicate incoming and outgoing data activity. It's a true Windows tool, which means you can have it do pretty much the same thing in about five different ways. NOTE If the connection icon is missing, open Network Connections. Right-click the connection you're using, select Properties, and check Show Icon in Notification Area When Connected.
Actually, all I ever do with the taskbar icon is make sure it blinks while I'm working, and right-click Disconnect when I'm finished. When you disconnect a remote network connection, the taskbar icon disappears. If you logged in using a remote network profile, you remain logged in using the local copy of this profile until you log out. Enabling Dial-In and VPN Access to Your ComputerWindows XP Professional has a stripped-down Remote Access Server (RAS) built in, and you can take advantage of it to get access to your work computer from home or from the field, or vice versa. You can also enable remote access temporarily so that a system administrator can maintain your computer. CAUTION RAS is not too difficult to set up, but beware: Permitting remote access opens up security risks. Before you enable dial-in access on a computer at work, be sure that your company permits it. In some companies, you could be fired for violating the security policies. To enable dial-in access, you must be logged on as a computer administrator. Then follow these steps:
NOTE If you want to use incoming VPN connections and you use Internet Connection Sharing or a connection sharing router between the Internet and your computer, you'll have to forward incoming VPN connections to your computer. For details, see "Making Services Available" in Chapter 19. Access to Windows and NetWare servers through the IPX/SPX protocol is handled without difficulty. However, the TCP/IP protocol presents a significant problem. Incoming callers must be assigned IP addresses that are valid on your LAN if they are to be able to communicate with computers other than your own. If your network has a DHCP server, or if you are using Internet connection sharing or a gateway device, then a caller will automatically receive a valid IP address. You don't have to worry about setting the TCP/IP address. If your network does not have a true DHCP server on the network, you must manually assign a valid subnet of at least four IP addresses taken from the IP address range of your network. If you don't, incoming callers can access only your computer. (And if that's sufficient, you don't need to worry about this.) NOTE You must provide a subnet with one IP address for the RAS server component on your computer and one for each incoming connection. Subnets have an overhead of two addresses, so the minimum subnet size is four addresses (two overhead, one for the server on your computer, and one for a caller). With an eight-address subnet, you could have five incoming connections (two overhead, one for the server, five for callers), although XP limits you to two or three incoming connections total. Unfortunately, the process of assigning subnet addresses is more complex than I can go into here in any detail, and the articles on this topic in Windows XP's online help are worse than useless. You'll have to get a network manager to assign the subnet for you. NOTE You also can read more about TCP/IP networking in Upgrading and Repairing Networks, 4th Edition, published by Que. TIP Look up your LAN adapter's IP address. If it starts with 192.168, you might try this trick for assigning IP addresses for incoming connections. For the starting and ending addresses, use the first three numbers of your IP address followed by 220 and 223, respectively. For example, my IP address is 192.168.0.34. I'd enter 192.168.0.220 and 192.168.0.223 as the From and To addresses. When the incoming connection information has been entered, a new icon appears in your Network Connections window. You can edit its properties later or delete it to cancel incoming access. When someone connects to your computer, yet another icon appears in Network Connections showing their username. If necessary you can right-click this to disconnect them. |
 For detailed instructions on establishing locations and dialing rules,

EAN: 2147483647
Pages: 450