A Quick Look at Spelling and Corrections
|
|
Project 2002 shares its spelling features with other Microsoft Office applications. If you are familiar with the spell-checking functions in Word or PowerPoint, you already know how to check your spelling in Project.
| Note | Project does not have the Check Spelling As You Type feature or the grammar-checking feature found in Microsoft Word. |
Correcting Spelling Errors
To use Spelling in Project, click the Spelling button on the Standard toolbar. Project reviews all the text in the project, flags possible misspelled words, and opens the Spelling dialog box shown in Figure 7.15.
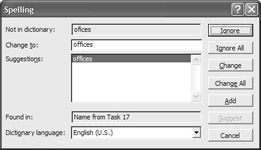
Figure 7.15: Use the Spelling dialog box to find misspelled words.
When the Spelling feature finds a word that is not in one of its dictionaries, you have a number of ways to deal with it:
Ignore this occurrence of the word.
Ignore All occurrences of the word in this document.
Add the word to the Custom dictionary so Project/Office recognizes it the next time you use it.
Change the word by choosing one of the suggested corrections or editing the word manually.
Change All occurrences of the word in this document by choosing one of the suggested corrections or editing the word manually.
AutoCorrect the word (after choosing or entering a correction) and add it to the AutoCorrect dictionary (see “Automatic Correction of Common Errors,” coming up).
Because Project checks the spelling of words even in fields that are not currently visible, it identifies where the word was found to help give you a context for the word. For example, in Figure 7.14 the word offices was found in the Name field from Task 17.
| Tip | All the Office applications share a user dictionary with Project, so words you add in one application are also added to all the others. |
Checking Words in Other Languages
If the text you are entering in Project is traditional Spanish, French, or Canadian French; or if you speak English from the UK, Canada, or Australia, you can switch the spelling dictionary to reflect that language. To change the language dictionary, follow these steps:
-
Click the Spelling button on the Standard toolbar.
-
When the Spelling dialog box opens, select the language you want to use from the Dictionary Language drop-down list. (You must have at least one misspelled word for the dialog box to open.)
-
Project warns you that you must restart the spelling checker for the dictionary to take effect. Click the Cancel button to close the Spelling dialog box.
-
If the language you selected was not previously installed, Project’s Install on Demand feature runs. You must have access to the program files from the CD-ROM or network installation path. As long as Project can find the install.msi file, it installs the alternative dictionaries.
-
Rerun Spelling by clicking the Spelling button, or choosing Tools Ø Spelling to check the spelling in the new language.
| Note | Installing language dictionaries does not change the language that Project uses in the menus and dialog boxes of its interface. To change the program interface to another language, you must install the Language Settings tool and the Microsoft Office language pack. |
When you choose Add from the list of Spelling choices, the identified word is added to the default user dictionary. The next time you type that word, Project recognizes it and ignores it. If you work with specialized terminology, you can save yourself time and trouble by editing the dictionary directly. The user dictionary is shared by all of the Microsoft Office applications, so you must be in one of the Office applications to edit it directly.
To access the dictionary and add new words or edit existing words, follow these steps:
-
Switch to Microsoft Word and then choose Tools Ø Options. Click the Spelling and Grammar tab.
-
Click Dictionaries to open the Custom Dictionaries dialog box.
-
Select the dictionary you want to open, and choose Edit. This opens a document that contains any words already in the dictionary. If none have been added, the document is blank.
-
Type individual words, pressing Enter after each word.
-
Edit or delete misspelled words.
-
When you finish adding or editing words, close and save the document in *.dic format. You will be prompted twice about file formats; click Yes both times.
Even though you added them through Word, all of the words you entered should now pass a spelling check in Project with flying colors.
Automatic Correction of Common Errors
Project 2002 shares another feature with Microsoft Office: AutoCorrect. With AutoCorrect, you can build your own list of common misspellings. When Project encounters one of those misspelled words, it automatically fixes it for you. Some misspelled words, such as adn and teh, are already in the list. As you correct misspelled words, you can add them to the AutoCorrect list. AutoCorrect is one of the options in the Spelling dialog box. You can also access it from Tools Ø AutoCorrect Options.
AutoCorrect maintains a dictionary of commonly misspelled and mistyped words; when you mistype one, AutoCorrect fixes it automatically. AutoCorrect is also the feature that changes :) to a smiley face J and (c) to the copyright symbol ©.
Because some of the AutoCorrect changes can be a bit disconcerting, you have the option of turning it on and off as desired. Figure 7.16 shows the AutoCorrect dialog box that can be accessed by clicking Tools Ø AutoCorrect Options.
To add a word or phrase to the AutoCorrect dictionary, you can either select the text in the document, or enter the words in the Replace and With text boxes in the AutoCorrect dialog box. If you select text in your document and then open the AutoCorrect dialog box, the text appears in the With text box. You have the option of saving this AutoCorrect entry as plain or formatted text. Text that you enter directly in the Replace and With text boxes can appear only as plain text.
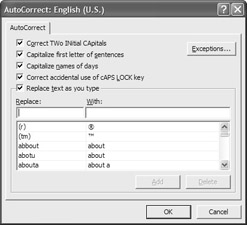
Figure 7.16: AutoCorrect options automatically correct common typing mistakes.
| Note | AutoCorrect is case sensitive. If text appears in the Replace column in uppercase, it must be typed in uppercase for AutoCorrect to replace it. |
Although AutoCorrect is typically used to correct single words, you can use it to insert entire paragraphs or even longer segments of formatted text. Just be careful to use a “Replace” word that you don’t typically type—remember that every time you type this word, the text will be replaced with the AutoCorrect entry.
AutoCorrect is designed to prevent typing and spelling errors, but it is also valuable as a shortcut tool. You can enter words that you type regularly into your AutoCorrect list to save yourself time and keystrokes” long company names, for example, or legal or medical terminology. Just enter a code that you will recognize, such as USA, and AutoCorrect expands it for you into United States of America. If you think you will ever want to use the abbreviation without expanding it, however, enter a slash (/) or some other character in front of the abbreviation (/USA). You can then choose whether to have AutoCorrect supply the long form (by typing /USA) or use the abbreviation (by typing USA without the slash). If you want the actual characters to appear in your document rather than the AutoCorrect symbol, type the characters—for example, type (c). As soon as the symbol appears (©), press the Backspace key. This replaces the symbol with the original characters. This only works on symbols, however; it doesn’t change text back to the typed text.
|
|
EAN: 2147483647
Pages: 241