Working with Tasks in Gantt Chart View
|
|
As you know, the Gantt Chart view is the default view in Microsoft Project. This view, shown in Figure 7.1, consists of a task list on the left pane of the window and a Gantt chart in the right pane. (To display the Gantt Chart view, select View Ø Gantt Chart, or click the Gantt Chart button on the View bar.)
Use the horizontal scroll bars at the bottom of each pane to scroll to additional information. If you scroll the task list (also called the task table, in the left pane), you see additional columns. For example, scrolling to the right makes visible the Start, Finish, Predecessors, and Resource Names fields, shown in Figure 7.2.
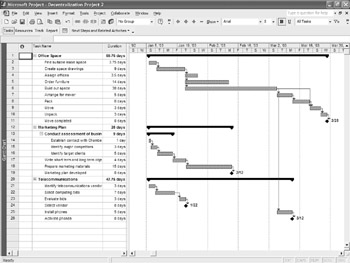
Figure 7.1: The Gantt Chart view shows the tasks list and timescale.
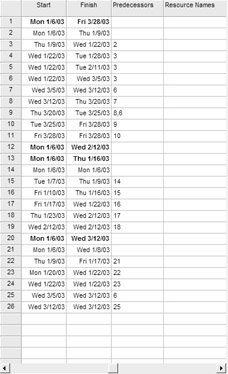
Figure 7.2: Scroll the task list horizontally to see additional task-related fields.
You can also drag the vertical split bar to change the size of the panes. Point to the vertical split bar; when the pointer changes to a two-header arrow, drag to the left or right.
Use the horizontal scroll bar in the Gantt Chart pane to move to future or past dates in the Gantt chart. By default, the Gantt Chart view displays the Project Start date you entered in the Project Information dialog box (Project Ø Project Information) as the leftmost date.
| Tip | You can also zoom to show more or less of the Gantt Chart timescale. Select View Ø Zoom to display the Zoom dialog box, select a timescale, and click OK. (To view your entire project, from start to finish, select Entire Project from this dialog box.) |
Entering Tasks
To enter a task, click in the first cell of the task table and then type the task. Press Enter to move to the next row. Project automatically assigns an estimated duration of one day, and creates a bar on the Gantt chart representing the task. You can tell that the duration is an estimate because it has a question mark after it. You can enter task durations as you go along, or enter all the tasks and then come back and assign durations. For the purposes of this chapter, we’ll focus on tasks first and then discuss durations later.
Enter additional tasks in the same way: Type the task and then press Enter. Don’t worry at this point about the different types of tasks because you can convert a task to a summary task, subtask, milestone, or recurring task after you enter the list.
Assigning Task Durations
Duration is the total span of time you expect it will take to complete a task. In most cases, durations are estimates because you generally can’t predict exactly how long a task will take. Although you can use your previous experience and the experience of others to make predictions, when it comes down to it, you will often use your best educated guess. You also must consider that the duration of the task can be directly tied to the resource and the number of resources assigned to the task. If the task is to paint an office, one resource might take two hours and another might take two days, based on their painting skills. If you assign two people to the task, they could split the painting and finish it in even less time.
Microsoft Project calculates duration by counting the amount of active working time between the scheduled start and finish of the task. When you assign resources, you can revisit duration and make refinements to the project estimates.
| Note | For a more systematic method of assessing duration by using PERT estimates, see Chapter 13. See Chapter 10 for more information about assigning resources. |
How Calendar Settings Affect Duration
By default, Project assigns 1 day to each task. The definition of 1 day is based on the number of hours per day setting on the Calendar tab of the Options dialog box (Tools Ø Options, and select the Calendar tab). If this is set to the default 8 hours, a duration of 2.5 days is equivalent to 20 hours. If the task starts on Thursday and the default Standard calendar shows that Saturday is not a workday, Project would set the task’s completion to noon on Monday (assuming that the workday starts at 8:00 a.m.)
Entering Duration Units
Durations can be entered as minutes, hours, days, weeks, or months. Project accepts either abbreviations or the full word to describe these units. For example, you can enter 1h, 1hr, or 1hour (no space is required). Because 1m is equivalent to 1 minute, you must enter 1mo, 1mon, or 1month to indicate a month; however, entering a month is not the same as entering 20 days, the standard number of workdays in a month. A duration of 1 month refers to a month of workdays (30 of them), so that duration could actually take 6 calendar weeks.
When you edit a duration, Project extends the task bar on the Gantt chart to show the scheduled start date and the finish date, based on the new duration.
If you are unsure about the actual time it will take to complete a task, enter a question mark after the duration. Project marks this as an estimated duration.
| Tip | To change the view options for the way Project displays time units, choose Tools Ø Options and then click the Edit tab. For more about setting View options, see Chapter 16. |
Applying Elapsed Duration
Elapsed duration is a type of duration that you can use when the activity or task continues around the clock, irrespective of the workday hours. A ship that is carrying parts to a manufacturing plant does not typically stop sailing at the end of the workday. If the trip takes 10 hours to sail from one port to another, the duration can be entered as elapsed time. Figure 7.3 shows the difference between a 10-hour duration and a 10-hour elapsed duration. To enter an elapsed duration, type the letter e before the time unit, such as 10ehrs.
![]()
Figure 7.3: A 10-hour trip entered as a standard duration, and as an elapsed duration.
Adding More Details about a Task
In the task list itself, the amount of detail you can include in a task description is fairly limited. Those limitations are removed, however, when you click the Task Information button on the Standard toolbar (or double-click a task) to open the Task Information dialog box, shown in Figure 7.4.
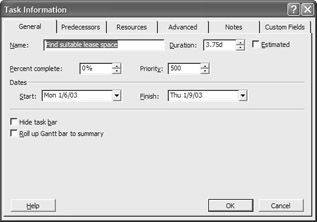
Figure 7.4: Entering details about a task
The Task Information dialog box consists of five tabs: General, Predecessors, Resource, Advanced, and Notes. You will enter and view additional information about tasks in this dialog box as you progress through the project’s creation. For now, though, focus on the Notes tab.
As you can see in Figure 7.5, the Notes tab is an open text box in which you can enter text and insert objects. You can enter a thorough task description, identify issues and concerns related to the task, and attach documents that were created to support the task. For example, if a task is related to creating a marketing plan, you could attach the marketing plan document and workbook to the task.
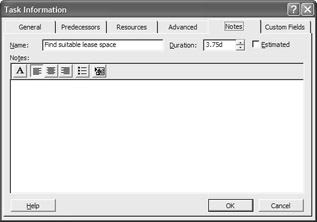
Figure 7.5: Use the Notes tab to insert text and enter objects.
You have access to only a few formatting options in the Notes text box, as shown in Table 7.1.
| Button | Description |
|---|---|
|
| Use the Font button to open the Font dialog box to change font attributes. |
|
| Align the text on the Left, Center, or Right. |
|
| Apply bullet characters to lists. |
|
| Insert documents and objects created in other applications. |
If you want notes that are formatted more extensively, you can create a document in Word and then copy and paste it in (right-click in the text box to choose Paste).
You can use the Notes tab to attach other files, such as Word documents or Excel spreadsheets, to a task. Just follow these steps:
-
Click the Insert Object button on the Notes tab of the Task Information dialog box. This opens the Insert Object dialog box. It may take a few seconds to load, so be patient.
-
When the Insert Object dialog box opens, choose whether you want to create a new object or create an object from file.
-
If you choose to create a new object, scroll through the Object Type list and then select the type of object you want to create. Click OK to launch the application that creates that object type and then create the object. For example, if you choose to create a new Microsoft Word document, Project launches Word, and you can create the document. Close the application to return to the Insert Object dialog box.
OR
If you choose to insert an existing object, click Create from File and then enter the file path where the object is saved. Click the Browse button if you want to explore for the object. Click the Link check box if you want to link to the object. Linking ensures that any changes you make to the original document are reflected in the linked document.
-
Click the Display as Icon check box if you want to insert an icon to represent the object instead of the object itself. Click the Change Icon button if you want to select a different icon for the object.
-
Click OK to close the Insert Object dialog box, and insert the object.
Note that if you link an object to a Project task and then move or delete the object, Project won’t be able to find it. As a result, Project does not respond when you double-click the object’s icon to open it.
Editing Tasks
After you enter a task list, chances are you will want to make some changes in it. You can edit text in a cell, adjust columns and rows, move and copy tasks, and insert and delete tasks.
Editing Text
Editing text in Gantt Chart view is most easily accomplished using the Entry bar. The Entry bar is the bar above the task list that displays entries you make to cells in the table. When you are entering or editing text, a Cancel button (X) and an Enter button (red check mark) appear in the Entry bar.
![]()
To edit in the Entry bar, follow these steps:
-
Click the cell you want to edit.
-
Point to the contents in the Entry bar so the pointer changes to an I-beam.
-
Click the I-beam where you want to edit.
-
When you finish editing, click the Enter button (or press Enter) to accept the changes, or click the Cancel button to cancel the changes.
To move or copy an entry in a cell, click the cell to select it, and click the Cut or Copy button on the Standard toolbar. Move to the new location and then click Paste.
To delete an entry, click the cell to select it, right-click, and choose Clear Contents from the shortcut menu.
Undoing Mistakes
When you change your mind, Project gives you a chance to undo your last action. Click the Undo button, or choose Edit Ø Undo.
When you click Undo, the button changes to a Redo button. If you want to reverse the last undo, click Redo or choose Edit Ø Redo.
| Warning | Unlike Word or other Microsoft Office applications that allow you to undo multiple mistakes, Project only lets you Undo or Redo the last action undertaken. |
Adjusting Columns and Rows
If a numeric or date column is too narrow for you to see its contents, Project displays pound signs (#) in place of the actual contents. You can resize any column by pointing to the column head divider, and double-clicking or manually dragging left or right.

If a text column is too narrow, you can resize the column, or let it automatically wrap by increasing the row height. You can resize a row by pointing to the row divider and then dragging up or down.
| Note | Double-clicking a row divider opens the Task Information dialog box; it does not adjust row height. |
Moving and Copying Tasks
Being able to change the order of tasks is essential to effectively organizing a project. In Project, you can move and copy tasks by using the traditional cut/copy and paste, or drag and drop.
To move or copy a task, follow these steps:
-
Select the entire task by clicking the ID number for the task.
-
Click the Cut or Copy button. If you click Cut, the task should be removed from the list.
-
Click in the row where you want the task to appear.
-
Click the Paste button.
To drag and drop a task, follow these steps:
-
Select the entire task by clicking the row header (ID number) for the task.
-
Point to the row header, or the top or bottom border of the selected area, with the arrowhead pointer.
-
Drag the mouse; when the shadowed I-beam appears just below where you want the task to appear, release the mouse button.
You can select multiple consecutive rows by dragging over the row headers with the four-headed cross. To select rows that are not consecutive, hold down the Ctrl key while clicking the row headers. You cannot drag and drop multiple nonconsecutive rows. You must cut and paste to move them. When you paste nonconsecutive rows into a new location, the rows become consecutive.
Inserting and Deleting Tasks
To insert a row, select the row below where you want the new row by clicking the row number. Choose Insert Ø New Task, or right-click and choose New Task from the shortcut menu. If you want to insert multiple rows, select the number of rows you want to insert by clicking the first row number and dragging to select additional rows.
To delete entire tasks, select the row or rows you want to delete and then choose Edit Ø Delete Task, or press the Delete key.
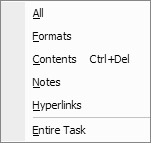
You can also choose Edit Ø Clear to delete tasks or parts of tasks. The Clear menu, shown here, has options for clearing formats, contents, notes, hyperlinks, or the entire task.
Using the Outlining Features
To organize the tasks of a project into summary tasks and subtasks, Project uses outlining. The outlining technique has several advantages; for example, you can
-
Create multiple levels of subtasks that all roll up into a summary task
-
Collapse and expand summary tasks so that you can focus on specific phases of the project
-
Move, copy, or delete entire groups of tasks
-
Apply WBS (Work Breakdown Structure) numbering; see Chapter 2 for more about WBS
Outlining is not a feature you have to turn on—it is already active when you launch Project. The Outlining tools occupy the space on the left end of the Formatting toolbar.
![]()
The major activities related to outlining involve demoting (indenting) and promoting (outdenting) tasks to create summary tasks and subtasks. You can have multiple levels of subtasks. When you demote a task to a subtask, the task above it becomes a summary task, and you can no longer edit the data related to that task. As a summary task, it derives its values from its subtasks. The Start Date, for example, is determined by the earliest Start Date of any of its subtasks. Its Finish Date is the latest Finish Date of its subtasks. The duration of a summary task is the total of all its subtasks’ durations.
Creating Subtasks
To enter a new subtask, enter the task in a blank cell in the Task Name column and then click the Indent button on the Outlining toolbar. In addition to indenting the new task, it automatically changes the task above it to a summary task. A summary task, such as the one shown in Figure 7.6, is outdented to the left cell border, expressed in boldface, and has a Collapse (Hide Subtasks) button (ñ) in front of it. The task bar in the Gantt chart changes to a solid black bar with start and finish markers.
![]()
Figure 7.6: Indenting the second task makes the first task a summary task.
The next task you enter is entered as a subtask. If it is not a subtask, click the Outdent button on the Outlining toolbar. If the new task is a subtask of the first subtask (a third-level task), click the Indent button again. This indents the new task even farther and makes the second task a summary task, as you can see in Figure 7.7.
![]()
Figure 7.7: Indenting the third task makes the second task a summary task.
In Figure 7.6, the Identify Major Competitors task has a duration of three days, as does its Marketing Plan summary task. Because there is only one subtask, the summary task assumes the duration of the subtask. In Figure 7.7, notice that the durations for both these tasks have changed to one day. The third task, Establish Contact with Chamber of Commerce, has a duration of one day, so both the immediate summary task and the first-level summary task assumed that duration. As more tasks and subtasks are added, the duration for both summary tasks will change, as you can see in Figure 7.8.

Figure 7.8: As more subtasks are added, the durations for the summary tasks increase.
Showing and Hiding Outline Levels
One of the advantages of using outlining is that you can hide outline levels and then show them again as you want to focus on a particular task group. When you create a summary task, a Hide Subtasks button is added to the task. Click the button next to the task, or click the Hide Subtasks button on the Formatting toolbar to hide all the subtasks under the summary task.
When the subtasks are hidden, as they are in Figure 7.9, you can focus your attention on the major areas of the project. The button next to the task changes to a plus symbol. Clicking it again or clicking the Show Subtasks button shows the subtasks again.
![]()
Figure 7.9: With the subtasks hidden, the major sections of the project become the focus of attention.
You can also use the Show menu to display the outline levels that you want to see, and to show all the tasks without having to go through each one to display the subtasks. Click the Show button to access the menu of choices.
Displaying WBS Numbering
If you use WBS to define project tasks and work packages, you can display a WBS column in the task table. To display the WBS numbering column, follow these steps:
-
Click in the column to the right of where you want the new column to appear.
-
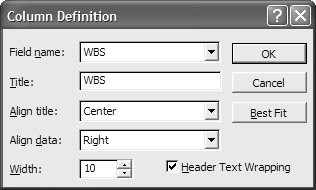
Select Insert Ø Column to display the Column Definition dialog box.
-
Pull down the Field Name list and then select WBS.
-
Enter a title for the new column, such as WBS, in the Title text box.
-
Make any desired modifications to the title alignment, data alignment, and width.
-
Click OK to insert the column.
Defining the WBS Coding Schema
Project’s default WBS coding schema is 1, 1.1, 1.2, 2, 2.1, and so on. To change this coding definition, follow these steps:
-
Choose Project Ø WBS Ø Define Code.
-
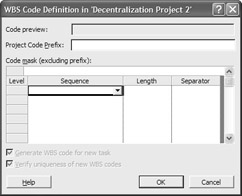
In the WBS Code Definition dialog box, enter the Project Code Prefix, if you would like to use one.
-
Enter a Code Mask (excluding prefix), if desired.
-
Click in the Sequence field to choose a sequence from the drop-down list.
-
Click in the Length field and then select a length, or choose Any.
-
Click in the Separator field and then choose a separator.
-
Repeat steps 4 through 6 for each additional level you want to define. If you do not define additional levels, Project applies the first-level definition to subsequent levels by using the indicated separator.
-
If you want Project to generate a WBS code for each new task, verify that the first check box is checked.
-
If you want Project to verify the uniqueness of each WBS code, verify that the second check box is checked.
-
Click OK to apply the new coding definition to the WBS column.
| Note | For a more detailed understanding of WBS, refer to Chapter 2. |
Entering Milestones
Earlier in this chapter, we defined milestones as tasks that usually have no duration and mark the completion of a significant phase of the project. To create a milestone, reduce the duration of the task to 0. Project immediately converts the task to a milestone by changing the task bar in the Gantt chart to a black diamond with the date above it. In Figure 7.10, “Marketing plan developed” is an example of a milestone—the plan shows it being completed by February 12.

Figure 7.10: Example of a milestone
| Note | Although milestones do not typically have durations, you can create a milestone that has a duration of more than 0 days by clicking the Task Information button on the Standard toolbar and then clicking the Advanced tab. In the Duration box, enter the task duration and then select the Mark Task as Milestone check box. |
Entering Recurring Tasks
When planning a project, it is not uncommon to plan for tasks that recur throughout the life of the project. A project review meeting is the most obvious example. If a task occurs more than once during the life of the project, but does not occur at regular intervals, you need to enter the task multiple times. If a task does recur at regular intervals, however, you can enter the task once and Project can show it as a recurring task.
To enter a recurring task, follow these steps:
-
Click in the row where you want the recurring task to appear.
-
Choose Insert Ø Recurring Task (Project inserts a row for you so there is no need to insert a blank row first).
-
Enter a task name in the Recurring Task Information dialog box that appears (see Figure 7.11).
-
Enter a duration and recurrence pattern for one occurrence of the task. The Project Review meeting shown in Figure 7.11 will be held for 1 hour every Thursday. Depending on whether you choose Daily, Weekly, Monthly, or Yearly, you have different options for the recurrence pattern.
-
Enter a date in the Start field for Range of Recurrence. If the task is an event, such as a meeting, enter the start time also.
-
Indicate whether you want the task to end after a specific number of occurrences or by a certain date.
-
Assign a calendar for scheduling the task, if you want. If you don’t assign a calendar, Project uses the default Standard calendar.
-
Click OK to set the recurrence pattern.
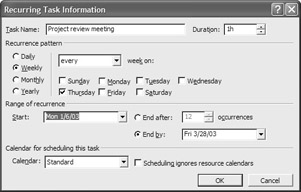
Figure 7.11: Entering information about a recurring task
Project enters the task as a summary task with multiple subtasks that represent each occurrence of the task. It differs from a normal summary task, however, as you can see in Figure 7.12. Each occurrence of the “Project review meeting” task is represented by a single blue bar in the Gantt chart rather than by a solid black line.
![]()
Figure 7.12: A recurring task is represented by individual bars on the Gantt chart.
Making Changes
To revise the recurrence pattern, double-click the major summary task to reopen the Recurring Task Information dialog box. Make the changes and then click OK. Every occurrence of the task is changed.
You can also edit individual occurrences of the task. For example, suppose you want the project review meeting to occur on Friday during one week because of a conflict, but the other meetings are scheduled to stay on Thursday. To make changes to an individual task, follow these steps:
-
Click the Show Subtasks button on the summary task to view each task occurrence, as shown in Figure 7.13.
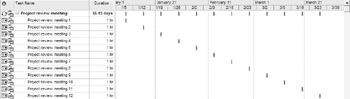
Figure 7.13: Viewing each occurrence of a recurring task -
Double-click any of the subtasks to open the Task Information dialog box for that specific occurrence.
-
Make any changes you want to make to the recurrence pattern or range of recurrence.
-
Click OK to save the changes.
| Warning | If you change an individual occurrence of a recurring task and then revise the recurrence pattern for the summary task, the individual changes are lost. |
|
|
EAN: 2147483647
Pages: 241