Tutorial: Name Resolution for Virtual Hosts
As discussed earlier in the Apache chapter, a name-based virtual host has to have a name mapped to an IP address before you can even access its contents with a browser. BIND, of course, will be our means of providing lookup of those names. Because we're only concerned with web service for this tutorial, we only need to concern ourselves with the creation of a forward zone (a forward zone maps names to addresses).
Create a New Master Forward Zone
Assuming you've already allowed Webmin to initialize your named configuration files you're ready to add a master forward zone for your domain (Figure 8-11). Click the Create a new master zone link on the front page of the BIND module.
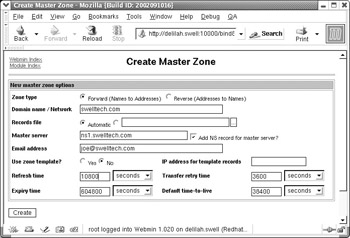
Figure 8-11: An example master zone
The Zone type should remain at its default of Forward. The Domain name/ Network field should contain the second level domain name under which your virtual hosts will reside. For example, if I had one or more virtual hosts under the swelltech.com domain, that would be the domain name I would enter here. If you have other second level domains, you will create a zone for each. It is easiest to allow Webmin to automatically name the Records file, and the Master server will probably be correct if your host name is configured correctly. Enter your email address, or the address you would like to be the administrative contact for this zone, into the Email address field. Finally, click Create. You will immediately be directed to the new zone for further configuration.
Adding Address Records
Now we can begin adding records to our new zone. The first record I would add to my swelltech.com domain would be swelltech.com itself, and it will be an address record, also known as an A record. Clicking the Addresses icon provides a simple form for adding the new record. Because this first record is for a host named simply swelltech.com, we enter nothing in the Name field. Then we enter the IP address of the server we'd like this name to point to, in my case it is the same address on which my Webmin server is running. All other fields can remain at their defaults. Clicking Create adds the record.
Follow the same steps to add another address record for www.swelltech.com, presumably on the same IP. All that changes from the above steps is to enter www in the Name field instead of leaving it blank. If you've worked through the examples in the Apache tutorial on virtual hosting, you'll now have all of the pieces for web service on both domain names.
Adding an Mail Server Record for Mail
Because no domain would be complete without mail service, and mail service for a domain does not have to reside on the same server as web service, we need to have some way to tell mail servers where to direct our mail. Luckily, the designers of DNS have thought of that already and provide the MX, or mail server, record as a means of notifying other mail servers where to send email destined for the domain.
Adding a mail server is usually a two part process. First, a new record is created pointing to the address of the mail server. In the case of small networks, this will likely be a machine that is providing other services. For example, the Swell Technology mail server resides on the same machine as our web server and our NTP time server. So, in most cases we can use a Name Alias record, also known as a CNAME record, for our mail server name. If you have a dedicated mail server you will use an address record instead.
Adding a Name Alias
Because my mail server is hosted on the same address as my web server, I've chosen to use a CNAME record, or name alias, for mail.swelltech.com. Creating a name alias record is a lot like creating an address record. Click the Name Alias icon, and fill in the appropriate fields. In this case, I will fill in mail for the Name and swelltech.com. for the Real Name. Notice there is a period at the end of my real name. This period is significant, and required to indicate a fully qualified domain name, otherwise the real name pointed to would be swelltech.com.swelltech.com, which is probably not what we want. Click Create to add the new record.
| Note | This step is not strictly necessary if your mail server is hosted on the same machine as other named services. However, traditionally mail servers have had a name record of their own, usually mail.domain.com or smtp.domain.com. It also makes it easier to plan for later network expansions if you begin your network design with appropriate names for all of the services available on your network. If you wish to avoid adding a CNAME for mail service, you can skip this step and point your MX record to an existing name. |
Creating an MX Record
Now that we have a name for our server, we can add an MX, or mail server, record. This is simply a record that indicates to other mail servers where mail for our domain should be delivered. In my case, I would like mail directed to swelltech.com and all names within the domain to be delivered to mail.swelltech.com. So when a mail server receives a mail from one of its users directed to joe@swelltech.com, it will first find out where that mail ought to be delivered by querying the name server that is authoritative for swelltech.com for its MX record.
To create a new mail server record, click the Mail Server icon. Because we are currently concerned with our primary domain, in my case swelltech.com, the Name field can be left empty. The Mail Server field can be filled in with the name of the mail server we created in the previous step, mail.swelltech.com in my case. There is an additional field required, called Priority, which is simply a number that dictates the preference of this mail server relative to others that may be configured, where lower numbers have higher priority with zero being the lowest. Traditionally, a priority of 10 is used for the primary mail server, and other servers will be given priorities higher in steps of ten. So a backup mail server could have a priority of 20. There is no enforcement of this de facto standard, so you could use priorities of 0 and 43 to represent your primary and backup mail servers, but following traditions is probably more polite to any administrator who might have to follow in your footsteps. Click Create to add the mail server record.
Applying Changes and Testing the Results
Now we have the bare minimum configuration required to make good use of our name server in the real world, so let's reload our BIND configuration and make sure it is working. First, return to the BIND module front page by clicking the Module Index link in the upper right corner of the page. Then click the Apply Changes button at the bottom of the page to signal BIND to reload its configuration files.
To test our work, we can use the host program. First, we'll test to be sure our domain is resolvable from our name server:
[joe@delilah joe]$ host swelltech.com 192.168.1.1 Using domain server: Name: 192.168.1.1 Address: 192.168.1.1#53 Aliases: swelltech.com has address 192.168.1.1
The host command is discussed further in the troubleshooting section of this chapter, but I will point out arguments I've used. Obviously, the first argument to the command is swelltech.com, which is the domain I'd like to look up. While the second argument is 192.168.1.1, which is the name server I'd like to query for the information. This allows us to easily set up a name server in isolation, without relying on it for real-world name service, so that it can be thoroughly tested and confirmed working. Because the above result is exactly what we expected to see, we can move on to testing the MX and NS records, to be sure they also match our expectations:
[joe@delilah joe]$ host -t mx swelltech.com 192.168.1.1 Using domain server: Name: 192.168.1.1 Address: 192.168.1.1#53 Aliases: swelltech.com mail is handled by 10 mail.swelltech.com.
This time, we've added an additional argument, "-t mx", to specify the type of record we'd like to retrieve. With this we can retrieve any record type we would like to test. Our only other currently configured record type is an NS record to indicate the authoritative name server for this domain, so we'll also check it:
[joe@delilah joe]$ host -t ns swelltech.com 192.168.1.1 Using domain server: Name: 192.168.1.1 Address: 192.168.1.1#53 Aliases: swelltech.com name server ns1.swelltech.com.
So far, so good! Just for completeness, let's run one last lookup, to see how a name alias differs from a normal address record:
[joe@delilah joe]$ host mail.swelltech.com 192.168.1.1 Using domain server: Name: 192.168.1.1 Address: 192.168.1.1#53 Aliases: mail.swelltech.com is an alias for swelltech.com. swelltech.com has address 192.168.1.1
Assuming all went well with your results, you're ready to put your name server into service. The rest of this chapter is devoted to troubleshooting methods, and more advanced uses for the host and dig utilities, and working through the examples might provide some insight into the workings of DNS in a variety of applications and environments.
EAN: 2147483647
Pages: 142