Inserting and Configuring Layers
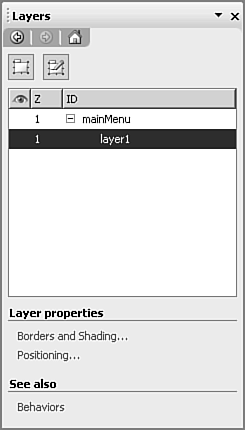
| Layers are inserted and formatted in FrontPage using the Layers task pane. There are other ways to insert a layer, but the Layers task pane is the most efficient way because it is also used to format and arrange layers. To insert a layer in to your Web page, simply select Format, Layers to display the Layers task pane seen in Figure 25.1. From the Layers task pane, you can click the Insert Layer button or the Draw Layer button to insert a new layer into the page. In addition to using the Layers task pane, you can also select Insert, Layer to insert a new layer. Figure 25.1. The Layers task pane is where you insert and configure your layers.
In addition to the Insert Layer and Draw Layer buttons, the Layers task pane is made up of three columns. The leftmost column, the Layer Visibility column, allows you to control whether a particular layer is visible and to see at a glance which layers are visible and which ones are not. The second column, the Layer Z-Index column, provides for a quick reference to the z-index for each layer. The rightmost column, the Layer ID column, displays the ID for each layer. TIP Choose the ID for each layer carefully and try to choose an ID that describes the layer's purpose. You will use the ID of the layer to refer to the layer in Behavior dialogs and if you are writing client-side code. By naming your layers with descriptive names such as mainContent and navButtons, you will be less likely to confuse them later. Adding Content to a LayerLet's begin creating the Web page you'll use throughout this chapter to learn about layers in FrontPage.
Resizing a LayerThe layer you have just inserted needs to be resized so that it is the same size as the four Interactive Buttons inside it. Change the width and height of the layer to match the height of the size of the Interactive Buttons. To do that, follow these steps:
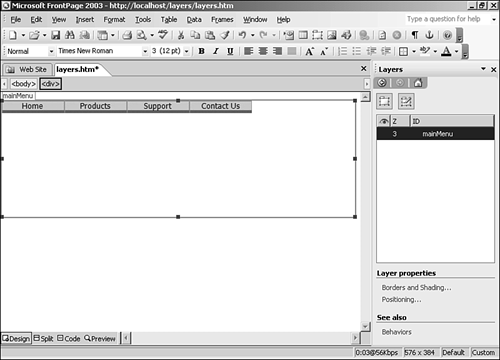
Resize the mainMenu layer until it matches the width and height of the Interactive Buttons. You should now have a new layer containing four Interactive Buttons, as shown in Figure 25.3. The buttons represent the top-level menu. You will create submenus that will display when a user hovers over the Products or Support menu buttons. Figure 25.3. These Interactive Buttons will be the top-level menu for your dynamic menu built using layers.
Creating and Working with Child LayersYou now need to create a layer to hold each submenu. You will then control the visibility of the layer based on the position of the mouse. To do that, you'll use Behaviors and the Layers task pane. One of the great things about layers is that because they are absolutely positioned, you can design them anywhere on the page and then simply drag and drop them where you want them to appear when your page is complete. In the case of your menu, you will be creating three separate layers. As you'll soon see, being able to design these layers and then place them in their final positions makes the development of menus much more convenient. The mainMenu layer is the parent layer for all the other layers in the menu system. By making the mainMenu layer the parent layer, all the layers that make up your menu will be attached to the mainMenu layer. If you move the mainMenu layer, it will move the entire menu system and keep all of your layers in place. You now need to create the first child layer for the mainMenu layer. To do that, follow these steps:
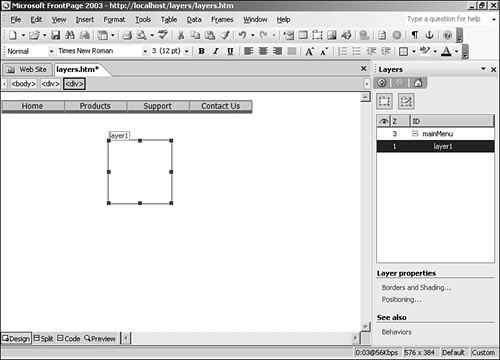
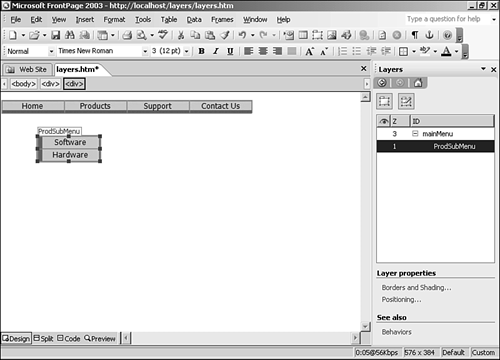
The mainMenu layer now has a child layer called layer1, and that layer contains two Interactive Buttons. Resize the layer so that its height and width matches the height and width of the Interactive Buttons. You should now rename the layer and give it a more descriptive ID. Right-click the layer1 layer in the Layers task pane and select Modify ID. Type ProdSubmenu for the layer ID. Your page should now resemble the page in Figure 25.5. Note that the ProdSubmenu layer appears slightly indented below the mainMenu layer in the Layers task pane, and there is minus sign next to the mainMenu layer. This indicates that the ProdSubmenu layer is a child layer. Figure 25.5. The ProdSubmenu layer is a child layer of the mainMenu layer.
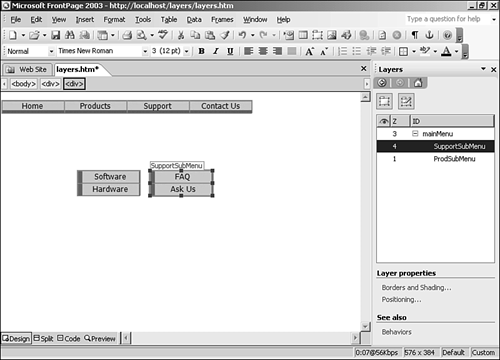
The layer is still not in its final position. When you've finished this page, the ProdSubmenu layer will appear just below the Products menu button. However, it's easiest to design your layers first and then move them into their correct positions later. Because the ProdSubmenu layer is a child layer to the mainMenu layer, it will always move with the mainMenu layer. Therefore, when you place it into its final position, you'll never have to worry about it losing its position relative to the mainMenu layer. NOTE When you insert a child layer, FrontPage simply inserts the <DIV> tag for the layer nested within the parent <DIV> tag. The final popup menu you need to create is the Support menu. Copy the ProdSubmenu layer and paste it as a new layer. Rename the new layer SupportSubmenu. This layer also needs to be a child of the mainMenu layer. To make it a child layer, click the SupportSubmenu layer in the Layers task pane and drag and drop it on top of the mainMenu layer in the Layers task pane. They layer is now a child layer at the same level as the ProdSubmenu layer. You now need to change the Interactive Buttons in the new SupportSubmenu layer. Double-click the first button and change its text to FAQ. Double-click the second button and change its text to Ask Us. You now have all the layers complete for your interactive menu, and your page should look like the one seen in Figure 25.6. Figure 25.6. The layers have all been inserted for your dynamic menu.
NOTE When using Interactive Buttons in a real application, you would also configure the button to link to another page. In the example you're building in this chapter, you don't configure a hyperlink because you're only designing one page to illustrate the use of layers. |
EAN: 2147483647
Pages: 443