Creating and Using CSS Classes
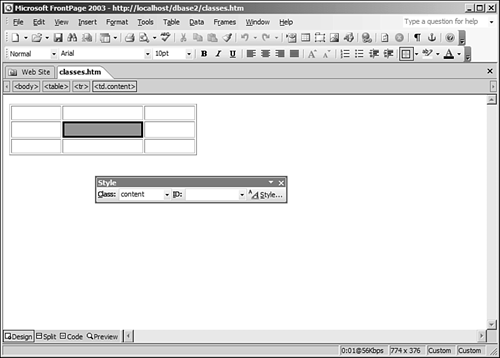
| A CSS class is a very powerful formatting tool. Some formatting tasks just cannot be easily accomplished using styles applied to HTML tags. There are also tasks that can be accomplished using styles applied to HTML tags, but are much better suited to CSS classes. Defining a CSS ClassA CSS class is simply a collection of style elements packaged inside of a style and named with a custom name of your choice. That might not sound like much of a power tool, but it is: You will soon see why. The following is a CSS class declaration: /* Style definition for page content. */ .content { font-family: Arial; font-size: 10pt; color: #000000; border: 3px solid #000000; padding: 2px; background-color: #999999; } This CSS code defines a class called content. This new CSS class can be applied to any HTML element to format it with a gray background color, a 3 pixel black border, and black Arial text that is 10pt in size. This simple style can be used to format any page element on the page. For example, you can apply the content class to a particular table cell if you want that cell to be formatted differently than the rest of the table. TIP It's a good idea to comment your style sheets when defining classes so that you will remember what they're for. To add a comment, start the comment line with /* and end it with */. Anything between those characters is a comment. The page pictured in Figure 19.17 has a three column, three row table on it, and the center cell has been formatted with the content class. Figure 19.17. This table doesn't have a border or background shading, but the center cell does thanks to the content class.
Formatting Tags Using CSS ClassesTo assign the content class to the center cell, you simply add a class attribute to the HTML tag and set the value of that attribute to the name of the class. Switch to Code view and locate the tag to which you want to apply the CSS class. Click inside that HTML tag and right after the tag name, add the following: By adding the class attribute to the HTML tag, you are letting FrontPage know that this HTML tag should be formatted using the style defined in that CSS class. The following HTML code assigns the content class to the table cell: <td > TIP
To reformat any HTML element to which the content class has been applied, simply edit the content class and all HTML elements using that class will change automatically. Now take it a bit further. Suppose that you have a Web page with a banner section, header sections for your primary content sections, and content areas for your content. First, you apply the content style to all of your content areas. Then you create a CSS class called header and a CSS class called banner. You can then format the entire page by simply applying your CSS classes to the appropriate HTML elements. Your site can be easily redesigned for a fresh look by changing your CSS classes. To create a new CSS class in FrontPage
You now have a new style called .content listed in your style sheet. This is the style for the content CSS class. The period in front of the content style's name indicates that it is a CSS class and not an HTML tag. To format an element on the page with your new CSS style
As soon as you select the content class, the paragraph will be instantly formatted using the style defined in that class. Notice that the style has been applied to your entire paragraph, as shown in Figure 19.18. This is because the content class defines a paragraph style and is applied to the parent HTML tag of the element under the current selection or insertion point. In other words, when you applied the style to the line of text you typed, the parent tag is the <p> tag surrounding the line, so the content class is applied to the entire paragraph. Figure 19.18. The content class applied to a Web page.
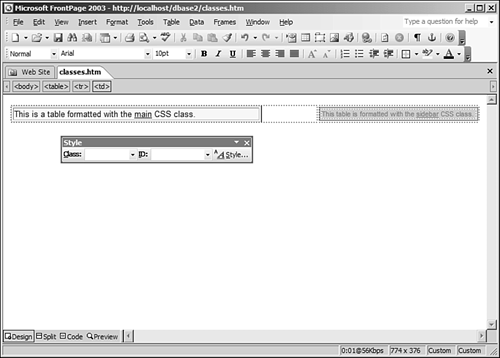
Paragraph and Character StylesFrontPage includes the ability for you to configure a new CSS class as either a character style or a paragraph style. The only difference between the two is that FrontPage will associate the <span> HTML tag (by naming the CSS class span.<classname>) with any CSS class defined as a character style. This doesn't seem particularly helpful to me, and I have never used a character style in FrontPage for that reason. Any style that I define in FrontPage is defined as a paragraph style. The format that FrontPage uses to define a character style is called a class selector. A class selector is simply a class definition with a selector associated with it. Using this method, you can specify that the CSS class only applies to a particular selector. Because FrontPage uses span.<classname> to define a character style, the class that is defined can only be applied to the <span> HTML tag. This is not very useful because characters in your Web site are not normally contained within a <span> tag. However, there are many situations in which you can use class selectors to your advantage. Suppose that you have many tables in your Web page. Some of these tables you want formatted using one particular style, and others you want formatted in a different style. If you create a CSS style simply for the table selector, all tables will look the same. Therefore, you will need to define some CSS classes that will format the tables the way you want them. You could create CSS classes without associating the table selector with them, but it's very possible that the classes would contain CSS settings that apply specifically to tables. In that case, you wouldn't want to allow anyone to apply those classes to anything but tables. Using class selectors is the perfect solution. The following CSS code defines two classes for the table selector. /* sidebar class for tables in borders. */ table.sidebar { font-family: Arial; font-size: 8pt; color: #FF3300; border: 1px solid #CC3300; padding-left: 4px; padding-right: 4px; padding-top: 1px; padding-bottom: 1px; background-color: #E4CBBA } /* main class for tables in main content area. */ table.main { font-family: Arial; font-size: 10pt; color: #000000; border: 1px solid #C0C0C0; padding-left: 4px; padding-right: 4px; padding-top: 1px; padding-bottom: 1px; background-color: #FFF5DF } When you are applying CSS styles to your Web page using the Style toolbar, the sidebar and the main class will only be available if the currently selected tag is a <table> tag. The page in Figure 19.19 shows the result of applying these classes to a Web page. Figure 19.19. Two tables formatted with the main and the sidebar classes.
It's a little known fact that you can apply two CSS classes to one HTML element by separating each class with a space. For example, you can apply both the sidebar and main classes to one table by adding a class attribute to the <table> tag with a value of sidebar main, as follows: <table > Any style element in the main class will now override a corresponding style element in the sidebar class. |
 For more information on using FrontPage's Quick Tag Editor,
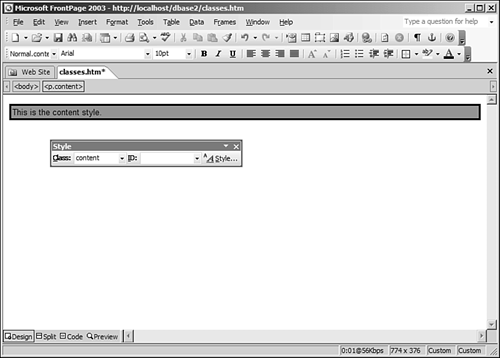
EAN: 2147483647
Pages: 443
- ERP System Acquisition: A Process Model and Results From an Austrian Survey
- Context Management of ERP Processes in Virtual Communities
- Data Mining for Business Process Reengineering
- Healthcare Information: From Administrative to Practice Databases
- Relevance and Micro-Relevance for the Professional as Determinants of IT-Diffusion and IT-Use in Healthcare