| InDesign also has its own unique approach to automation: It can create documents which have personalized, or variable, informationsuch as business cards, mailing labels, form letters, even simple catalogs. The data for the personalization comes from the structured information in a database. But you have a wide range of sources: Any data source that can create comma- or tab-delimited text is fair game (including Excel spreadsheets, database files, or Microsoft Word documents with tabbed text). You can, of course, do a mail merge in Word, but in InDesign, you have access to all its typographic refinements. If you're not familiar with data sources, it's helpful to understand their language: A datasource file (which contains the structured information of a database or spreadsheet) is made up of fields and records. A field is a category of informationfor example, an address or a zip code. A record is the complete set of fields that extend across a row of the data: Each field is separated with a tab or comma character, and each record is ended with a return character. Here are two more bits of terminology: The InDesign document that contains data-field placeholders is called the target document. It may also contain other boilerplate informationfor example, the text in a merged letterthat remains the same in each iteration of the data merge. The merged document is the InDesign document that contains the boilerplate information, repeated as many times as it takes to accommodate each record selected from the data source. Creating a Merged Document in InDesign Let's create a mailing list as a simple example of a data merge. Examine your data-source document. Open your data-source file and save it, if necessary, into a tab- or comma-delimited format. We started with a Word file with tabs between the fields (Figure 15-17). Figure 15-17. Data-source file for a mailing list. 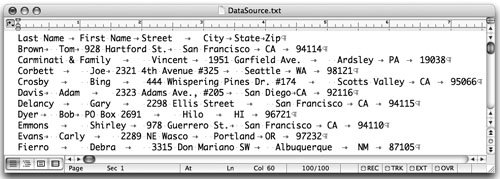 Create the target document. Create a new InDesign document that will contain any boilerplate information and data-field placeholders. We created a letter-sized document. (Optional) Use guides to make a grid for multiple records on a page. Because we wanted to place multiple mailing labels on a page, we found it helpful to use the Layout > Create Guides feature to preview how many labels we wanted to place on a page. We decided on a 2 x 7 array of labels, with a .25-inch gutter between columns, and clicked OK to add guides to our document page (Figure 15-18). (You could also place data-field placeholders on a master page, but we didn't choose to do that.) Figure 15-18. The Create Guides dialog box can be used to create a page grid. 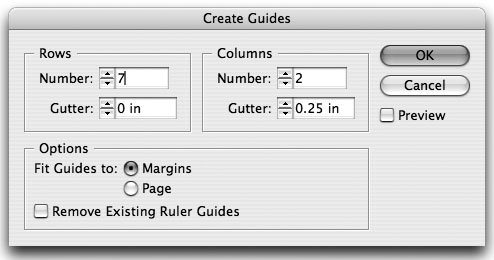 Create text and graphic frame placeholders. Create placeholder frames for text and graphics by using the Type tool for type and the Rectangle Frame tool for graphics. (There are some special instructions for working with graphics, which we describe in the next section.) We added a single frame for the first instance of the mailing label (Figure 15-19). It fit in the upper-left grid square that we created in step 2. Also add any boilerplate material to the target document you want to appear with every record (in this case, we didn't need it for a mailing list). Figure 15-19. Dragging a data field to the placeholder frame in the Data Merge dialog box. 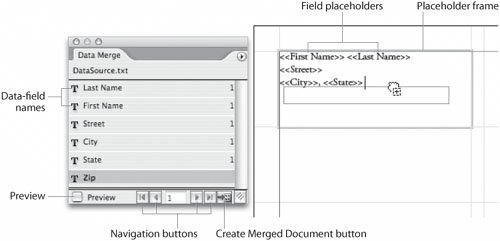 Select the data source. Open the Data Merge palette (Window > Automation > Data Merge). Choose Select Data Source from the palette menu, and select the file described in step 1. The palette should be populated with the data-field names that are identical to the column heads in the source file. Drag data fields into the placeholder frames. Select one of the text frames you created, and drag the field names from the Data Merge palette to position them in your frame. They become field placeholders, such as <<First Name>>. You can use any of InDesign's character, paragraph, or text frame attributes to format them, including paragraph and character styles. You can place the data fields in any order that you like. Notice that in our example, First Name comes before Last Name, a different order than in the source file. Add commas, spaces, returns, or any other formatting that you like (Figure 15-19). Preview the data. You can preview the data by checking Preview at the bottom of the palette, and then using the navigation buttons to move forward and back through the records. There are a couple of good reasons to do this: To look for records that don't fit the frame you have created (like a long name you didn't anticipate). The frame should be large enough to accommodate the largest element in the formatting you've chosen. To look for other errors in the data (like having the data capitalized when it's not supposed to be). In general, it's a good idea to correct these mistakes in the datasource document, rather than the InDesign file.
Merge the target document with the data-source file. Choose Create Merged Document from the palette menu or click the Create Merged Document button. The Records tab of the Create Merged Document dialog box appears (Figure 15-20, left). On this tab, you can choose which of the records to include in the merged document. You also choose in the Records Per Document menu between Single Record and Multiple Records. Single Record means there will be one InDesign page created for each record. Multiple Records means you can place multiple records on each pageas we wanted to do for our mailing list. Be sure to also check Preview Multiple Record Layout, and use the navigation buttons to preview your pages. Then on the Multiple Record Layout tab (Figure 15-20, right), you can tweak the page margins and the record layout. Figure 15-20. The Record tab of the Create Merged Document dialog box lets you choose between one or multiple records on a page (left); the Multiple Record Layout tab controls the layout of multiple records (right).  When finished with the preview, click OK to generate the merged document. This creates a new InDesign document with the merged data.
Adding Graphics to a Data Merge in InDesign You can also place graphics in a data merge. We did this in the business cards that we created in the "Business Cards" section of Chapter 2, "Which Application Does What?" As we illustrate in Figure 2-4, there are a few things that you must do when graphics are included in a data merge: In the first line of the data-source document, if the field contains a graphic, its name must begin with the "@" characterfor example, "@photos". (The @ sign tells InDesign that you don't really want the path to appear, but the picture instead.) In subsequent lines of the data-source file, that field should contain the exact file path on your computer to the graphic, in a format appropriate for your operating system: Mac: Macintosh HD:Photos:sandee.tif Windows: c:\Photo\sandee.tif Note that this file path is case-sensitive. Tip: Creating the @ Character in Excel If you type the @ character in Excel, it will try to treat the text as a formula. Put a single straight quote (') in front of the @ character to tell Excel this is text. (Example:'@Photos). When saved as tab- or comma-delimited text, the quote disappears.
Create the placeholder frame for a graphic with the Rectangle Frame tool. In the Data Merge palette, there is a special graphic icon beside the data-field name. Drag the field name to the graphic placeholder frame. By default, when merged, the images will be placed in a graphic frame that's sized proportionally to fit. However, if you want to change this, choose Content Placement Options from the Data Merge palette menu (Figure 15-21). Figure 15-21. Control image placement with the Content Placement Options dialog box. 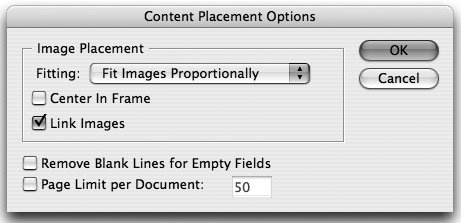
Variables: Data Merge in Photoshop and Illustrator Photoshop and Illustrator each have a feature called variables, which you can use to import data from a data-source file into a template to automate the creation of artwork. We discuss Photoshop variables in "Using Photoshop Variables with GoLive Graphics" in Chapter 9, "Smart Objects and Intelligent Layouts." We talk about Illustrator variables in the "Business Cards" section of Chapter 2, "Which Application Does What?" |
|