Reports and Summary Fields
A database excels at keeping track of thingsitsy bitsy teeny tiny details about hundreds, thousands, even millions of little things. But people aren't so good at dealing with all that detail (hence the invention of the database). They like to see the big picture. If you want to understand your customer's music tastes, a report of 200,000 individual CD sales won't do you much good: The information is in there somewhere, but your feeble mind stands no chance of ferreting it out. But a report that divides that information into 25 music genres, each with sales totals, both in aggregate and by gender, helps you interpret all those reams of data at a glance. In other words, a well-designed report summarizes the data for you. FileMaker's not only fantastic at showing you information, it also excels at helping you see what it all means.
In Chapter 5, you learned how to create reports that show lists of records, but they don't include any so-called summary data. They only show the details. To get summary information, you need summary fields.
6.9.1. Summary Fields
In Chapter 3, you learned that a summary field isn't associated with records like the other field types (Section 3.3). Instead, summary fields gather up and process data from several records. Creating summary fields is much easier than describing what they do, as you can see from the following example.
- In the People database, choose File
 Define
  Database.
In the Define Database window, choose the Fields tab. Then, in the Field Name box, type Count of People.
A summary field, like any other, has a name. You're going to use this summary field to count the people in your database.
- From the Type pop-up menu, choose Summary, and then click Create.
The Options for Summary Field window appears (Figure 6-39).
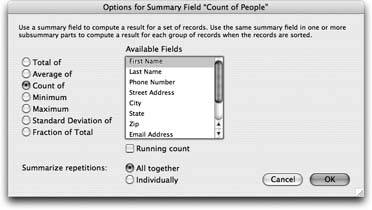
Figure 6-39. The Options for Summary Field dialog box appears when you make a new summary field. Unlike the field types you've used so far, a summary field has options that must be set for it to be usable, so FileMaker shows you those options right away. This window also shows up if, in the Define Database window, you select a Summary field and click Options.
- Choose the "Count of" radio button.
A summary field can perform one of seven summary calculations. In this case, you want it to count things.
- From the Available Fields list, choose First Name.
A summary field is always based on some other field in the database. For example, this field counts the First Name field. What does that mean? Simple: If a record has something in the First Name field, it gets counted, but if the First Name field is blank, FileMaker skips the entire record. Since every person has a first name, this field counts every record. But bewareif you forget to type somebody's first name in a new record, that person doesn't get included in the count.
- Click OK.
FileMaker adds the new field to the field list.
You now have a field that helps you find out how many people are in the database. That piece of information is much more useful than it sounds; you'll be using it to find out interesting things soon. It would also be nice to be able to summarize the Goodness Rating information. In this case, an average makes sense.
- In the Field Name box, type Average of Goodness Rating.
Remember, field names can be about as long as you want.
- With Summary selected in the Type pop-up menu, click Create.
The Options for Summary Field dialog box makes its second appearance.
- Select the "Average of" radio button.
Since averages only make sense for numbers, FileMaker grays out any non-number fields in the Available Field list. In this example, that leaves only Goodness Rating, which is automatically selected. But if you had date, time or timestamp fields in your file, those would remain available, too, in case you wanted to do some math on them.
- Click OK to add the Goodness Rating field, and then OK again to dismiss the Define Database window.
- FileMaker returns you to your database window.
| POWER USERS' CLINIC Stop That |
|
Normally when you add a field to the database, FileMaker automatically adds it to the layout you were just on. This feature is nice in the same way those child safety bottle lids are nice: It's probably good for kids. But big people like you find it terribly annoying. First of all, FileMaker can't possibly know where you want the field, so it just sticks it at the bottom of the layout. This place might be the right one but it just as easily might not. If it isn't the right place you can just move it, but if the body part had to grow to accommodate it, you have to reduce it again. What's more, it usually doesn't use the right font and formatting (your new notes field is probably formatted like the text under the Goodness Rating field shown on Section 6.7.17: small, gray, and right-aligned). Putting it right is tedious. It's usually easier to duplicate an existing field and change it to show your new field. This way, you get all the right formatting in one step. Finally, if you have several layouts in your database, you don't necessarily want the new field on the current layoutand its existence there is just something you have to go fix. To teach FileMaker that you're a big boy or girl, just do this:
If you someday decide to stop thinking for yourself, you can always turn the current layout setting back on. |
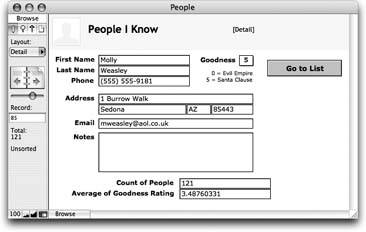
If you squeeze these two fields onto the detail layout and have a look in Browse mode, you see something altogether unimpressive: the total number of people in the database (the status area already tells you this information) and their average goodness rating (OK, this number is mildly impressive). If you don't believe it, have a look at Figure 6-40.
6.9.2. Creating a Summary Report
This section began by talking about how useful it can be to summarize your data. It specifically mentions a report that shows sales by Zip code and genre for a music retailer. When you hear something like that, you're sure to think that a Summary field should have some kind of a "by what" option. In other words, how do you tell that Total Sales field to summarize by Zip code? You don't. There's no such choice in the Options for Summary Field dialog box.
|
A Summary field is, by nature, abstract. You tell it which field to summarize, and that's about it. You might have one that counts people, another that totals orders, and a third that shows the standard deviation of the Height field.
The way to tell reports how to summarize your data is to design your layouts to produce the specific groupings you want. For example, you can make that Total Orders field display totals per customer on one layout, per product on another, and per month on a third. This field gives you tremendous flexibility when asking your database questions, without the need to define different fields for the totals on each different report. You can even make a new layout that slices your data a brand-new way without ever revisiting the Define Database window. Once you understand this process, defining summary fields is easy. You usually need just a handful at most.
To help you understand how to tailor a layout to a report's best advantage, how about adding a new report to the People database that uses the new summary fields? Start by opening the database and switching to Layout mode.
- Choose Layouts New Layout/Report.
In the Layout Name box, type Summary Report, and then, in the "Select a layout type" list, choose Blank Layout.
You're going to build this layout by hand.
- Click Finish.
FileMaker creates its basic blank layout: empty header; empty body; empty footer.
First things first: This layout is a report, and as such it's going to be printed. A lot. In this case, it makes sense to fix page margins so the printed output looks as nice as possible.
- Choose Layouts Layout Setup. In the dialog box that opens, click the Printing tab.
Turn on "Use fixed page margins."
If you leave this option off, FileMaker automatically prints things as close to the edge of the page as your printer allows. When on, you get to edit the four margin boxes (Top, Bottom, Left, Right).
- In each of the boxes for Top, Bottom, Left, and Right, enter 1, and then click OK.
Back in Layout mode, you may notice that the page break lines have moved to reflect the printable area considering the new margins.
- Choose File Print Setup (Windows) or File Page Setup (Mac OS X) and make sure the paper size is correct and the orientation is set to the normal The page break lines may move once again to show the new size and shape of the paper.
Since your layout now has fixed margins, you might want to see them in Layout mode so you have a feel for how things fit on the page. Just choose View Page Margins.
Note: Showing page margins in Layout mode is not a substitute for Preview mode. FileMaker doesn't attempt to show the page at the proper size. Instead, the margins in Layout mode help you get a feel for the space around your layout objects on the printed page. For example, without them, you might avoid putting text at the very top of the layout. But the margins remind you that this text will actually sit an inch below the top of the page. You can switch to Preview mode at any time for a more accurate look.
Now it's time to design the body part.
- Add a new field to the layout by dragging the field tool into the body part.
FileMaker instantly asks you which field you want.
- Select the First Name field in the Specify Field list, and then click OK.
The First Name field is now on the layout, although it may not be formatted properly. You're going to format it, and then use it as the basis for the rest of the fields in this layouta great timesaving trick.
- Change the field's font to Verdana 10 point regular. Make sure the field content aligns to the left (Format Align Text Left).
While pressing the Alt (Option) key, drag the First Name field to the right a few inches.
When you Alt-drag (or, on the Mac, Option-drag), FileMaker makes a copy of whatever you're dragging. See Section 4.4.9.4 for more cool dragging tricks.
- Double-click the new copy of the First Name field. When the Specify Field window returns, choose the Last Name field from the list, and then click OK.
You now have a First Name field and a Last Name field on the layout.
- Repeat steps 4 and 5 six times to add these fields: Phone Number, Email Address, Street Address, City, State, Zip
You now have eight fields on the layout.
- Arrange the fields in the body part to match Figure 6-41.
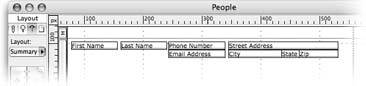
Figure 6-41. The fields on your new layout should be arranged something like this. You'll add titles, page numbers, decorations, and so forth shortly. You also need to resize the parts and work your new summary fields in there somewhere.
If you stop and view this layout in Browse mode now, it looks sparse, but the data's there. You may notice, though, that the address portion is "spaced out" in an unpleasant way. You can fix this problem with sliding. (And if you don't remember what sliding is, see Section 6.9.3.)
- In Layout mode, select these fields: First Name, Last Name, City, State, and Zip.
Remember to press Shift as you click to select more than one item. All these fields need to slide to the left.
- Choose Format Sliding/Printing, turn on "Sliding left," and then click OK.
Next, you can add the summary fields to the layout. Since they summarize data, they really don't belong in the body part, which repeats for every record on every printed page.
FREQUENTLY ASKED QUESTION
Seen: SlidingIs there any way I can tell which items have sliding turned on?
Yep. Choose View
If that way's not your bag, there's another way. When you choose Format Show Sliding Objects. Every object that is set to slide gains a small black arrow pointing in the sliding direction. In this picture, you can see the arrows clearly on several fields, indicating that those fields slide left. Sliding/Printing, the Set Sliding/Printing window first appears with the settings that match the currently selected object. You can therefore find out how an object slides by selecting it and then choosing Format Sliding/Printing.
"images/fmakerprotmm_06SB08.jpg">6.9.3. Adding a Summary Part
You need to show them only onceprobably after all the data. There's a part type that does exactly this: Trailing Grand Summary. When you start with a brand-new layout, it has a body, a header, and a footer, but it doesn't automatically have any summary parts. You have to add them yourself:
- Choose Insert Part. When the Part Definition dialog box appears, select Trailing Grand Summary, and then click OK.
Tip: If you prefer to have your summary information before the data in the report, use a Leading Grand Summary part instead, which appears between the body and the header. Whether you want your grand totals at the top of your report or at the bottom is purely a matter of preference.
- Add the two summary fields to the new part, along with meaningful labels.
Refer back to Section 4.4.4.4 for instructions.
Next up, you need to reduce the size of the body part so it shows a slim row, add a title and any lines you feel would look nice, and add a page number in the footer. You might also use separate title header and header parts so you can put a smaller header on every page after the first. You can see one way to format this report in Figure 6-42.
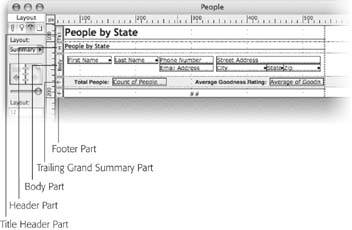
Figure 6-42. This is one way you could lay out your report. The Count of People and Average Goodness Rating fields are in a trailing grand summary part, which shows just below the body. Switch to Preview mode and click the last page to see the summary fields in action.
Tip: If you use Find mode to find only a few records (you have to switch to the detail layout first), the summary fields change to reflect only the records in the found set. Of course the printed report also includes only the data in the found set.
6.9.4. Other Summary Field Types
The Options for Summary Field dialog box has several choices. The first decision you need to make when defining a summary field is which radio button to turn on. Here's what each choice does:
6.9.4.1. Total of
Use the "Total of" option to sum (add) number fields. For instance, you can make a summary field that shows total sales by turning on "Total of" and, in your Orders database, selecting the Order Amount field.
When you have this option selected, a "Running total" checkbox appears below the Available Fields list. When you use a summary field on one of those magical layouts (like the one you create on Section 6.9.4.7) that produces groupingtotal sales by Zip code, total sales by state, and so onyou normally see just the totals for each group in the report. If you turn on "Running total," FileMaker changes things slightly. Instead of individual totals for each group, the totals add up from group to group. Figure 6-43 shows just such a report.
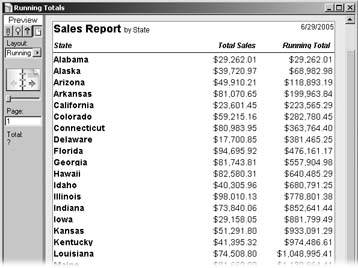
Figure 6-43. This report shows summary fields in action. The Total Sales field uses the "Total of" option to add up sales numbers. The Running Total field is the same, but it has the "Running total" box turned on. As you can see, one shows totals for each individual state, while the other has a continually growing number. FileMaker adds each state's totals to the previous total to arrive at the new number.
6.9.4.2. Average of
Obviously, the "Average of" choice calculates the average of the values in a number field. This time, you see a "Weighted average" checkbox. When you turn it on, another field list appears (see Figure 6-44). From this list, you choose the field by which to weight your average.
You would use a weighted average when the things you are averaging have an associated quantity. For example, suppose your database has a record for each product sale. It records which product was sold, how many were sold, and the unit price. If you want a summary field that calculates the average sale price, you probably want to turn on the "Weighted average" checkbox. Imagine you have these sales figures:
- You sold three laptop computers for $2,500 each.
- You sold 18 more laptops for $2,200 each.
- You sold a single laptop for $2,800.
If you use a simple average, FileMaker tells you the average sale price for laptops is $2,500 ($2,500 + $2,800 + $2,200, divided by three). But that's not exactly right. You sold 18 of those laptops at just $2,200 each, but it only counts once in the calculation. In fact, you really sold 22 laptops in all, at three different price points. To calculate the correct average, you need to take quantities into consideration. In FileMaker, turn on the "Weighted average" checkbox and choose the Quantity field in the "Weighted by" list. Now it reports the correct average: $2,268.18.
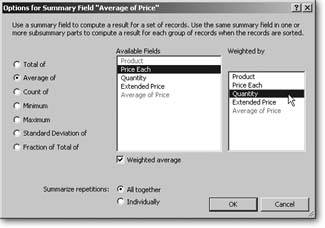
Figure 6-44. When you turn on the "Weighted average" checkbox, FileMaker adds a second field listWeighted byto the window, where you can pick another number field. FileMaker averages the data in the first field, and weights each record's input by the second field. If you're not a statistician, see the explanation on the previous page.
6.9.4.3. Count of
Choose "Count of" to count items without totaling them. Since this option doesn't involve actual math, you can pick any field type, not just numbers. FileMaker counts each record in which that field isn't empty. If it's empty, it simply doesn't contribute to the count. Choose a field that is never empty if you want to be sure you count every record. You can use this property to your advantage, though. If you wanted your count to reflect just the records that are flagged, count the Flag field instead. This option gives you a "Running count" checkbox. It works like "Running total" (Section 6.9.4.2), but has an option that running total doesn't offer.
Say you want to know how many contacts in your People database live in each city. In your counting summary field, choose the "Restart summary for each sorted group" option. A new list of your fields appears, letting you determine how you want the restarted count to behave. Since it's the city you care about, choose the city field from the list that appears on the right. To see the restarted count in action, sort your list by city (Figure 6-45).
6.9.4.4. Minimum and Maximum
If you want to know the smallest or the largest value in a group, use Minimum or Maximum. Both are very simple: Just pick the number field you want to look at. No checkboxes, no extra lists. You might use these to see the largest goodness rating in your database, or the price of the least expensive product.
6.9.4.5. Standard Deviation of
If you're into statistics, use "Standard Deviation of." It gives you a field that calculates its namesake for the selected number field. It also has a "by population" checkbox, which is a little oddly named (it probably should be called "of population"). Turn this checkbox on if your records represent the entire population in your particular domain, and FileMaker uses the formula for the standard deviation of a population. Turn it off to calculate the standard deviation of a sample.
Note: If none of this makes sense to you, then rest assured you don't need to know what it means. If you're cursed with a curious mind, Google define: standard deviation and go to town.
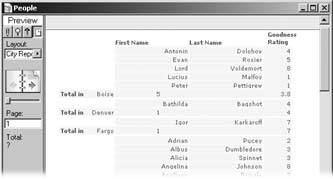
Figure 6-45. When you turn on the "Running count" and "Restart summary for each sorted group" options for a "Count of" summary field, you get a nifty report that counts up each group individually. This report was sorted by the City field, so the people records are grouped according to city.
6.9.4.6. Fraction of Total
Fraction of Total is the most complex summary option. It looks at the total for the group you're summarizing, as well as the total for the entire database. It then reports what portion of the overall total the group represents, as a decimal number. If all your sales were in California, it would show 1. If California only accounted for 5 percent of your sales, on the other hand, it would say .05.
The "Subtotaled" checkbox that comes along with this option is also a little confusing. When you turn it on, FileMaker lets you pick another field from a list called "When sorted by." The name of this list serves to inform you that you must sort the record by the selected field for this summary field to work. If you don't sort the records yourself before you view the report, the field stays empty.
Note: That problem's not as big as it might seem at first. As you'll see on Section 6.9.5.1, you have to sort records to do a lot of things with summary fields.
FileMaker looks at the selected field, figures out which records have the same value in them as in the current record, and calculates the fraction based only on the total of those records. Figure 6-46 illustrates this concept.
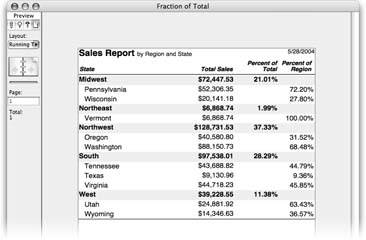
Figure 6-46. This report shows sales figures by region as well as by state. The Total Sales column shows the total sales in each region or state. Percent of Total shows each region's contribution to the total sales using the Fraction of Total summary type. The Percent of Region also uses Fraction of Total, with Subtotaled turned on and the Region field selected. Set up this way, it reports each state's contribution to the total sales for the region, rather than the grand total.
6.9.4.7. Summarizing repetitions
When you summarize a repeating field (Section 3.3.4.2), you have another choice to make. Do you want one summary value that aggregates every repetition, producing a single value? If so, choose "All together." If you want a repeating summary value that aggregates each repetition individually instead, choose Individually.
Note: If you have sharp eyes, you notice that the "Summarize repetitions" radio buttons are available all the time, although they don't do anything unless you've selected a repeating field. Don't waste your time clicking them unless you're working with a repeating field. Just one of those FileMaker mysteries for the cocktail-party circuit.
6.9.5. Sub-Summary Reporting
The report you just created is nice, but it could be even nicer (imagine that). Wouldn't it be fantastic to know how many people in your database live in each state? The average goodness rating per state would be pretty telling as well. Since there are 50 possible states and two summaries, you need 100 summary fields, right? Nope: Here's where summary fields really start to shine. Since your new needs still involve just counting and averaging, you already have all the fields you need.
All you really need to do is sub-summarize your existing data by state. This process just involves adding a new part to your layout; a sub-summary part. You tell this part to use the State field, and any summary fields you put in it automatically operates on the correct subset of records.
6.9.5.1. Sub-summary parts
A sub-summary part shows summary information about a subset of the records in the found set. When you add a sub-summary part to a report, it acts like a cross between a trailing (or leading) grand summary and a body part. It doesn't repeat for every record, but it does repeat: It shows once for each group of records.
POWER USERS' CLINIC
Sub-Summary PowerYou can actually put two sub-summary parts associated with the same field on a layout at the same time, as long as one's set to print above the records and the other below.
You can also put several sub-summary parts on the same layout with each associated with a different field. This way you can create nested sub-groupings, each with their own summarization data. When you create them, you need to be extra careful with the sort order. For sub-summary parts that print above the records, you should sort the fields in the order of the sub-summary parts themselves. If your sub-summary parts are below the records, you should sort first by the field associated with the bottommost part, and then by the next one up, and so on.
If you don't include a field in the sort order, FileMaker simply excludes the sub-summary part(s) for that field from the report. In this way, you can have a single layout that reports on data with different groupings based only on the sort order.
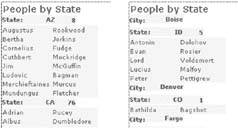
In the left window shown here, the records are sorted by state. In the right window, though, they're sorted first by state, then by city. Even though each window shows the same layout, you see very different results.
You can even make a layout with sub-summary parts, but no body part. A layout set up like this just shows group summaries, without individual record details. For example, if you remove the body part from the report you just made, you see the people count and goodness rating for each state in a simple list, but you don't see individual people.
Sub-summary parts are unique in two ways. First, they only show up in Preview mode. You never see a sub-summary part in Browse or Find modes. Second, they only show up when the data is sorted by the field they're associated with.
You tell a sub-summary part how to group records by associating it with a single field in your database. The part shows up once for each unique value in that field (you get to decide if it comes before or after the records in its group). But the magic doesn't stop there. If you put summary fields in a sub-summary part, the fields automatically summarize just the records in the associated group. In other words, you can put the same fields in different parts to see different results.
In the People database, for instance, you could add a sub-summary part to this report based on the State field and set to appear above the summarized records. The result would look something like Figure 6-47.
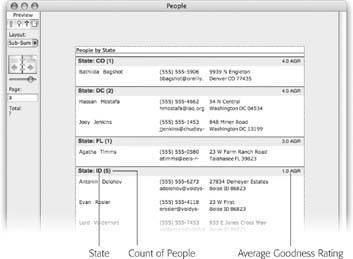
Figure 6-47. This version of your report includes a gray-colored subsummary part based on the State field. The part includes the State field itself, as well as the two summary fields. As you can see, the summary field values reflect just the group under them. In other words, they sub-summarize (clever, huh?).
6.9.5.2. Creating a sub-summary part
Adding sub-summary parts to your layout is a breeze, since you already know how to create summary parts (Section 6.9.3).
- In Layout mode, choose Insert Part. Then, in the Part Definition dialog box, select "Sub-Summary when sorted by."
Scroll down to State in the field list and click it.
You've just told FileMaker to use the State field to group records.
- Click OK.
FileMaker asks if you want to print the part above or below the records it summarizes.
- To get the result shown in Figure 6-47, click Print Above.
A new sub-summary part appears between the header and body.
- Add the State, Count of People, and Average of Goodness Rating fields to the new part.
You can also decorate this part any way you see fit, using any of the methods described on Section 4.4.5.3.
To see the results of your labors, sort the records by the State field and switch to Preview mode.
III Multiple Tables and Relationships
- Choose Insert
Part I: Introduction to FileMaker Pro
Your First Database
- Your First Database
- An Very Quick Database Tour
- Creating a New Database
- Opening and Closing Database Files
- Saving Your Databases
- Adding Records to Your Database
- Navigating Your Database
- Same Database, Multiple Windows
Organizing and Editing Records
- Organizing and Editing Records
- Views
- Advanced Find Mode
- Changing Multiple Records
- Sorting Records
- Editing Whats in Your Fields
- Paragraph Formatting
- Beyond Text: Container Fields
- Checking Spelling
- Printing and Preview Mode
Building a New Database
- Building a New Database
- Tables and Fields
- Defining Fields
- Advanced Field Options
- Bringing It All Together
Part II: Layout Basics
Layout Basics
Creating Layouts
Advanced Layouts and Reports
- Advanced Layouts and Reports
- Setting up Field Controls
- Adding Field Controls to Layouts
- Field Behavior
- Tab Order
- Print-Related Layout Options
- Format the Number/Date/Time/Graphic
- Adding Buttons
- Tab Panels
- Reports and Summary Fields
Part III: Multiple Tables and Relationships
Multiple Tables and Relationships
- Multiple Tables and Relationships
- Relational Databases Explained
- Modeling Your Database
- Creating a Relational Database
- Relational Databases
Advanced Relationship Techniques
- Advanced Relationship Techniques
- Creating Related Records
- Table Occurrences
- Managing Data with Data Tunneling
- Building a Data Tunneling Interface
- Connecting Databases
- Lookups
- Advanced Relationships
Part IV: Calculations
Introduction to Calculations
- Introduction to Calculations
- Understanding Calculations
- The Structure of a Calculation
- Creating a Calculation Field
- Auto-Enter Calculations
- Validate Data Entry with a Calculation
- Replacing Data Using a Calculation
- Comments
Calculations and Data Types
- Calculations and Data Types
- Number Crunching Calculations
- Going Beyond Basic Calculations
- Text Parsing Calculations
- Date and Time Calculations
- Containers in Calculations
Advanced Calculations
- Advanced Calculations
- Stored, Unstored, and Global Fields
- Logical Functions
- The Let Function and Variables
Extending Calculations
Part V: Scripting
Scripting Basics
- Scripting Basics
- Your First Script
- The Importance of the Layout
- Running Scripts
- Branching and Looping in Scripts
Script Steps
- Script Steps
- Go to Layout
- Scripting for Fields
- Working with Records
- Finding Records
- Sorting Records
- Working with Windows
- Working with Files
- Printing
- Other Script Steps
Advanced Scripting
- Advanced Scripting
- Commenting Scripts
- Asking and Telling the User
- Organizing Complex Scripts
- Handling Errors
- Putting a Complex Script Together
Part VI: Security and Integration
Security
Exporting and Importing
- Exporting and Importing
- Exporting a File
- Export Formats
- Importing Data
- Import Data Sources
- Importing and Exporting in a Script
Sharing Your Database
- Sharing Your Database
- FileMaker Network Sharing
- Sharing Over the Internet
- FileMaker Server
- Server Hardware
Developer Utilities
- Developer Utilities
- Script Debugger
- Disable Script Steps
- The Database Design Report
- Tooltips
- Copying Database Structure
- Custom Menus
- Developer Utilities
- File Maintenance
Part VII: Appendixes
Appendix A. Getting Help
EAN: 2147483647
Pages: 176
