15.3 Key archival and recovery
Key archival and recovery are PKI services that are used to recover lost, stolen, or simply unavailable private encryption keys. Encryption key archival and recovery are a key requirement in PKI-enabled applications that are dealing with persistent data. Good examples are secure mail applications.
Microsoft first introduced automatic and centralized private encryption key archival and recovery in the Key Management Service (KMS), which is part of the Secure MIME (S/MIME)–based secure mail application that ships with Microsoft Exchange Server.
Windows Server 2003 PKI archival and recovery builds on the central- database concept as it is provided by the Exchange KMS: It includes an automated and centralized key archival and recovery service with every Windows Server 2003 enterprise CA. Key archival and recovery can also be done manually by the PKI user—how to do this is explained in Section 15.3.1.
A very important detail related to the KMS archival service is that the latest Exchange release—Exchange 2003—does not come with a KMS service anymore. This means that if you have an operational KMS in an Exchange 2000 environment and you plan to migrate to Exchange 2003, you must migrate the KMS key archival database to the Windows Server 2003 CA key archival database. How to do this is explained in Section 15.3.5. Chapter 17 contains more information on the S/MIME standard for secure mail and how it can be used in a Windows Server 2003 PKI environment.
15.3.1 Manual key archival and recovery
There are different ways for a PKI user to manually back up his or her private encryption keys. The preferred and most commonly used format to store archived private keys is PKCS12. Access to and the confidentiality of a PKCS12 file’s (*.pfx) content can be secured using a password. To manually back up your private keys to a PKCS12 file, you can do one of the following:
-
Open your personal certificate store using the Certificates MMC snap- in. Right-click the certificate whose private key you want to manually back up and select All Tasks\Export… This action brings up the Certificate Export Wizard. Make sure that you check the “Yes, export the private key” option and that you enable strong key protection (as shown in Figure 15.18)—the latter option will make the wizard prompt you for a password to protect the PKCS12 file’s content. Do not check the “Delete the private key if export is successful” option.
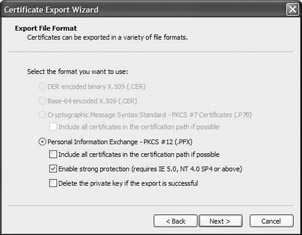
Figure 15.18: Backing up the private key using the Certificate Export Wizard. -
From Internet Explorer: Select the Internet Options menu option from the tools menu. In the Internet Options dialog box, go to the Content tab. Click the Certificates pushbutton—this brings up the Certificates dialog box. Select the certificate whose private key you want to export and click Export… This action will also bring up the Certificate Export Wizard. Use the same options as mentioned above.
You can also archive your private encryption keys from Outlook. Out- look does not store the keys in a PKCS12 formatted file, though; it uses a special Outlook export format (*.epf). Like PKCS12, this format can be secured using a password that is provided by the user. To export your private encryption keys from Outlook, select the Options menu option in the Tools menu and go to the Security tab. At the bottom of the Security tab, click the Import\Export pushbutton. This brings up the Import\Export Digital ID dialog box—in this box, check the “Export your Digital ID to a file” radio button. Select the Digital ID whose private key you want to export, and fill in a filename and password. Make sure that you do not check the “Delete Digital ID from system” checkbox.
The epf extension shows the historical roots of Microsoft Outlook’s secure mail technology: epf stands for Entrust profile. One of the reasons why Outlook still uses this format is that it supports X.509 version 1 certificates, which were used in the early Exchange KMS implementations.
15.3.2 Automatic key archival and recovery architecture
A Windows Server 2003 CA securely stores the archived private keys in the CA database. The CA uses a symmetric 3DES key to encrypt a private key, and then uses a key recovery agent’s public key to encrypt the symmetric key. A new symmetric encryption key is randomly generated for every new key archival request.
A key recovery agent (KRA) is a Windows account that has key recovery privileges. An account has those privileges if it owns a key recovery certificate and private key.[4] If more than one KRA is defined, the symmetric encryption key will be encrypted with each KRA’s public key. Windows Server 2003 PKI comes with a predefined key recovery agent certificate template, so it is relatively easy to set up a key recovery certificate for a particular account.
The key archival process occurs in a completely transparent way for the PKI user. It occurs as part of the certificate enrollment process. Whether or not a private key is archived depends on a certificate template setting that will be explained next.
During a certificate enrollment that incorporates an automatic key archival, the following steps occur—Figure 15.19 illustrates this process:
-
The PKI client queries AD for a CA. It specifically looks for CA entries in the enrollment services container in the configuration naming context. AD returns the name and location of CA.
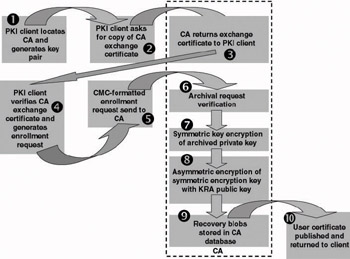
Figure 15.19: Windows Server 2003 key archival process. -
The PKI client requests the CA for a copy of its CA exchange certificate.
-
The CA returns the CA exchange certificate to the client.
-
The PKI client validates the CA’s CA exchange certificate. It verifies the signature, performs a revocation check, and validates the certificate format.
-
The PKI client encrypts the private key that must be archived with the CA exchange certificate’s public key. This encrypted blob is then embedded in a CMC-formatted request object and forwarded to the CA.
-
The CA decrypts the encrypted private key of the client with the private key associated with the CA’s exchange certificate. It then encrypts the private key with a random 3DES symmetric key.
-
The CA checks whether the private key in the CMC cryptographically pairs with the public key in the certificate request. It also validates the signature on the request using the public key that comes with the request.
-
Finally, the CA encrypts the symmetric key with the public keys of one or more Key Recovery Agents (KRAs) based on the CA configuration.
-
The CA saves the encrypted blob containing the encrypted private key and the symmetric key encrypted with one or more KRA public keys in the CA database.
-
The CA processes the certificate request. It then forwards the certificate to the user and publishes it in the directory (if this option has been set in the certificate template).
In this process the CA exchange certificate is used to provide confidentiality and integrity protection when the PKI client’s private key is forwarded to the CA for archival. The CA exchange certificate’s content is defined in a new certificate template coming with Windows Server 2003. A CA’s CA Exchange certificate is physically stored in the attributes of the CN=<CAName>-Xchg,DC=<domainname> AD object. Its private key is stored in a secured part of the CA server’s registry. For obvious security reasons, the CA exchange certificate and key pair have a very short lifetime (7 days).
The Windows Server 2003 CA stores the encrypted private key in the CA database’s RawArchivedKey column and stores the encrypted symmetric key in the KeyRecoveryHashes column. You can view these columns and the rest of the CA database’s schema from the command line by typing the following certutil command at the command line:
certutil –schema
Whether or not the private key of a given certificate is archived in the CA database can also be seen from the CA MMC snap-in. To do so, you must change the columns that are displayed in the Issued Certificates CA container: You must add the Archived key column (as illustrated in Figure15.20). To add this column, right-click the Issued Certificates container, then select View\Add/Remove columns… . Then add the Archived key in the available columns list.
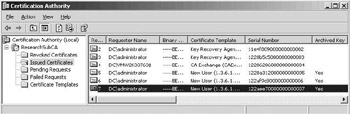
Figure 15.20: Archived key column in CA interface.
15.3.3 Configuring automatic key archival and recovery
Configuring automatic key archival and recovery in Windows Server 2003 requires configuration changes in the CA and the certificate template properties. The changes are explained next.
To configure a CA object’s key-archival settings, open the MMC Certification Authority snap-in, open the CA object’s Properties dialog box, and then go to the Recovery Agents tab, which is shown in Figure 15.21. Select the Archive key checkbox to enable key recovery.
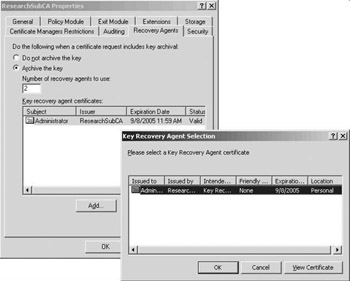
Figure 15.21: CA key recovery settings.
You can specify the number of KRAs you want to define in the “Number of recovery agents to use” text box. At the bottom of the Recovery agents tab, you can select the KRA certificates you want to use for key archival.
When you click the Add button, the CA logic will query the KRA container in the AD configuration naming context and retrieve a list of available KRA certificates. Each time you add a new KRA certificate you must restart the CA service. As long as the CA service has not been restarted, the status column of the KRA certificate will say Not Loaded.
To enable key archival at the certificate-template level, you must use the Certificate Templates MMC snap-in. To automatically archive the private key when a user requests a certificate based on a particular template, open the template, go to the Request Handling tab, and select the Archive subject’s encryption private key checkbox (as illustrated in Figure 15.22). You can set the key-archival option only on version 2 certificate templates.
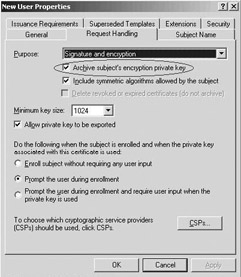
Figure 15.22: Key archival settings in certificate template properties.
15.3.4 Key recovery from the CA database
A key recovery is typically initiated by a PKI or PKI-enabled application (PKA) user. Key recovery requires the intervention of at least one key recovery agent (KRA)—depending on how key archival and recovery has been configured in the CA properties.
Key recovery requires the intervention of both a certificate manager and a KRA: a certificate manager to retrieve the recovery data from the CA database and a KRA to retrieve the archived private key from the recovery data.
An archived private key can be recovered from the command line or from the Windows GUI.
A full Windows Server 2003 private key recovery sequence from the command line consists of the following steps:[5]
-
The KRA identifies the user who requests a key recovery.
-
The KRA writes down the user principal name (UPN), user common name (CN), account name (domain\username), SHA-1 thumbprint (hash), or serial number, of the user certificate whose private key the agent wants to recover. In this step, the most important task is to find a unique identifier for the key to be recovered. If more than one key is archived for a particular user, the safest thing is to first retrieve a list of all archived keys. This can be done using the following command:
Certutil –getkey <user common name, account name or UPN>
-
Then to export the recovery data from the CA database, the KRA opens a command prompt and types
certutil -getkey <Unique identifier> <output file>
-
To transform the output file to a PKCS #12 file (which will contain the recovered private key and is secured using the password "test"), the KRA types
certutil –p "test" -recoverkey <output file> <pkcs12 file>
-
The KRA provides the PKCS #12 file to the appropriate user, who can then import it to his or her certificate store.
If the KRA recovered multiple keys for the same user, he or she can merge them all into a single PKCS12 file. This will facilitate the installation of the recovered keys for the user. To do so, he or she must type the following certutil command (the password used to secure the PKCS12 file is again “test”):
CertUtil -p "test" -MergePFX -user "<PKCS12_File1>,<PKCS12_File2>" "<NameofCombined_PKCS12"
To recover keys from the GUI, you must use the Key Recovery Tool (krt.exe) that is part of the Windows Server 2003 Resource Kit (illustrated in Figure 15.23). It offers a very convenient GUI-based way to recover keys that have been archived in the CA database.
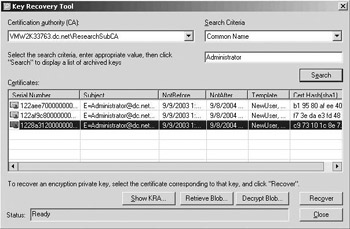
Figure 15.23: Key recovery tool.
To recover keys using the Key Recovery Tool, you must do the following:
-
Select a CA from whose database you want to recover keys (in the CA drop-down box).
-
Search for the archived private keys and certificates for a particular user: To do so, select a search criterion (common name, UPN, serial number, hash, or account name) in the Search Criteria drop-down box, and then fill in the user identifier and click the Search button.
-
You can then:
-
Recover all archived keys at once (using the Recover button).
-
Recover a single key-certificate pair (using the retrieve Blob… and decrypt blob… buttons).
-
15.3.5 Migrating the exchange KMS database
As mentioned earlier, Exchange 2003 does not come with a KMS service anymore. If you have an operational KMS in an Exchange 2000 environment and you plan to migrate to Exchange 2003, you must migrate the KMS key archival database to the Windows Server 2003 CA key archival database. This section explains how to do this.
To migrate the KMS key archival database to the Windows Server 2003 CA key archival database, you must run through the following steps:
-
If you are running an Exchange 5.5 KMS, upgrade to Exchange 2000. The KMS migration process can only support an Exchange 2000 KMS database.
-
Configure the Windows Server 2003 CA for key archival. How to do this has already been explained.
-
Ensure that an export encryption certificate is available for KMS database migration.
-
Enable the foreign certificate import option on the Windows Server 2003 CA if necessary.
-
Export the Exchange KMS database’s content.
-
Import the Exchange KMS data into the CA’s key archival database.
The export encryption certificate and its associated private key are required to secure the KMS data when they are exported from the KMS database and transported to the Windows Server 2003 CA. The export encryption certificate must be available on the KMS machine whose data you want to migrate. The certificate is a copy of the CA server’s machine authentication certificate. In case the CA server does not have a machine authentication certificate, make sure it gets one before you start the KMS migration. The machine authentication certificate is stored in the CA server’s local machine certificate store. To transfer it to the KMS machine, export it from the CA server using the PKCS12 format as outlined earlier and then store it in some file system folder on the KMS machine.
Importing certificates and keys that were issued by another CA into a Windows Server 2003 CA’s database is only possible if you have enabled the CA to accept certificates and private keys that were issued by another CA. To enable this, use the following certutil command:
Certutil –setreg ca\KRAFlags +KRAF_ENABLEFOREIGN
To export KMS archival data, you must use the KMS Key Export Wizard that is available from the Exchange 2003 System Manager MMC snap- in. This wizard (illustrated in Figure 15.24) can be started from the properties of the Key Manager object in the Exchange 2000 System Manager: Select All Tasks\Export Users. The wizard will prompt you for the CA’s export signing certificate and will ask you for which Exchange 2000 administrative group’s user keys you want to export. The wizard will by default save the export file in the %systemdrive%:\program files\exchsrvr\kmsdata directory. Locate the export file and copy it to the CA server.
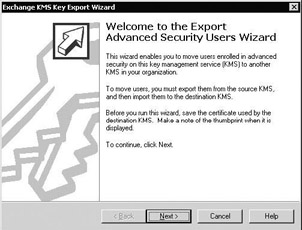
Figure 15.24: The Exchange 2003 KMS Key Export Wizard.
The exported KMS archival data can be imported into the central CA archival database using the following certutil command:
Certutil –f –importKMS <Filename>
This command can handle files that are formatted using the Exchange KMS export format as well as *.pfx files and *.epf files. The latter two formats are used to manually archive certificate and private key data (as was explained earlier).
This certutil command is illustrated in Figure 15.25 for the import of a*.pfx archive called admin.pfx containing a manually archived certificate- private key pair.
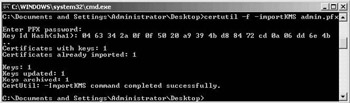
Figure 15.25: Manual CA archival database import.
The –f switch in this command must be used if the certificate that will be injected into the database was not issued by the CA itself (which is typically the case when you are migrating a KMS key archival database). The switch stands for “issued by a foreign CA.”
[4]For advanced security reasons, both the KRA certificate and private key can be stored on a smart card. This is supported in Windows Server 2003 PKI.
[5]In this example, no role separation has been defined. Also, it uses a single KRA certificate.
EAN: 2147483647
Pages: 137