| In Phase II, you will install and configure NetWare 6 storage devices by selecting an appropriate platform support module and/or HotPlug support module (if applicable), and configuring storage adapter(s), storage device(s), and network board(s). Step 6: Select Platform Support Figure 2.12 shows the first of three driver screens. This one lists the plat form and support modules (which have been auto-detected, wherever possible): Platform Support Module A platform support module (PSM) driver can be loaded to optimize the performance of servers with multiple processors and other configurations. If a PSM is not detected, your computer probably does not need one. If a platform support module driver is detected on a computer that does not contain multiple processors, the driver can be allowed to load without adversely affecting performance. Platform support modules typically have a .PSM filename extension. HotPlug Support Module PCI HotPlug technology allows storage adapters and network boards to be inserted and removed while the computer is powered on. If a PCI HotPlug module is not detected, your computer probably does support the technology (and thus, does not need one). PCI HotPlug modules typically have an .NLM extension. Storage Adapters Storage adapters require a software driver called a host adapter module (HAM) to communicate with the computer (host). Because a single storage adapter can control more than one type of storage device, only one HAM may be required. Various types of storage adapters, such as Integrated Drive Electronics (IDE) and Small Computer System Interface (SCSI), maybe autodetected. If a particular storage adapter is not detected, choose the appropriate driver from the list, or load it from a manufacturer-provided disk. Verify that properties such as interrupt, port value, and slot do not conflict with any other device in the computer. Host adapter modules typically have a .HAM extension.
Figure 2.12. Selecting platform support during NetWare 6 upgrade.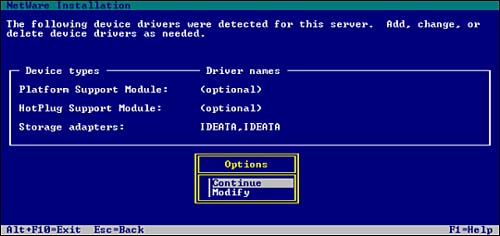
REAL WORLD To add, change, or delete a device driver in any of the three driver screens discussed here, follow these simple steps: In the Options box, select Modify. Select the device type that you want to work with and press Enter. To add a driver, press Insert, specify the location of the driver, and press Enter. To delete a driver, select it from the list and press Enter. To modify a driver, select it from the list, choose the property to modify, and press Enter.
|
Step 7: Select Storage Devices The second driver screen lists Storage devices. Storage devices require a software driver, called a custom device module (CDM) to communicate with the storage adapter that controls it. Each type of storage device requires a separate CDM. The Upgrade Wizard autodetects many types of storage devices, such as SCSI/IDE drives, CD-ROM drives, and tape drives. If a storage device is not detected, choose the appropriate driver from the list provided, or load it from a manufacturer-provided disk. Custom device modules typically have a .CDM extension. TIP Because a single adapter can control more than one type of storage device, your computer may require only one HAM, but have multiple types of storage devices, and thus, multiple CDMs.
Step 8: Select Network Boards and NLMs The third driver screen lists these storage drivers: Network Boards Network boards require a software driver called a LAN driver to communicate with the network. The upgrade program autodetects many types of network boards. If a particular network board is not detected, choose the appropriate driver from the list provided, or load it from a manufacturer-provided disk. To edit the properties of the network board, it must be installed and configured properly. Verify that properties such as interrupt, port value, and slot do not conflict with any other device in your server. LAN drivers typically have a .LAN extension. NetWare Loadable Modules Some servers and network configurations require that you load an NLM before completing the server upgrade. (For example, if you are installing the server in a Token Ring environment, you may need to load ROUTE.NLM.) If required, add the appropriate NLM to the NetWare Loadable Modules field.
When you select Continue the Upgrade Wizard copies system files to the SYS: volume. TIP If you are installing NetWare 6 from the network, you will be prompted to reconnect to the network. To continue the upgrade, you must authenticate with the same User object and password that you used at the beginning of the upgrade process.
This completes the next three steps of NetWare 6 upgrade, and Phase II. Now, we will venture into a whole new world GUI installation screens. |