Phase I: Choosing the Correct NetWare 6 Settings
| Test Objective Covered:
In Phase I, you will get things started by executing the INSTALL.BAT file, accepting the license agreements, and loading the core NetWare operating system. Then, you will select a plethora of general NetWare 6 settings, including installation type, server address settings, regional parameters, the mouse type, and video mode. Step 1: Begin the InstallationTo begin the NetWare 6 installation process, insert the NetWare 6 Operating System CD into the CD drive (or log into the network if you have stored the NetWare 6 installation files on an existing server), and enter the following command at the prompt: INSTALL
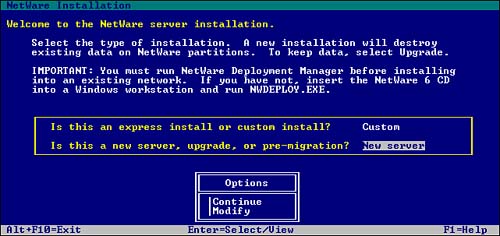
You'll notice that the installation program displays the initial screens in text mode. Autodetected and/or default settings appear on each screen. You can either accept the autodetected and default settings or you can modify them to meet your requirements. To navigate a text screen, use the arrow keys on your keyboard. To select a menu choice, highlight the desired option and press Enter. To toggle between predetermined values in a field, highlight the field and then press Enter to toggle to the next value. See the bottom of each screen for further information. TIP The NetWare 6 installation program is available in several languages. If you have an international version of the program, a NetWare Installation screen eventually appears, giving you the opportunity to select the language to be used during installation. Later in the installation process, you will be given the opportunity to install other language options, such as the language for the operating system and for the Admin user. Also note that whichever language the Admin user selects becomes the default language for all the objects he or she creates. Step 2: Accept the License AgreementAt the beginning of the installation process, you are asked to agree to the terms and conditions contained in the NetWare 6 Novell Software License Agreement. Press F10 or select Accept License Agreement, as appropriate, to indicate that you have read the agreement and accept its terms and conditions. (The appropriate choice will depend on the method you used to start the installation program.) The installation program then checks the server's first hard disk to verify that it has a valid boot partition and adequate disk space. When a screen appears indicating that a valid boot partition has been found, select Continue with Existing Partition. When the JReport Runtime License Agreement screen appears, press F10 to indicate that you have read the agreement and accept its terms and conditions. TIP NetWare 6 contains two license agreements: the NetWare 6 Novell Software License Agreement and the JReport Runtime License Agreement. The first agreement is a binding contract between you and Novell for use of the NetWare 6 operating system. The second agreement gives you permission to use the following two Java components with NetWare 6: JReport Engine Bean and JReport Result Viewer Bean. Step 3: Select the Installation Type and MethodWhen the Welcome to the NetWare Server Installation screen appears (see Figure 1.4), you are given the opportunity to select the installation type (Express or Custom) and the installation method (New Server, Upgrade, or Pre-Migration). The default installation type is Express and the default installation method is Upgrade. Let's take a closer look at each of these options. Figure 1.4. Step 3: Selecting the installation type and method.
Understanding Installation TypesThe Express installation option autodetects drivers, uses default settings, and installs default software programs, including:
The Custom installation option enables you to select advanced configuration parameters. This option can be used to install NetWare 6 on a new computer (which is the method described in this chapter) or to upgrade an existing computer running NetWare 4 or NetWare 5 (which is described in Chapter 2.) Understanding Installation MethodsThe NetWare 6 installation methods shown in Figure 1.4 include
Review the values listed on this screen and modify them as necessary. At the end of this chapter, we will perform a NetWare 6 custom installation from scratch. Step 4: Specify the Server SettingsThe Server Settings screen appears next, listing the following default values:
Some of the information that you may want to keep in mind regarding these options includes
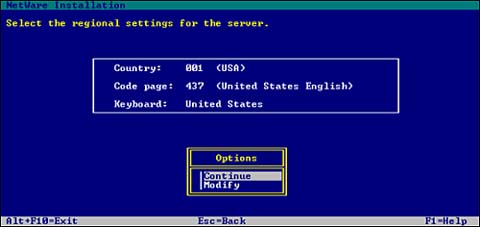
Step 5: Select the Regional SettingsThe Regional Settings screen appears next, as shown in Figure 1.5. Regional settings are used to customize server language and keyboard settings. If you are located in the United States, the default values are as follows:
Figure 1.5. Step 5: Selecting regional settings.
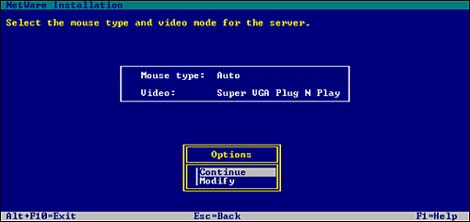
Step 6: Select the Mouse Type and Video ModeDuring the next few steps, the Installation Wizard attempts to automatically detect certain types of hardware devices and to load the appropriate drivers. Other drivers must be selected manually. Figure 1.6 shows the first of three consecutive driver screens. This first screen lists the server's autodetected mouse type and video mode parameters. Following is a brief description of each:
Figure 1.6. Step 6: Selecting mouse type and video mode.
Review the values listed on this screen and modify them as necessary. The Installation program then copies a number of server boot files from the CD to the C:\NWSERVER startup directory. These include files such as SERVER.EXE, disk drivers, NWCONFIG.NLM, NWSNUT.NLM, VREPAIR.NLM, and other NetWare Loadable Modules (NLMs). This completes the first six steps of NetWare 6 installation, and Phase I. Now, we move on to platform support and NetWare storage. |
EAN: 2147483647
Pages: 128