Project 5. Bridging the Gap with Panoramas Panoramas can be fun. They can be fun to shoot and fun to display and view. The problem is in creating the darn things. Of course, the final process involves combining two or more photographs into one in such a way that the photographs look as though they were taken with a special camera. 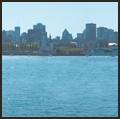 Tip One quick way to fake a panoramic shot, depending on the photo you are working with, is to simply crop a long horizontal area from the image. Depending on the resolution of the original, how much detail you want to preserve, and so on, this might be a viable alternative to stitching photos together.
Third-party programs are available that would probably do the job. In fact, there are probably even some Paint Shop Pro plug-ins that help create panoramas. I've tried at least one fairly high-end plug-in, but I wasn't that impressed with it. In fact, I ended up simply creating the image myself using the best visual processor and inputs I had on handmy brain and eyes. I believe I (and you, for that matter) can do a better job of telling when the images are lined up (not to mention correct any small problems that crop upand they will crop up) and when the colors match than those giant piles of plastic, metal, and silicon that occupies most of our precious desktop real estate. A lot of the work in this project takes place behind the lens of your camera. Planning ahead will save you time and trouble in the long run. Here are a couple of things that will help you get the best results when you finally get back to your digital darkroom: Use a tripod I can't overstate how important this is. I know, I know, I hate carrying that thing around, too (mine likes to bite and it's quite heavy), but without it you have less chance of lining up your separate images. Trust me, carry the tripod this one time; it will be worth the effort. Don't use too wide an angle zoom setting Doing so distorts things and makes stitching the results together more difficult. Try not to shoot toward the sun Doing so can introduce color shifts that are difficult to deal with. Of course, if it's a sunset you're shooting, then that's different. If possible, try to use the manual settings on your camera The automatic settings can change as you turn the camera to get more of the landscape, for example. The change can be reflected in the colors of the image. If the colors are shifted too much, it is one of the toughest things to deal with. (It's not impossible, but it can be very difficult.) Try to get the camera as level as possible Your camera or tripod might have a level, like mine does, or it might have a visible grid you can turn on. Whatever it takes, try to get your camera as level as possible. Make sure you have enough of an overlap in the images that you'll be stitching together Having more overlap is better than not having enough.
1. | Open all the files you'll be stitching together. I'll be using the two (RightPanorama.tif and LeftPanorama.tif) in Figure 8.26.
Figure 8.26. Two photos about to be stitched together. 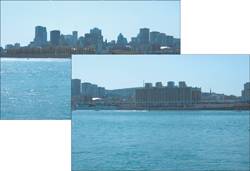
Note the boat in the middle of the photo. I only realized later that this might be a problemthat's something to watch for next time, I guess. For now, there's always the Clone Brush tool.
|
Resizing, Copying, PastingLather, Rinse, Repeat Whoa! Say that five times fast. It actually gets a little musical. Now where were we? Ah, yes, the panoramic. I'll stitch only two images together, but you can put as many together as you like. Simply follow the directions in this project, but set the canvas size to reflect the size of your final image. 2. | Select one of the images; it doesn't really matter which, but I'll choose the one on the left and paste the other to its right after resizing the canvas. Activate the image you've selected by clicking its title bar.
| 3. | Select Image, Canvas Size to open the Canvas Size dialog box (see Figure 8.27).
Figure 8.27. The Canvas Size dialog box. 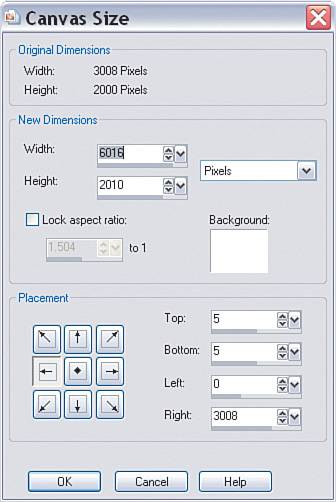
Because I chose to start with the left image, I'll set the Placement to the left.
The only other setting I'll make is that I will double the Width so I can paste the second image in. I set the Width to 6016 pixels.
Click OK and you'll see that the image's canvas size has doubled in width, with the original photo tucked away to the left of the newly resized image.
| 4. | Activate the second photo by choosing Selections, Select All, Select Edit, Copy. Activate the first image and select Edit, Paste As New Layer.
|
Positions, Everyone This next part is pretty crucial. The images need to be lined up properly so the rest of the project falls into place. Take your time with this part and pay special attention to how the two images fit together. 5. | It's time to get the images together. To do so, lower the Opacity of the new layer. This will enable you to see the lower layer behind the new layer and help you get the two matched up. I set the Opacity to 70. This setting was enough so that I could easily see both images overlapping (see Figure 8.28).
Figure 8.28. Lowering the opacity to allow the underlying image to show through. 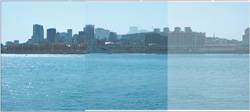
Tip At this point, you can close the second image to free up the memory it's using. It won't be necessary unless we make a really big mistake and have to start over. Note You'll notice that you can't necessarily line up all the points in the image. We'll fix that to some extent, but for now concentrate on the edge where the two images meet. After that, you can concentrate on where they meet, or near, the topfor instance, where the first high-rise buildings meet in this project's example. With that point lined up, we can fix the rest, at least any of it that will impact the final result. | 6. | Select the Pick tool and move the upper layer into position. Don't worry about getting it exact at this point. Just get it roughly into place. You can use existing objects that stand out to help you place the image. For example, the tops of buildings or something prominent in the overlap will help you get the two images lined up. You did shoot with enough overlap, right?
| 7. | With the images roughly in place, zoom in so you can get a better view of where the images overlap.
Select the Pick tool again and use the arrow keys to nudge the top layer into place. You can use the Ctrl key to move in larger increments and the Shift key to move in even larger increments.
|
Resizing, Reshaping, and so on I noticed that the images weren't exactly the same size and that they didn't line up. They aren't very different, but enough to spoil the effect. This means the upper layer needs to be resized. 8. | To help with the process of aligning and resizing the upper layer, drag the canvas out a little to you have some room around the images (see Figure 8.29).
Figure 8.29. Enlarging the canvas to help with sizing and placement of the layers. 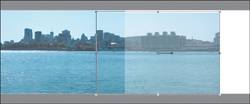
| 9. | Select the Pick tool and drag the bounding box to resize the new layer as necessary. I zoomed in and made sure the walkway was lined up. It might take some trial and error, and you might have to zoom in and out a couple of times to get it right.
| 10. | When you're satisfied that everything's in place, zoom out to take a look, paying attention to the seam (see Figure 8.30).
Figure 8.30. Checking the stitching between the layers. 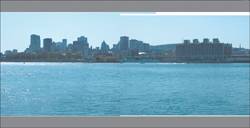
Figure 8.30 shows that the sky matches up quite well. This means, of course, that the colors in the two images are fine. If this isn't the case with your image, you'll have to play with the color settings of one of the images so it matches the other. Doing so can be a tricky proposition. If you do need to start changing the color, do so in a slow and methodical way, making very small adjustments as you go. I realize this might not be of great help or of much comfort, but the truth is entire books have been written about color and every image is different, so there's no magical fix. Following the shooting tips at the beginning of this project can help you prevent this from happening, too. The trouble I thought I'd have with one of the boats seems to have taken care of itself when I upped the opacity. At worst, though, I would have simply cloned it out if necessary.
|
Hiding the Seams and Final Crop The only things left to do are to fix the visible seam in the water and crop the image. 11. | To fix the visible seam, select the Clone Brush tool. Then, using a brush size that will cover the seam, clone other parts of the water over the seam. If you need a refresher on the Clone Brush's use, see Appendix B,"Paint Shop Pro X in a Nutshell." I cloned to a new layer to make it easier to go back and start again if problems arise with the cloning process.
Tip Move around a lot as you sample and clone, and then resample and clone again. Keep things moving and as random as you can; change the brush size, the brush Hardness, and even the Opacity settings to see if they can help you blend the two areas together without any seams showing. Also, try not to rework an area too much because doing so can introduce patterns that will be visible in the final result. | 12. | When you're happy with the result of the coverupor the seams, that isselect the Crop tool and use it to crop out the part of the image you want to print. I removed the areas of the image where there was some white left over from the copy and paste. My final result is shown in Figure 8.31.
Figure 8.31. The final panoramic shot digitally stitched together from two separate photos. 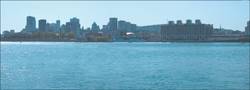
Note As I mentioned earlier, if you have other photos to blend in, simply follow the directions outlined here. The idea will be the same, but your panoramic will be all the more spectacular. |
|