Project3.Amongst the Greatest
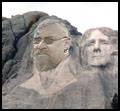
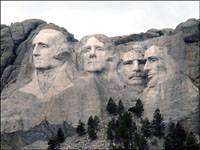
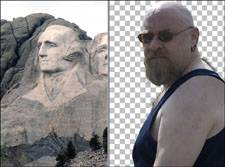
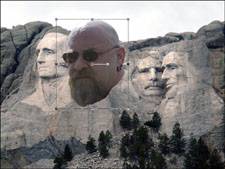
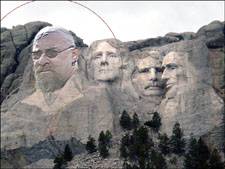

Project 3. Amongst the Greatest

Have you ever had presidential aspirations? What about just wanting your face to become a national landmark? You can picture your face sitting amongst the greatest presidents in history by putting yourself on Mount Rushmore.

For this project, I'm using a stock image of Mount Rushmore (see Figure 7.21) and the same face we've used and abused in previous projects. The angle of his head is perfect to replace George Washington (see Figure 7.22). You can, of course, use your own face to replace George or any of the other presidents. You can even use the following steps to add a fifth head to the right of Abraham Lincoln. If you don't have your own images for this project, just download the ones I'm using here from the website and from www.shutterstock.com (image 20535).

Figure 7.21. One of the most popular landmarks in the United States.


Figure 7.22. Could this man be one of the great persidents of all time?
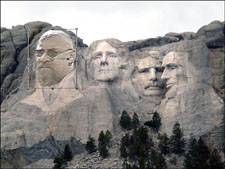

1.

By now, you're probably quite familiar with the process of making a selection and pasting it into a new layer on the target image. If this is your first project in this book, you can turn to Appendix B for details on how to accomplish this.

2.

Click the Pick tool and set it for the Scale mode (see Figure 7.23). Move the head into position over George Washington's head.

Figure 7.23. Pasting the head into the Mount Rushmore image.


3.

Click one of the corners of the Pick boundary box and drag it inward to scale the head down to size. Use George's head as a guide (see Figure 7.24).

Figure 7.24. Where'd Washington go?


Carving a Place in History

Our new president's head is in position, but it's a bit too lifelike. We want it to look carved into the mountain, just as Jefferson, Roosevelt, and Lincoln are. Fortunately, Paint Shop Pro X has effects filters that can convert the face of Rushmore's newest resident into rock in just a few steps.
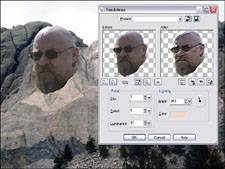
4.

Select Effects, Texture Effects, Sandstone. The trick is to create a carved effect without losing the detail of the face. I used the following settings: Blur 7, Detail 1, Luminance 10, and Angle 343 (see Figure 7.25).

Figure 7.25. Creating a carved image.


5.

For the color, I moved the cursor over an area of the Mount Rushmore image. The cursor turns into an eye dropper, and clicking selects the color. After you click OK and return to the image, you can see how well your new president fits into his new surroundings.

Blending In

Our president is starting to take form, but the color is still a bit off. The granite of the mountain can be very challenging to duplicate without losing the detail of the face. Paint Shop Pro X has a tool that helps.

Note

The Change to Target Brush changes the color of an area without changing its luminance. You can also set the brush to Hue, Lightness, or Saturation mode to change those values without affecting the other attributes. The target color is based on the Foreground color in the Materials palette.


6.

Click the down arrow to the right of the Lighten/Darken brush; then click the Change to Target Brush.

7.

Click the Foreground color in the Materials palette; then use the Eyedropper tool to select a sample of the granite from Jefferson's face.

8.

Change the size of the Change to Target Brush to cover the entire head of our new president and the surrounding mountain (see Figure 7.26).

Figure 7.26. Blending in the head.


Finishing Touches

After applying the sandstone effect and matching the color, it has become more apparent that the size and angle of the head aren't quite right. Because the head is still on its own layer, we can use the Pick tool to scale it down and rotate it into perfect position.

9.

Click the Pick tool and select Scale mode. Drag one of the boundary corners to scale down the size of the head.

10.

Move the cursor into the middle of the Pick boundary box to rotate it clockwise so the head appears to be gazing straight out (see Figure 7.27).

Figure 7.27. Presidents look outward, not downward.


11.

There's only one remaining problem: If you look at the top of our president's bald head, he has a glare that's not in keeping with the light on the rest of the presidents (see Figure 7.28).

Figure 7.28. The President has a shiny, bald head.


Use the Freehand Selection tool to create a selection around the bright area on the head.

12.

Select Adjust, Brightness and Contrast, Brightness/Contrast to adjust the glare. I adjusted both settings to 26 for this image.

Our president is now ready to be visited by his adoring public. As you can see in Figure 7.29, cutting down the glare has not only corrected the lighting, but has also helped the head blend even more completely into the mountain.

Figure 7.29. The new and improved Mount Rushmore.


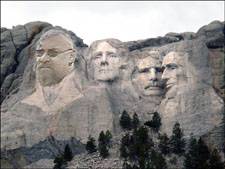
For even more fun with Mount Rushmore, try replacing the faces with those of your family pets.

Tip

This is another project where attention to detail can really up the realism. The Dodge Brush can lighten the highlights on the new president's cheeks and forehead. The Burn Brush can enhance the creases along the jawline, inside the ear, and around the nose to increase the chiseled appearance. The final result is subtle, but that's the idea (see the accompanying figure). If you go overboard, you'll find yourself toggling between the Burn Brush and Dodge Brush well beyond the point

Dodging and burning enhance the carved effect.


Corel Paint Shop Pro X Digital Darkroom
ISBN: 0672328607
EAN: 2147483647
Year: 2004
Pages: 109

flylib.com © 2008-2017.
If you may any questions please contact us: flylib@qtcs.net