| In the following sections, we discuss issues that are of interest to JSF programmers. We show you how to use Eclipse with JSF, how to reduce the drudgery of common implementation tasks, how to initialize your application, and how to package components into a reusable JAR file. How do I use JSF with Eclipse? You can use Eclipse to edit JSF pages and to compile the code for beans, converters, validators, and components. We assume that you are familiar with the basic operation of Eclipse and so we cover only the special configuration details for JSF programming. The principal issue is the installation of JSF and Ant libraries. It would be rather tedious to install the libraries separately for each project. Let us consider the JSF libraries first. The trick is to make a project that contains the libraries, and to use it as a base for all JSF projects. Here is how you set up the base project (which we will call jsflibs). Select File->New->Project from the menu and supply the project name, jsflibs.
In the "Java Build Settings" screen of the project wizard, click on the "Libraries" tab, then click on the "Add External JARs" button. Add the jsf-api.jar file from the jsf/lib directory.
Repeat to add the servlet-api.jar and jsp-api.jar files from tomcat/common/lib (see Figure 12-12).
Figure 12-12. Adding Libraries to the jsflibs Project 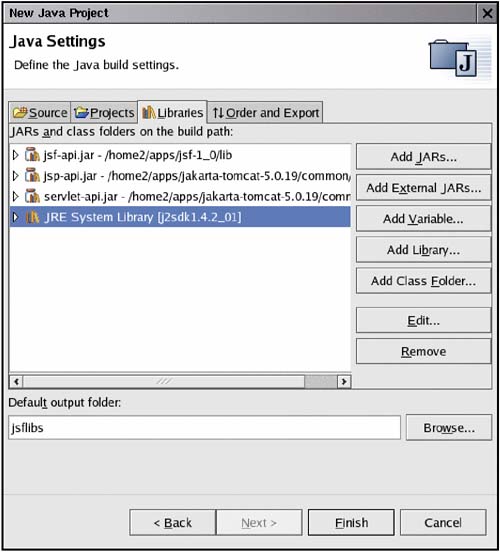
Click on the "Order and Export" button and check the three libraries that you just added (see Figure 12-13).
Figure 12-13. Exporting Libraries in the jsflibs Project 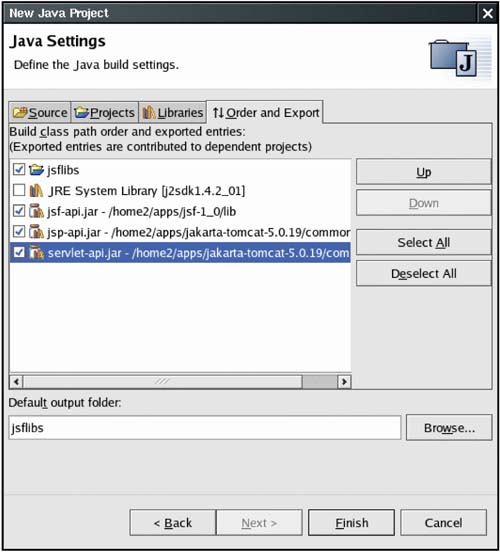
Click the "Finish" button.
Whenever you set up your JSF projects, start with the "New Java Project" wizard in the usual way. However, when you get the "Java Build Settings" screen, click on the "Projects" tab and check the jsflibs project (see Figure 12-14). Now all the required libraries are automatically included in your project. Figure 12-14. Including the jsflibs Project 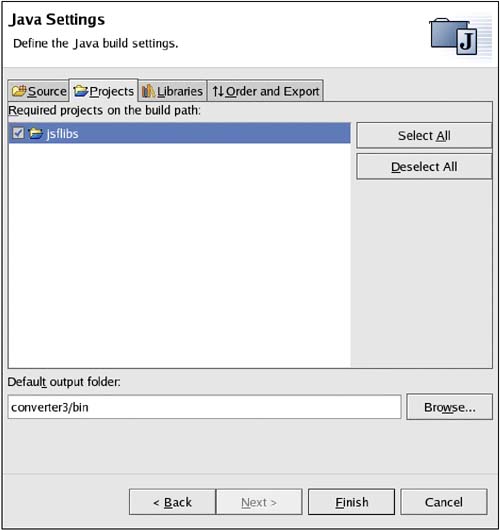
Now let us turn to the Ant setup. Our Ant script uses the catalina-ant and ant-contrib libraries. If you want to run Ant inside Eclipse, you need to add these libraries to the Ant configuration. Follow these steps. Select the Window -> Preferences menu option.
Select the Ant -> Runtime tree node.
Click on "Ant Home Entries" (see Figure 12-15).
Figure 12-15. Configuring Ant libraries 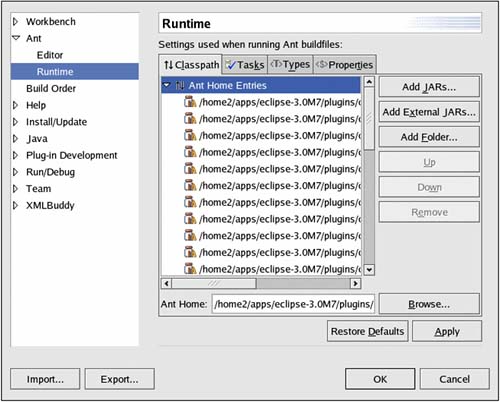
Then click on the "Add External JARs" button to add tomcat/server/lib/catalina-ant.jar.
Repeat to add the ant-contrib JAR file.
Click the "OK" button.
For easy invocation of Ant, the build.xml file must be included in the project directory. This differs from the setup of our sample applications for which we use a single build.xml file for all applications. If you like our setup, simply add the following build.xml file into each Eclipse project directory:
<project default="build.war"> <basename property="app" file="${basedir}"/> <property file="../build.properties"/> <property name="appdir" value="${basedir}"/> <import file="../build.xml"/> </project>
Or, if you prefer, copy the build.xml and build.properties files into each project. To run Ant, simply right-click on the build.xml file and select "Run Ant...". The Ant messages show up in the console. TIP  | We recommend that you install the XML Buddy plugin and make it the default editor for JSF pages. You can download the plugin from http://xmlbuddy.com.Of course, since XML Buddy is a real XML editor, it will frown upon <%...%> delimiters. We suggest that you use proper XML syntax see the note on page 15. |
How do I locate a configuration file? Some applications prefer to process their own configuration files rather than using faces-config.xml or web.xml. The challenge is to locate the file since you don't know where the web container stores the files of your web application. In fact, the web container need not physically store your files at all it can choose to read them out of the WAR file. Instead, use the getResourceAsStream method of the ExternalContext class. For example, suppose you want to read app.properties in the WEB-INF directory of your application. Here is the required code:
FacesContext context = FacesContext.getCurrentInstance(); ExternalContext external = context.getExternalContext(); InputStream in = external.getResourceAsStream("/WEB-INF/app.properties");
How do I get the form ID for generating document.forms[id] in JavaScript? Some components will need to generate JavaScript code to access the current form, either to submit it or to access fields contained in the form. The JSF API has no convenience method for finding the form ID. Use the following code:
UIComponent parent = component; while (!(parent instanceof UIForm)) parent = parent.getParent(); String formId = parent.getClientId(context);
(We supply this code in the getFormId method of the com.corejsf.util.Renderers class.) You can now render JavaScript commands like this:
String command = "document.forms['" + formId + "'].submit()";
How do I make a JavaScript function appear only once per page? Some components require substantial amounts of client-side JavaScript. If you have multiple instances of such a component in your page, you do not want to render multiple copies of the function. To suppress multiple copies of the same code, your renderer can get the request map (facesContext.getExternalContext().getRequestMap()) and put a value of Boolean.TRUE with a key that indicates the component type. Next time the renderer is called, it can retrieve the key to find out if it has run previously in the same request. How do I package a set of tags into a JAR file? If you designed components, validators, or converters that are reusable across multiple projects, you will want to package them into JAR files so that they can be added to the WEB-INF/lib directory of any web application. You will want to make the JAR file self-contained so that users don't have to worry about editing tag library descriptor or configuration files. Follow these steps: Place a TLD file into the META-INF directory. The TLD file should contain a uri element that users of your library can reference in their JSF pages.
Place a file named faces-config.xml into the META-INF directory that contains the required component, validator, and converter elements.
Place any resource bundles and configuration files together with your classes. Load them with ResourceBundle.getBundle or Class.getResourceAsStream.
Avoid name clashes by using an appropriate prefix for the global names, such as component names, message keys, or loggers, used by your implementation.
Let us look at an example: the corejsf-validator.jar file described on page 615. Figure 12-16 shows the directory structure. Listings 12-29 and 12-30 show the tag library descriptor and configuration files. Listing 12-29. commons-validator-lib/META-INF/validator.tld 1. <?xml version="1.0" encoding="ISO-8859-1" ?> 2. <!DOCTYPE taglib 3. PUBLIC "-//Sun Microsystems, Inc.//DTD JSP Tag Library 1.2//EN" 4. "http://java.sun.com/dtd/web-jsptaglibrary_1_2.dtd"> 5. <taglib> 6. <tlib-version>1.0</tlib-version> 7. <jsp-version>1.2</jsp-version> 8. <uri>http://corejsf.com/validator</uri> 9. <tag> 10. <name>commonsValidator</name> 11. <tag-class>com.corejsf.validator.CommonsValidatorTag</tag-class> 12. <attribute> 13. <name>type</name> 14. </attribute> 15. <attribute> 16. <name>min</name> 17. </attribute> 18. <attribute> 19. <name>max</name> 20. </attribute> 21. <attribute> 22. <name>minlength</name> 23. </attribute> 24. <attribute> 25. <name>maxlength</name> 26. </attribute> 27. <attribute> 28. <name>mask</name> 29. </attribute> 30. <attribute> 31. <name>datePatternStrict</name> 32. </attribute> 33. <attribute> 34. <name>message</name> 35. </attribute> 36. <attribute> 37. <name>arg</name> 38. </attribute> 39. <attribute> 40. <name>client</name> 41. </attribute> 42. <attribute> 43. <name>server</name> 44. </attribute> 45. </tag> 46. <tag> 47. <name>validatorScript</name> 48. <tag-class>com.corejsf.validator.ValidatorScriptTag</tag-class> 49. <attribute> 50. <name>functionName</name> 51. </attribute> 52. </tag> 53. </taglib>
Listing 12-30. commons-validator-lib/META-INF/faces-config.xml 1. <?xml version="1.0"?> 2. 3. <!DOCTYPE faces-config PUBLIC 4. "-//Sun Microsystems, Inc.//DTD JavaServer Faces Config 1.0//EN" 5. "http://java.sun.com/dtd/web-facesconfig_1_0.dtd"> 6. 7. <faces-config> 8. <validator> 9. <validator-id>com.corejsf.validator.CommonsValidator</validator-id> 10. <validator-class>com.corejsf.validator.CommonsValidator</validator-class> 11. </validator> 12. 13. <component> 14. <component-type>com.corejsf.validator.ValidatorScript</component-type> 15. <component-class>com.corejsf.validator.UIValidatorScript</component-class> 16. </component> 17. </faces-config>
Figure 12-16. Directory Structure of corejsf-validator.jar 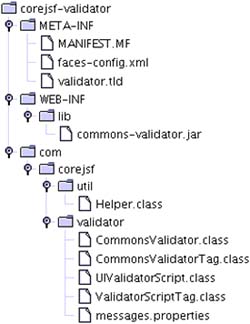
How do I carry out initialization or cleanup work? You have several choices, depending on the timing of your tasks. To manage application scope objects, attach a ServletContextListener. Implement the contextInitialized and contextDestroyed methods. Add the listener class to the web.xml file like this:
<listener> <listener-class>mypackage.MyListener</listener-class> </listener>
To manage session scope objects, attach an HttpSessionListener. Implement the sessionCreated and sessionDestroyed methods. Add the listener class to the web.xml file as in the preceding case. To manage request scope objects, attach a PhaseListener. (Phase listeners were discussed in Chapter 7.) You can initialize objects in the beforePhase method when the phase ID is APPLY_REQUEST_VALUES. You can clean up in the afterPhase method when the phase ID is RENDER_RESPONSE.
How do I extend the JSF expression language? You can supply your own variable resolver and property resolver for evaluating value binding expressions. The variable resolver determines the value of the first variable in an expression. For example, the standard variable resolver looks up managed beans and handles the predefined variables such as cookie or view. The property resolver takes an object and a property value and looks up the result. For example, if the getValue method of the standard property resolver is given the UIView object corresponding to the view variable and the string locale, the result is the return value of view.getLocale(). If you want to introduce your own variables, you supply your own variable resolver and install it in an application resource file. If you package your custom classes in a JAR file, place a faces-config.xml file into the META-INF directory. Include a variable-resolver element like this:
<application> <variable-resolver> com.corejsf.CustomVariableResolver </variable-resolver> ... </application>
Since you probably don't want to reimplement the existing lookup rules, you should use the decorator pattern for your own variable resolver. Apply your lookup rules and defer to the original resolver for all other cases. If you supply a constructor with a single parameter of type VariableResolver, then the JSF implementation passes you its default variable resolver. This makes it straightforward to use the decorator pattern. Here is an example of a variable resolver that recognizes the variable name sysprop:
public class CustomVariableResolver extends VariableResolver { private VariableResolver original; public CustomVariableResolver(VariableResolver original) { this.original = original; } public Object resolveVariable(FacesContext context, String name) { if (name.equals("sysprop")) return System.getProperties(); return original.resolveVariable(context, name); } }
Once you install this variable resolver, the expression #{sysprop['java.version']} yields the version of the virtual machine. Installing a property resolver is similar. You add a property-resolver element to the application configuration, like this:
<application> ... <property-resolver> com.corejsf.CustomPropertyResolver </property-resolver> </application>
The PropertyResolver class has eight abstract methods that look up and set indexed and named properties. As with variable resolvers, you will want to decorate the standard property resolver. The following example lets you look up components by their ID.
public class CustomPropertyResolver extends PropertyResolver { private PropertyResolver original; public CustomPropertyResolver(PropertyResolver original) { this.original = original; } public Class getType(Object base, int index) { return original.getType(base, index); } public Class getType(Object base, Object property) { if (base instanceof UIComponent && property instanceof String) { UIComponent c = ((UIComponent) base).findComponent((String) property); if (c != null) return c.getClass(); } return original.getType(base, property); } public Object getValue(Object base, int index) { return original.getValue(base, index); } public Object getValue(Object base, Object property) { if (base instanceof UIComponent && property instanceof String) { UIComponent c = ((UIComponent) base).findComponent((String) property); if (c != null) return c; } Object r = original.getValue(base, property); return r; } public boolean isReadOnly(Object base, int index) { return original.isReadOnly(base, index); } public boolean isReadOnly(Object base, Object property) { if (base instanceof UIComponent && property instanceof String) { UIComponent c = ((UIComponent) base).findComponent((String) property); if (c != null) return true; } return original.isReadOnly(base, property); } public void setValue(Object base, int index, Object value) { original.setValue(base, index, value); } public void setValue(Object base, Object property, Object value) { if (base instanceof UIComponent && property instanceof String) { UIComponent c = ((UIComponent) base).findComponent((String) property); if (c != null) return; } original.setValue(base, property, value); } }
Consider, for example, the expression
view.loginForm.password.value
It finds the component with ID loginForm inside the view root, then finds the component with ID password inside the form, and then calls its getValue method. How do I choose different render kits? You may want to render your pages with the default render kit for browser clients and with a custom render kit for other client technologies such as mobile devices. To switch between render kits based on the incoming request, install a custom view handler. Add a view-handler element to a JSF configuration file:
<application> <view-handler> com.corejsf.CustomViewHandler </view-handler> ... </application>
As in the preceding section, use the decorator pattern to extend the regular view handler. In the calculateRenderKit method, select the appropriate render kit, depending on the incoming request:
public class CustomViewHandler extends ViewHandler { private ViewHandler original; public CustomViewHandler(ViewHandler original) { this.original = original; } public String calculateRenderKitId(FacesContext context) { ExternalContext external = context.getExternalContext(); String userAgent = (String) external.getRequestHeaderMap().get("User-Agent"); if (...) return WIRELESS_KIT_ID; else return RenderKitFactory.HTML_BASIC_RENDER_KIT; } public Locale calculateLocale(FacesContext context) { return original.calculateLocale(context); } ... }
You specify the render kit IDs when you set up the render kits in a JSF configuration file, for example,
<render-kit> <render-kit-id>com.corejsf.WIRELESS_KIT</render-kit-id> <renderer>...</renderer> <renderer>...</renderer> ... </render-kit>
|