Securing CallManager Communications Using HTTPS
HTTPS secures communication between the browser on the client PC and a web server. It allows authentication of the web server (to ensure the client is not accessing an impersonating website) and protects communication between the client and the web server. All packets are signed to provide integrity, so that the receiver has a guarantee that the packets are authentic and have not been modified during transit. In addition, all packets are encrypted to provide privacy, so that sensitive information can be sent over untrusted networks. These Cisco CallManager applications support HTTPS:
- Cisco CallManager Administration
- Cisco CallManager Serviceability
- Cisco IP Phone User Options web pages
- Bulk Administration Tool (BAT)
- Tool for Auto-Registered Phones Support (TAPS)
- Cisco Call Detail Record (CDR) Analysis and Reporting (CAR)
- Trace Collection Tool
- Real-Time Monitoring Tool (RTMT)
When you are using HTTPS for browsing to Cisco CallManager Administration and user options web pages, communication is secure. A hacker who sniffs the communication will find it very difficult to re-create any information from the sniffed packets.
HTTPS secures not only the username and passwords in the communication, but also configuration changes in Cisco CallManager Administration and other applications, such as Cisco CallManager Serviceability. If a user configures parameters such as call forwarding or speed dials on the user options web pages, the client and IIS communicate in a secure way.
HTTPS Certificates
HTTPS uses certificates for web server authentication. Certificates provide information about a device and are signed by an issuer, the Certificate Authority (CA). By default, Cisco CallManager uses a self-signed certificate, but it also allows you to use a certificate issued by a company CA or even an external CA such as VeriSign. The file where the Cisco CallManager HTTPS certificate is stored is C:Program FilesCiscoCertificateshttpscert.cer.
Tip
A self-signed certificate provides the same functions as a certificate issued by a recognized CA. The only problem that occurs with a self-signed certificate is that client web browsers issue warning or caution messages the first time they access the secured website. For internal and intranet server use, this should not cause any major problems.
The certificate will be used on the IIS default website that hosts the Cisco CallManager virtual directories, which include the following:
- CCMAdmin and CCMUser
- CCMService
- Administration Serviceability Tool (AST)
- BAT and TAPS
- RTMTReports
- CCMTraceAnalysis
- PktCap
- Administrator Reporting Tool (ART)
- CCMServiceTraceCollectionTool
To use a certificate issued by a CA after a Cisco CallManager installation or upgrade, delete the self-signed certificate and install the CA signed certificate instead.
Note
For more information on how to obtain a certificate from an external CA, contact a vendor of Internet certificates such as VeriSign or consult with the administrator of your company CA (if using your own CA).
Accessing CallManager When Using Self-Signed Certificates
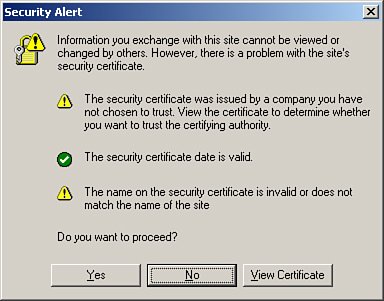
The first time that a user accesses Cisco CallManager Administration or other Cisco CallManager applications after the Cisco CallManager Release 4.1 installation or upgrade from a browser client, a Security Alert dialog box (shown in Figure 21-1) asks whether the user trusts the server. When the dialog box appears, clicking the buttons results in these actions:
- Yes Trust the certificate for the current web session only. The Security Alert dialog box will display each time you access the application.
- No Cancel the action. No authentication occurs, and the user cannot access the Cisco CallManager Administration pages.
- View Certificate Start certificate installation tasks, so that the certificate is always trusted. After you install the certificate, the Security Alert dialog box no longer appears when you access the Cisco CallManager Administration pages.
Figure 21-1. Self-Signed Certificate Security Alert
Click the View Certificate button. The Security Alert dialog box appears and the Certificate window opens, shown in Figure 21-2. The General tab shows brief information about the certificate, such as the issuer and the validation. For more detailed information, click the Details tab. Another way to get information about the certificate is to check the certificate directly on the Cisco CallManager. On the Cisco CallManager publisher, right-click the certificate name in C:Program FilesCiscoCertificateshttpscert.cer and choose Open. It is not possible to change any data in the certificate.
Figure 21-2. Viewing the SSL Certificate
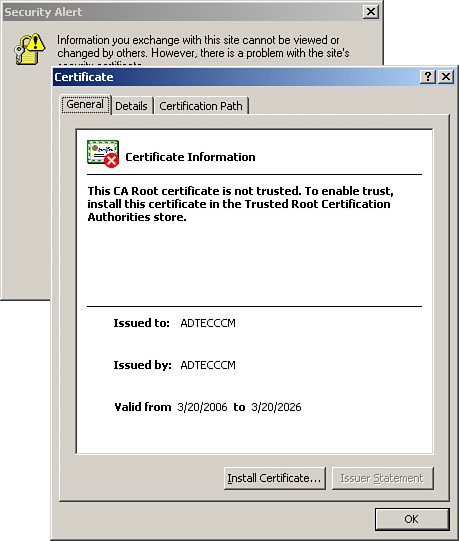
To keep from seeing the security warning each time you navigate to the Cisco CallManager server, click the Install Certificate button. By walking through the Microsoft Windows Certificate Import Wizard, you will import the CallManager self-signed certificate into your local certificate store. This keeps Microsoft Internet Explorer from prompting you with a security warning each time you access the CallManager Administration interface.
Part I: Cisco CallManager Fundamentals
Introduction to Cisco Unified Communications and Cisco Unified CallManager
Cisco Unified CallManager Clustering and Deployment Options
- Cisco Unified CallManager Clustering and Deployment Options
- The Two Sides of the Cisco Unified CallManager Cluster
- Cluster Redundancy Designs
- Call-Processing Deployment Models
- Summary
- Review Questions
Cisco Unified CallManager Installation and Upgrades
- Cisco Unified CallManager Installation and Upgrades
- Cisco Unified CallManager 4.x Clean Installation Process
- Upgrading Prior Cisco Unified CallManager Versions
- Summary
- Review Questions
Part II: IPT Devices and Users
Cisco IP Phones and Other User Devices
Configuring Cisco Unified CallManager to Support IP Phones
- Configuring Cisco Unified CallManager to Support IP Phones
- Configuring Intracluster IP Phone Communication
- IP Phone Configuration
- Case Study: Device Pool Design
- Summary
- Review Questions
Cisco IP Telephony Users
- Cisco IP Telephony Users
- Cisco CallManager User Database
- Cisco CallManager User Configuration
- User Logon and Device Configuration
- Summary
- Review Questions
Cisco Bulk Administration Tool
- Cisco Bulk Administration Tool
- The Cisco Bulk Administration Tool
- Using the Tool for Auto-Registered Phone Support
- Summary
- Review Questions
Part III: IPT Network Integration and Route Plan
Cisco Catalyst Switches
- Cisco Catalyst Switches
- Catalyst Switch Role in IP Telephony
- Powering the Cisco IP Phone
- Data and Voice VLANs
- Configuring Class of Service
- Summary
- Review Questions
Configuring Cisco Gateways and Trunks
- Configuring Cisco Gateways and Trunks
- Cisco Gateway Concepts
- Configuring Access Gateways
- Cisco Trunk Concepts
- Configuring Intercluster Trunks
- SIP and Cisco CallManager
- Summary
- Review Questions
Cisco Unified CallManager Route Plan Basics
- Cisco Unified CallManager Route Plan Basics
- External Call Routing
- Route Plan Configuration Process
- Summary
- Review Questions
Cisco Unified CallManager Advanced Route Plans
- Cisco Unified CallManager Advanced Route Plans
- Route Filters
- Discard Digit Instructions
- Transformation Masks
- Translation Patterns
- Route Plan Report
- Summary
- Review Questions
Configuring Hunt Groups and Call Coverage
- Configuring Hunt Groups and Call Coverage
- Call Distribution Components
- Configuring Line Groups, Hunt Lists, and Hunt Pilots
- Summary
- Review Questions
Implementing Telephony Call Restrictions and Control
- Implementing Telephony Call Restrictions and Control
- Class of Service Overview
- Partitions and Calling Search Spaces Overview
- Time-of-Day Routing Overview
- Configuring Time-of-Day Routing
- Time-of-Day Routing Usage Scenario
- Summary
- Review Questions
Implementing Multiple-Site Deployments
- Implementing Multiple-Site Deployments
- Call Admission Control
- Survivable Remote Site Telephony
- Summary
- Review Questions
Part IV: VoIP Features
Media Resources
- Media Resources
- Introduction to Media Resources
- Conference Bridge Resources
- Media Termination Point Resources
- Annunciator Resources
- Transcoder Resources
- Music on Hold Resources
- Media Resource Management
- Summary
- Review Questions
Configuring User Features, Part 1
- Configuring User Features, Part 1
- Basic IP Phone Features
- Softkey Templates
- Enhanced IP Phone Features
- Barge and Privacy
- IP Phone Services
- Summary
- Review Questions
Configuring User Features, Part 2
- Configuring User Features, Part 2
- Cisco CallManager Extension Mobility
- Client Matter Codes and Forced Authentication Codes
- Call Display Restrictions
- Malicious Call Identification
- Multilevel Precedence and Preemption
- Summary
- Review Questions
Configuring Cisco Unified CallManager Attendant Console
- Configuring Cisco Unified CallManager Attendant Console
- Introduction to Cisco CallManager Attendant Console
- Call Routing and Call Queuing
- Server and Administration Configuration
- Cisco Attendant Console Features
- Summary
- Review Questions
Configuring Cisco IP Manager Assistant
- Configuring Cisco IP Manager Assistant
- Cisco IP Manager Assistant Overview
- Cisco IP Manager Assistant Architecture
- Configuring Cisco IPMA for Shared-Line Support
- Summary
- Review Questions
Part V: IPT Security
Securing the Windows Operating System
- Securing the Windows Operating System
- Threats Targeting the Operating System
- Security and Hot Fix Policy
- Operating System Hardening
- Antivirus Protection
- Cisco Security Agent
- Administrator Password Policy
- Common Windows Exploits
- Security Taboos
- Summary
- Review Questions
Securing Cisco Unified CallManager Administration
- Securing Cisco Unified CallManager Administration
- Threats Targeting Remote Administration
- Securing CallManager Communications Using HTTPS
- Multilevel Administration
- Summary
- Review Questions
Preventing Toll Fraud
- Preventing Toll Fraud
- Toll Fraud Exploits
- Preventing Call Forward and Voice-Mail Toll Fraud Using Calling Search Spaces
- Blocking Commonly Exploited Area Codes
- Using Time-of-Day Routing
- Using FAC and CMC
- Restricting External Transfers
- Dropping Conference Calls
- Summary
- Review Questions
Hardening the IP Phone
Understanding Cryptographic Fundamentals
- Understanding Cryptographic Fundamentals
- What Is Cryptography?
- Symmetric Encryption
- Asymmetric Encryption
- Hash Functions
- Digital Signatures
- Summary
- Review Questions
Understanding the Public Key Infrastructure
- Understanding the Public Key Infrastructure
- The Need for a PKI
- PKI as a Trusted Third-Party Protocol
- PKI Entities
- PKI Enrollment
- PKI Revocation and Key Storage
- PKI Example
- Summary
- Review Questions
Understanding Cisco IP Telephony Authentication and Encryption Fundamentals
- Understanding Cisco IP Telephony Authentication and Encryption Fundamentals
- Threats Targeting the IP Telephony System
- How CallManager Protects Against Threats
- PKI Topologies in Cisco IP Telephony
- PKI Enrollment in Cisco IP Telephony
- Keys and Certificate Storage in Cisco IP Telephony
- Authentication and Integrity
- Encryption
- Summary
- Review Questions
Configuring Cisco IP Telephony Authentication and Encryption
- Configuring Cisco IP Telephony Authentication and Encryption
- Authentication and Encryption Configuration Overview
- Enabling Services Required for Security
- Using the CTL Client
- Working with Locally Significant Certificates
- Configuring the Device Security Mode
- Negotiating Device Security Mode
- Generating a CAPF Report
- Summary
- Review Questions
Part VI: IP Video
Introducing IP Video Telephony
- Introducing IP Video Telephony
- IP Video Telephony Solution Components
- Video Call Concepts
- Video Protocols Supported in Cisco CallManager
- Bandwidth Management
- Call Admission Control Within a Cluster
- Call Admission Control Between Clusters
- Summary
- Review Questions
Configuring Cisco VT Advantage
- Configuring Cisco VT Advantage
- Cisco VT Advantage Overview
- How Calls Work with Cisco VT Advantage
- Configuring Cisco CallManager for Video
- Configuring Cisco IP Phones for Cisco VT Advantage
- Installing Cisco VT Advantage on a Client
- Summary
- Review Questions
Part VII: IPT Management
Introducing Database Tools and Cisco Unified CallManager Serviceability
- Introducing Database Tools and Cisco Unified CallManager Serviceability
- Database Management Tools
- Cisco CallManager Serviceability Overview
- Tools Overview
- Summary
- Review Questions
Monitoring Performance
- Monitoring Performance
- Performance Counters
- Microsoft Event Viewer
- Microsoft Performance Monitor
- Real-Time Monitoring Tool Overview
- Summary
- Review Questions
Configuring Alarms and Traces
- Configuring Alarms and Traces
- Alarm Overview
- Alarm Configuration
- Trace Configuration
- Trace Analysis
- Trace Collection
- Bulk Trace Analysis
- Additional Trace Tools
- Summary
- Review Questions
Configuring CAR
- Configuring CAR
- CAR Overview
- CAR Configuration
- Report Scheduling
- System Database Configuration
- User Report Configuration
- Summary
- Review Questions
Using Additional Management and Monitoring Tools
- Using Additional Management and Monitoring Tools
- Remote Management Tools
- Dependency Records
- Password Changer Tool
- Cisco Dialed Number Analyzer
- Quality Report Tool
- Summary
- Review Questions
Part VIII: Appendix
Appendix A. Answers to Review Questions
Index
EAN: 2147483647
Pages: 329
