A Useful Effects Palette
| There's an old joke among effects artists working in After Effects that virtually any visual effect can be accomplished with just two effects: Levels and Fast Blur. This is, of course, a major exaggeration (I would want at least half a dozen!), but it makes a couple of important points about After Effects and its users:
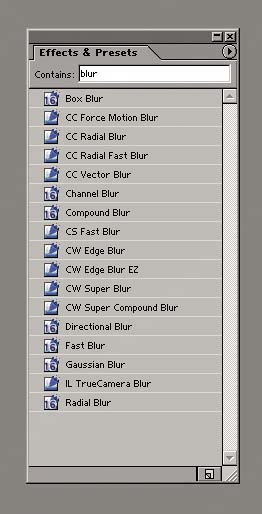
Meanwhile, there's a big problem with the Effect menu and the Effects & Presets palette: the categories. They're ancient, often nonintuitive, and each category contains a mishmash of constantly used and rarely to never used effects. The Adjust menu has Levels, the single most-used effect in the program, right above Photo Filter, a Photoshop rip-off better suited to still images. You can colorize footage with Hue/Saturation (from that same category) or with Tint, Change to Color, or Colorama from the Image Control menu. Luckily, there are alternatives. For one thing, you don't ever have to use the Effect menu. The Effects & Presets palette has options for displaying effects without their categories (Figure 1.33). Once you know what you're looking for, listing effects in alphabetical order and searching for them in the palette's text field can speed things along a bit. You then apply the selected effect by double-clicking it (if the target layer is selected) or by dragging it to the target layer in the Timeline window (or to its Effect Controls window). Figure 1.33. Wondering how many different blur options you have available? Type blur in the Contains field and find out. It may not be this many, as some here are from third-parties. This display is in Alphabetical mode (chosen from the wing menu, top right).
Types of EffectsYou may have noticed those little icons that appear next to the effect names in the Effects & Presets palette. There are four main types: 8- and 16-bit effects, Animation Presets, and Audio. You may not be working at 16-bit depth yet, but it is worth noting which effects are 16-bit ready; for the most part, those are the core After Effects plug-ins, the ones you'll consider using first and most often. Note that these effects are capable of supporting 16 bits, but they don't require that you work at that setting. Chapter 12 contains more about the difference between 8- and 16-bit depths and how to work with them.
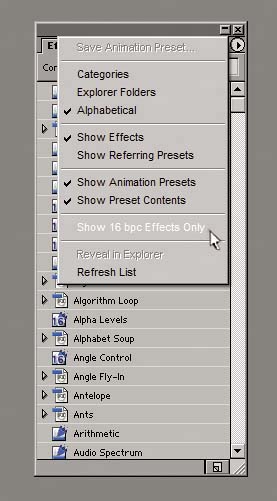
Using the wing menu you can specify which type of effect you want to see (Figure 1.34). For example, you can show only 16-bit effects, or you can see the contents of an Animation Preset (what it actually does, step by step). Beware if you set this option, however, because you may find yourself looking for an effect that is unexpectedly missing from the palette. Figure 1.34. The Effects & Presets wing menu includes options for sorting effects alphabetically, for showing or hiding presets and their contents, and for showing only 16-bit-per-channel effects, highlighted here.
Animation PresetsFormerly known as Effects Favorites, Animation Presets are particularly useful when you're working with a team and sharing standardized practices. You can recognize an Animation Preset in your system by its .ffx file suffix. In the Effect Controls window or the timeline, select whatever effects and properties you want to save and choose Animation > Save Animation Preset. You can save the preset wherever you like, but for it to show up in the Effects & Presets palette automatically, save it to the Presets folder (the default choice for After Effects). In a studio situation, you can roll a preset out to a number of users by placing it in this folder for them. The next time they restart After Effects or update the palette (using the Refresh List command in the wing menu), the preset appears, ready for use. Other Effects TipsThe wing menu of the Effect Controls window contains two options that interfere with a clean and consistent UI, so I turn them off (by default they are on). Auto Resize messes up the effort made by setting workspaces, making the effects window an arbitrary length, and Show Animation Presets leaves an extra little pull-down menu at the top of each effect instance that, frankly, rarely gets used.
There are a few different ways to adjust individual effects settings, depending on the type of setting. For the majority of them, which include a blue numerical setting, you can click and drag directly on the number, dragging left or right to decrease or increase it, respectively. And there are even the following refinements:
These same shortcuts work in the timeline as well, where applied effects can be revealed by highlighting a layer and pressing E on the keyboard. (More on optimal usage of the timeline follows in the next chapter.)
|
EAN: 2147483647
Pages: 156