Elegant UI Usage
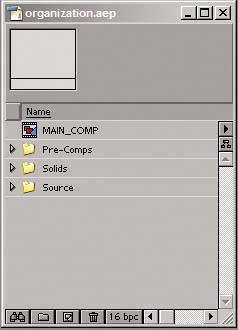
| There are many different ways to use After Effects, and typically there is more than one way to solve even the simplest visual effects problem. Nevertheless, not all approaches are created equal. Here, then, are some overall tips and opinions as to how to work quickly and effortlessly in After Effects. Setting up the UI properly, as you just did, is a good start, but now you need to look at specific interactions that come up all of the time. Project Window OrganizationThere are many compelling reasons for keeping a well-organized Project window, and they sound a lot like the reasons for keeping a well-organized hard drive. You create individual folders for individual types of items and organize them hierarchically. Why bother?
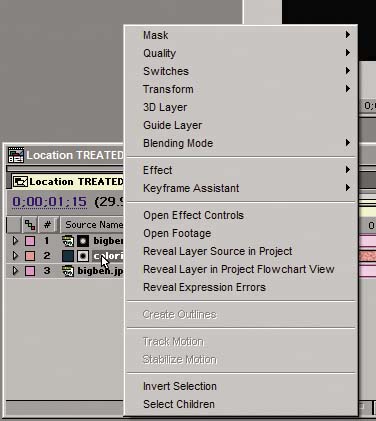
Context-Clicking (and Keyboard Shortcuts)Throughout this book you will see references to context-clicking on interface items. I would call it right-clicking, but, even at this late date, the Mac does not ship with a multi-button mouse (although every Mac-based artist I know has one). Therefore, on the Mac, to get the same effect without a right mouse button, you must hold down the Control key while clicking. After Effects does not let you take your hands off the mouse very often; many important operations are not possible with keyboard shortcuts alone. Although I highly advocate learning and using keyboard shortcuts wherever possible, and offer effective keyboard shortcuts throughout the book, I advocate context-clicking just as strongly because it is such a good fit with an interface that has the mouse always in your hand, engaged in the process. Between keyboard shortcuts and context menus, I practically never visit the menu bar in After Effects. The amount of mouse dragging and clicking I've saved might not stretch from my studio to the moon, but if I lost this workflow, I would be much less happy. I actively encourage you to choose context clicking and shortcuts over the menu bar whenever possible. There are dozens of context menus available, too many to discuss in detail without boring the pants off of you. Figure 1.13 displays a couple of the menus I use all of the time in the Project and Timeline windows. Figure 1.13. Context menus are everywhere and very effective. Context-click the tab of your Timeline window, and you will see very different selections than if you context-click a layer in that window. And depending on whether that layer is a camera, a solid, or footage, you will see different options, as well.
Keeping Sources LinkedIf you've been using After Effects for any amount of time, you understand that it is a nondestructive application that edits pointers to source files but has no way of editing those files directly. Therefore, it's very rare that any After Effects project is an island unto itself on your hard drive or server; to operate properly it also requires the presence of source footage files. It's all very well to keep a well organized project, but what if you have a constant problem with source footage files becoming unlinked? This problem arises particularly when you move a project from one location on your drive to another, to another drive, or to another computer or server altogether. Should a footage item become unlinked and you know where the source is located, or you can search for it on your drive, the solution is simple: Just choose your favorite method to bring up the Replace Footage File dialog:
In the Replace Footage File dialog, navigate to and choose the missing footage item (Figure 1.14). Figure 1.14. Missing footage appears with small color bar icons. In the File Path column, After Effects also displays the path where the file was expected to be, which can help when searching on your drive or network for a missing, unlinked file.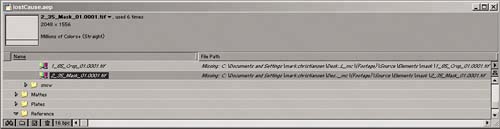 If you receive a warning on opening a project that a file or files are missing, but you don't know which ones (sometimes a project is too big or complex to spot them easily), try clicking on the little binoculars icon at the bottom of your Project window (Figure 1.15). Leave the text field blank and check the Find Missing Footage box; After Effects will search through your project for items that have become unlinked. If you have more than one, repeat this process and After Effects will search for each missing item in turn. It's not sophisticated, but it works. If you want to search for a specific file instead, simply clear the check box and type the filename in the text field. Figure 1.15. Click the binoculars icon at the lower left of the Project window and then check Find Missing Footage, entering nothing in the Find field. After Effects will look for unlinked files in your project.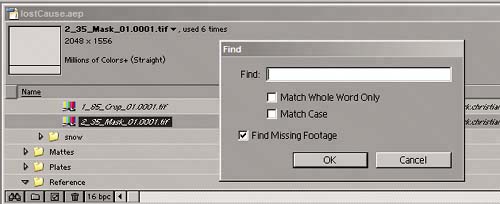 If all of your source files are missing, there is probably a better option than relinking each item individually. If all of the files are contained in one source folder (or one of only a few), after you link the first missing file After Effects may surprise you with the message that it has found and relinked others: The program automatically searches for other missing items in folders to which you relink. (For advice on guarding against the need to relink, see the section "Collect Files.") If for some reason a file refuses to relink (the item you are attempting to select is gray and cannot be highlighted in the dialog), After Effects is somehow not recognizing that footage as the format that it should be. There are a few potential reasons for this, but the most common is simply moving a project from Mac to Windows, or vice versa. The most common solution is to add a missing three-character extension to the file (for example, .jpg for a JPEG file). Note that this problem is not limited to Windows; when the headers are stripped from a file by transferring it via FTP or e-mail, OS X will fail to recognize it until the extension is restored. Get in the habit of always naming files with these extensions; unfortunately, some applications (such as Apple's Final Cut Pro) do not actively support this practice. If the file still won't relink even with the proper extension, it may have become corrupted or it may be one of the file types that does not work equally well on Mac and Windows. For example, Mac PICT files don't work well on Windows. To avoid this, use formats that are universally understood on all platforms: TIFF, TGA, PNG, or JPEG. (For more on choosing formats, see the section "Footage and Composition Settings.") Collect FilesOf course, a better approach is to avoid having to relink files at all, and you do have some elegant options for preparing After Effects projects and their source files to be moved or backed up. The old-fashioned way was to place the After Effects project in a master directory and all of its source files in subdirectories because this is how the program automatically searches for linked files (using relative, rather than absolute files paths). If you don't want to organize your files this way, however, consider the Collect Files alternative, which does this for you automatically. Located in the File menu, the Collect Files command was originally designed to support the Watch Folder command, which enables you to render an After Effects project on several machines (see Chapter 4). If you leave all the default settings for Collect Files and click the Collect button, you can select the location for creating a new folder that contains a copy of the project and all of its source files (Figure 1.16). Figure 1.16. The Collect Files dialog includes several options. It's useful to select the final rendering composition prior to activating Collect Files if the project is completethat way you don't collect files you don't need. In the lower left is a summary of what will be collected, what is missing, and how many effects are employed.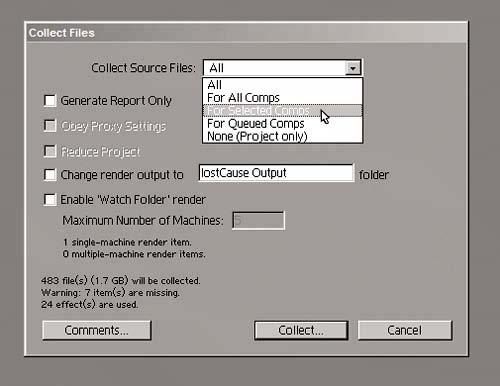 This is incredibly useful for transporting or archiving After Effects projects and their source files, a "no file left behind" policy for your workflow. To streamline even further, you can reduce your project down to only the files that are used in existing compositions. Instead of leaving Collect Source Files set to All, choose a subset of filesonly those used in comps in this project or in comps in the Render Queue, for example. Or you can select a composition prior to choosing Collect Files and reduce the project to only the files used in that one composition. Reduce ProjectReduce Project is available as a command under the File menu, in addition to being part of the Collect Files process, so you can engage its services at any time to clean up a project. With a composition selected, choose Reduce Project; After Effects removes all of the source files in the project that are not used in that comp (Figure 1.17). After Effects even lets you know (in a dialog box) how many files it removed and reminds you of the ability to undo this process. Figure 1.17. Do not be alarmed. After Effects is only reminding you that Reduce Project will delete items from the project. Click OK and then double-check to make sure you really had the comp you wanted selected.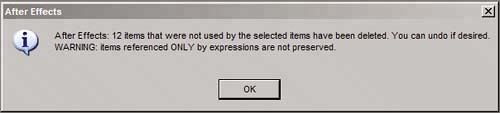
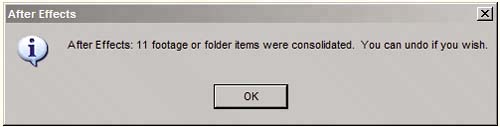
But wait, that's not all. Just above Reduce Project in the File menu are a couple of other highly useful tools for cleaning up your project: Consolidate All Footage and Remove Unused Footage. Consolidate All Footage looks for two or more instances of the same source file and combines them, choosing the first instance, top to bottom, in the Project window to replace all other instances (Figure 1.18). Remove Unused Footage does exactly as it says, ridding your project of all footage that is not included in any composition. Figure 1.18. A similar warning appears when you choose File > Consolidate Footage, which looks for duplicate instances of the same source file in the project and chooses the first of these from top to bottom to represent all instances.
Alas, Consolidate All Footage does not eliminate solids clutterthe presence of several identical solids in the Solids folder of your project. After Effects assumes that you are keeping each instance unique so as not to inadvertently edit them all by changing one (despite also offering a check box in the Solid Footage Settings dialog to Affect All Layers that Use This Solid). |

EAN: 2147483647
Pages: 156