The Role of Grain
Literally beyond lens effects stands another attribute of images shot with a real camera: grain. Grain is essentially high-frequency noise that can be found in each channel of most footage, to varying degrees. Far from being a mere annoyance or problem, grain can be your friend, given its due.
Grain adds texture and life to images and can help to conceal a multitude of small details, enabling compositors to get away with all kinds of stuff (in particular, adding life to a still image source in a moving image composition). Just like depth of field and motion blur, moderate amounts of grain are part of the key to a cinematic look.
Notes
The day may come when digital cameras can deliver moving footage with no grain whatsoever. Already, high-definition video cameras used to shoot movies pick up clearer detail than film cameras, all other things being equal, and all digital movies that use no footage, such as those by Pixar, also do not employ grain.
For compositors, perhaps the most important role of grain is its role integrating a flat, static layer with moving footage, adding life to an element that otherwise looks oddly suspended out of the time and place of the rest of the scene (Figure 9.27).
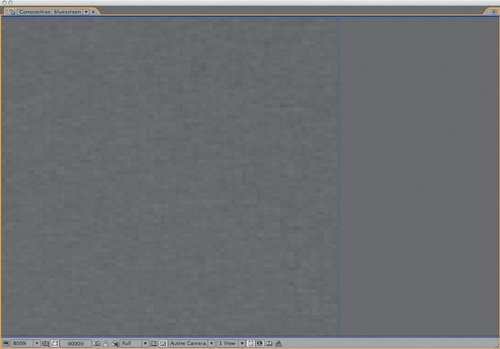
Figure 9.27. Solid areas of color without fine detail such as this section of blue screen (zoomed to 800%, blue channel displayed) are the best to sample and evaluate grain. At right of frame is a color-matched solid that evidently fails to blend with the background.
Proper grain is not simply switched on or off, however; it needs to be carefully adjusted. You can become quite theoretical about all this, but really you need to concern yourself with only two basic factors:
- Size of the grain, per channel
- Amount of grain, or amount of contrast in the grain, per channel
The emphasis here is that these factors typically vary from channel to channel. Blue is almost universally the channel likeliest to have the most noise; happily the human eye is less sensitive to blue than red or green, but this can be bad news for blue-screen shoots.
Notes
Excessive grain is often triggered by a low amount of scene light combined with a low-quality image-gathering medium, such as miniDV, whose CCD has poor light-gathering abilities.
How much grain is enough? As with color in Chapter 5, "Color and Light: Adjusting and Matching," the goal is typically to match what's there already. If your shot has a background plate with the proper amount of grain in it, you match your foreground elements to that. In the case of a fully computer-generated scene, you might have to match surrounding shots that have plate reference, which you would match in the same manner.
Grain Management Strategies
After Effects Professional includes a suite of three tools for automated grain sampling, grain reduction, and grain generation: Add Grain, Match Grain, and Remove Grain. Add Grain you adjust entirely manually, but Match Grain and Remove Grain sample a noise source layer to give you an initial result that you can then adjust.
If you've been reading closely up to this point, you know I'm not a fan of using the automated solutions. Not so in this case. The Match Grain effect does not seem to be appreciably slower due to grain sampling than Add Grain, which does not perform any sampling and includes all of the same controls. Therefore, I recommend you see what Match Grain can come up with as a starting point, and then work from there. In either case, the steps are the same:
|
1. |
Look for a section of your source footage that contains a solid color area and little or no motion for 10 to 20 frames. Most clips include an area satisfying these criteria, and those that don't tend to let you get away with less precision anyhow. |
|
2. |
Zoom to 200% to 400% on the solid color area, and create a Region of Interest around it. Set the Work Area to the 10 or 20 frames with little or no motion. |
|
3. |
Add a solid that is small enough to occupy part of the Region of Interest. Apply a Ramp effect to the solid, and use the eyedropper tools to select the darkest and lightest pixels in the solid color area of the clip. The lack of grain detail in the foreground gradient should be clearly apparent (Figure 9.28). Figure 9.28. Insert a small solid and add a Ramp effect, then use the eyedropper tools in Ramp to sample the brightest and darkest areas of the background. This offers a clear evaluation of a grain match once Match Grain or Add Grain is applied. 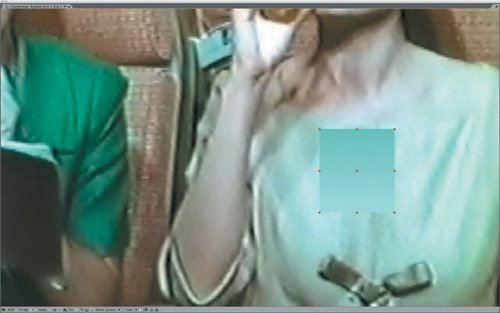
|
|
4. |
Apply the Match Grain effect to the foreground solid. Choose the source footage layer in the Noise Source Layer pull-down. As soon as the effect finishes rendering a sample frame, you have a basis from which to begin fine-tuning. You can RAM Preview at this point to see how close a match you have. In most cases, you're not done yet. |
|
5. |
Twirl down the Tweaking controls for Match Grain, and then twirl down Channel Intensities and Channel Size. You can save yourself a lot of time by doing most of your work here, channel by channel. |
|
6. |
Activate the red channel only in the Composition window (Alt+1/Option+1) and adjust the Red Intensity and Red Size values to match the foreground and background (Figure 9.29). Repeat this process for the green and blue channels (Alt+2/Option+2 and Alt+3/Option+3). RAM Preview the result. Figure 9.29. As with color matching, grain matching is best performed channel by channel. Match Grain is the best type of automated plug-in because it is really only semi-automated, enabling you to control and improve upon the initial result easily. 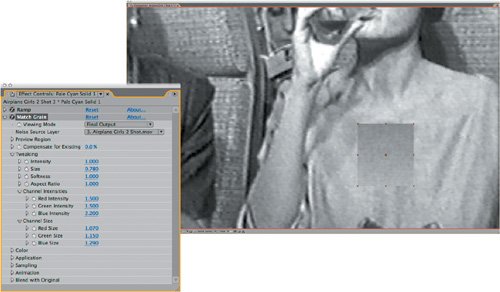
|
|
7. |
Adjust Intensity, Size, or Softness controls under Tweaking according to what you see in the RAM Preview. You may also find it necessary to reduce Saturation under Color, particularly if your source is film rather than video. |
Close-Up: Using Noise to Add Grain
Prior to the addition of Add Grain and Match Grain to version 6.5 Professional, the typical way to generate grain was to use the Noise effect. The main advantage of the Noise effect over Match Grain is that it renders about 20x faster. However, After Effects doesn't make it easy for you to separate the effect channel by channel, and scaling it requires a separate effect (or precomposing).
You can employ three solid layers, with three effects applied to each layer: Shift Channels, Noise, and Transform. You use Shift Channels to set each solid to red, green, or blue, respectively, set Blending Modes to Add, and set their Opacity very low (well below 10%, adjusting as needed). Next, set the amount of noise and scale it via the Transform effect.
If the grain is meant to affect a set of foreground layers only, hold them out from the background plate either via precomposing or track mattes. If this sounds complicated, it is, which is why Match Grain is preferable unless the rendering time is going to kill you.
In most cases, these steps yield a workable result; the example project (09_grainMatch.aep, located on the disc) used for these figures is included on your disc. The effect can then be copied and pasted to any foreground layers that need grain. If the foreground layer already contains noise or grain, you may need to adjust the Compensate for Existing Noise percentage for that layer.
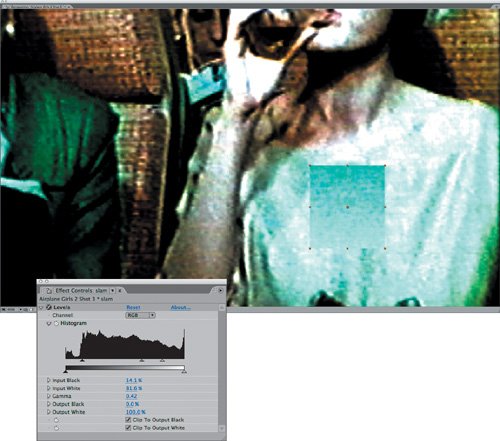
Obviously, whole categories of controls are untouched with this method (Figure 9.30); the Application category, for example, contains controls for how the grain is blended and how it affects shadows, midtones, and highlights individually. Typically these are overkill, as are the Sampling and Animation controls, but how far you go in matching grain before your eye is satisfied is, of course, up to you and your team. This is one more case in which slamming the result can help ascertain its effectiveness (Figure 9.31).
Figure 9.30. Highlighted are the essential controls in Match Grain, which contains a lot of properties. It is best to procede top to bottom through these, first adjusting overall Intensity, Size, and Softness, then refining the individual Channel Intensities and Channel Size (as in Figure 9.28).
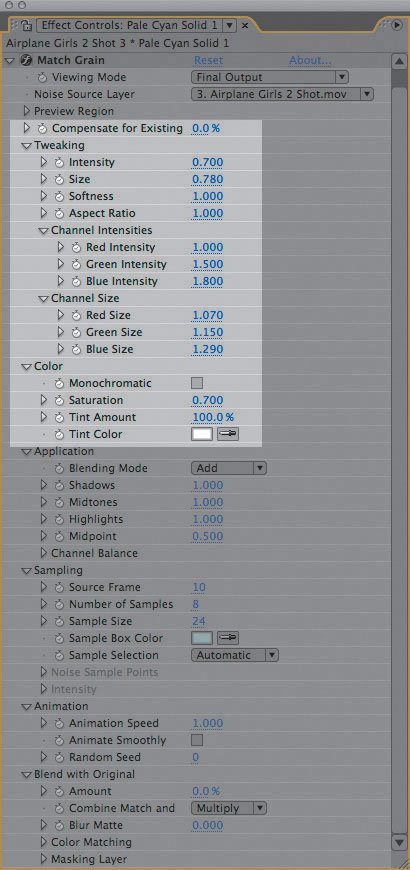
Figure 9.31. Slamming the resultwith an adjustment layer containing a Levels effect, in this case with Gamma and Input levels adjustedreveals the effectiveness of the match (and the full gnarliness of the grain).
Grain Removal
Removing grain, or sharpening an image in general, is an entirely different process from adding grain. On a well-shot production, you'll rarely have a reason to reach for the Remove Grain tool.
If you do, the reason for doing so may be unique to your particular footage. In such cases, you may very well find that Remove Grain at the default settings gives you a satisfactory result. If not, check into the Fine Tuning and Unsharp Mask settings to adjust it.
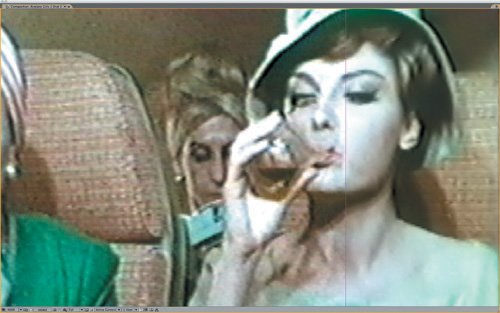
Remove Grain is often best employed "behind the scenes"not across the entire frame (Figure 9.32), or intermediately in combination with other effects.
Figure 9.32. It may suit a still figure in a book (applied at the right side of this image), but Remove Grain on an entire shot with the default settings is rarely desirable. In full motion the grain-reduced shot looks a bit strange and retains a certain soft lumpiness.
Tip
If you're using Remove Grain to improve the likelihood of a clean blue-screen or green-screen key, apply the resulting matte back to your source footage as an alpha track matte. This offers the best of both worlds: a clean matte channel and realistic grain on the source color layer.
When to Employ Grain Strategies
The most obvious candidates for grain addition are computer-generated or still image layers, because they lack any of the moving grain found in film or video footage. As soon as your shot has to match anything that came from a camera, and particularly in a large format such as HD or film, you must manage grain.
Blurred elements may also need grain addition, even if they employ matching source footage. Blurry source shots contain as much grain as focused ones because the grain is an artifact of the medium recording the image, not the subject itself. Elements that have been scaled down in After Effects contain scaled-down grain, which may require restoration. Color keying can also suppress grain in the channel that has been keyed out.
Notes
Chapter 10, "Expressions," offers a unique and highly effective strategy for removing extreme amounts of grain from a locked-off shot.
Other compositing operations will instead enhance grain. Sharpening, unless performed via Remove Grain, can strongly emphasize grain contrast in an element, typically in a not-so-desirable manner. Sharpening also brings out any nasty compression artifacts that come with footage that uses JPEG-type compression, such as miniDV video.
Lack of grain, however, is one of the big dead giveaways of a poorly composited shot. It is worth the effort to match the correct amount of grain into your shot even if the result isn't apparent as you preview it on your monitor.
Film and Video Looks |
Section I. Working Foundations
The 7.0 Workflow
- The 7.0 Workflow
- Workspaces and Panels
- Making the Most of the UI
- Settings: Project, Footage, Composition
- Previews and OpenGL
- Effects & Presets
- Output: The Render Queue
- Study a Shot like an Effects Artist
The Timeline
- The Timeline
- Organization
- Animation Methods
- Keyframes and The Graph Editor
- Uber-mastery
- Transform Offsets
- Motion Blur
- Manipulating Time Itself
- In Conclusion
Selections: The Key to Compositing
- Selections: The Key to Compositing
- The Many Ways to Create Selections
- Compositing: Science and Nature
- Alpha Channels and Premultiplication
- Masks
- Combining Multiple Masks
- Putting Masks in Motion
- Blending Modes: The Real Deal
- Track Mattes
Optimizing Your Projects
- Optimizing Your Projects
- Navigating Multiple Compositions
- Precomposing and Nesting
- Adjustment and Guide Layers
- Understanding Rendering Order
- Optimizing After Effects
- Onward to Effects
Section II. Effects Compositing Essentials
Color Correction
Color Keying
- Color Keying
- Good Habits and Best Practices
- Linear Keyers and Hi-Con Mattes
- Blue-Screen and Green-Screen Keying
- Understanding and Optimizing Keylight
- Fixing Typical Problems
- Conclusion
Rotoscoping and Paint
- Rotoscoping and Paint
- Articulated Mattes
- Working Around Limitations
- Morphing
- Paint and Cloning
- Conclusion
Effective Motion Tracking
- Effective Motion Tracking
- The Essentials
- Optimizing Tracking Using 3D
- Extending a Track with Expressions
- Tracking for Rotoscoping
- Using 3D Tracking Data
- Conclusion
Virtual Cinematography
- Virtual Cinematography
- 5D: Pick Up the Camera
- Storytelling and the Camera
- Camera Blur
- The Role of Grain
- Film and Video Looks
- Conclusion
Expressions
- Expressions
- Logic and Grammar
- Muting Keyframes
- Linking Animation Data
- Looping Animations
- Smoothing and Destabilizing
- Offsetting Layers and Time
- Conditionals and Triggers
- Tell Me More
Film, HDR, and 32 Bit Compositing
- Film, HDR, and 32 Bit Compositing
- Details
- Film 101
- Dynamic Range
- Cineon Log Space
- Video Gamma Space
- Battle of the Color Spaces
- Floating Point
- 32 Bits per Channel
- Conclusion
Section III. Creative Explorations
Working with Light
- Working with Light
- Light Source and Direction
- Creating a Look with Color
- Backlighting, Flares, Light Volume
- Shadows and Reflected Light
- HDR Lighting
- Conclusion
Climate: Air, Water, Smoke, Clouds
- Climate: Air, Water, Smoke, Clouds
- Particulate Matter
- Sky Replacement
- The Fog, Smoke, or Mist Rolls In
- Billowing Smoke
- Wind
- Water
- Conclusion
Pyrotechnics: Fire, Explosions, Energy Phenomena
- Pyrotechnics: Fire, Explosions, Energy Phenomena
- Firearms
- Sci-Fi Weaponry
- Heat Distortion
- Fire
- Explosions
- In a Blaze of Glory
Learning to See
Index
EAN: 2147483647
Pages: 157
