Deploying Intrusion Prevention on the ASA/PIX Using ASDM, you can perform three operations on the ASA/PIX Security Appliance associated with IP Audit: View a list of the signatures and choose which signature will be triggered by the ASA/PIX. Apply an IP Audit policy and action to an interface. Monitor which signatures have been triggered.
When you use ASDM in conjunction with ASA and SSM, you have the following key IPS GUI features available: Signature Configuration This GUI option enables you to perform the following tasks: - Enable/disable signatures. - Set actions such as packet drops. - Alert using SNMP traps. - Packet captures on alarm traffic. - Customize existing signatures. - Create new custom signatures. - View details of existing signatures. - Browse to signature definitions. - Set custom severity per signature. - Custom configuration definitions. - Configure blocking devices. - Configure IP management accounts. - Enable signature update management.
Meta Event Definitions A meta event is when you take several events and consolidate them into a single event. For example, when the Nimda attack hit the web, it fired several signatures. If a meta event had been in place when this attack hit, you could have defined your IPS in such a way that only the single meta event would have triggered. The ASA/SSM solution provides a number of meta events and enables you to generate your own events based on your requirements. By default, meta events correlating to high-profile worm attacks are provided with the ASA/SSM solution. Target Value Asset Configuration You can apply a variable to the devices in your network. If the device is important, you would set a high rating to indicate that you want to know about any alarms that are triggered with this device as the destination. Event Action Override You can consolidate several network assets and perform a single event based on the risk rating of the alarm with a single operation. This setup gives you the option, for instance, to apply a drop action if any alarm triggers that could be considered serious. Serious alarms "generally" have a risk rating between 85 and 100. Event Action Filter You can override alarms generated by certain IP addresses. For example, you might have devices in your network, such as vulnerability scanners or load balancers, that normally generate hundreds of alarms. Using the Event Action Filter option, you could tell the ASA/SSM device not to generate an alarm from these devices. Note Load balancer uses pings as a means to validate that devices are available. This ping sequence can look like a ping sweep to IPS devices.
Event Viewing The ASDM GUI enables you to look at events generated by the ASA/SSM module. These events could include a summary of why an alarm was triggered, a packet dump of an attack, or attack flows. The information in the event viewer includes signature ID and actions that the security appliance took against these packets. Signature Updates The ASA with the SSM card is capable of running all of the Cisco IPS signatures, which will also include some network virus signatures. These signatures are different from the ASA/PIX signatures, which tend to remain static. This feature of the GUI enables you to install new signature definitions for the SSM. Signatures come out at least once every two weeks. If a critical new attack is found, signature updates come out sooner, which gives you the flexibility to quickly download signatures and keep your network protected.
Viewing and Changing ASA/PIX IP Audit Signatures IP Audit signatures do represent overhead on the CPU of the security appliance; therefore, it is recommended, to preserve CPU, that you disable signatures that you might not need. For example, if you are not going to allow pings (ICMP) or FTP through your security appliance, you can use the following general steps to disable all the signatures related to those two protocols. The modification of which signatures the ASA/PIX uses to protect your network is a simple operation, as follows: Step 1. | To view and modify the default signatures in the ASA/PIX, use ASDM to navigate to the Configuration > Features > Properties > IP Audit > IP Signature panel. (See Figure 9-1.)
Figure 9-1. IP Audit Signatures 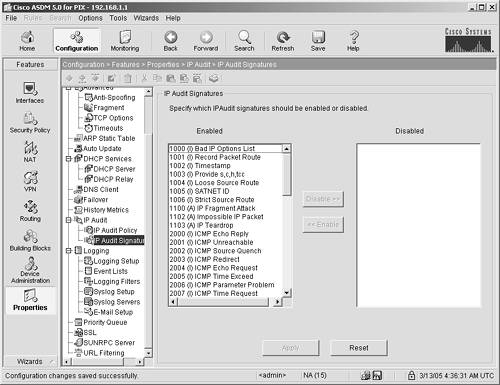
You can use the scroll bar on the right to view the signatures.
| Step 2. | Highlight the signature on the left that you want to disable.
| Step 3. | Click the Disable button to move the signature into the Disabled window.
| Step 4. | Click the Apply button to save the configuration to the ASA/PIX Security Appliance.
|
When you finish this procedure, you will have defined which signatures will be activated when you apply IP Audit to an ASA/PIX interface. Enabling IP Audit Policy on an Interface By default, the ASA/PIX ships with IP Audit turned off. You must follow the steps in this section to turn on IP Audit for a specific interface. Before reviewing the steps to activate IP Audit, it is important that you understand the types of signatures and the actions you can select for each signature type. The ASA/PIX Security Appliance has two different classes of IP Audit signatures, attack and informational: You can take three actions whenever a signature is matched, as follows: Alarm Sends a message to syslog Drop Silently discards the packet Reset Resets the TCP connection that sent this packet
The ASA with the SSM card allows for significantly more control when an IPS alarm is generated. It can perform any combination of the following actions: Deny attacker inline Does not forward the packet that triggered this alert or other packets from this source address Deny connection inline Does not forward the current packet and all following packets in this TCP connection Deny packet inline Does not forward the packet that triggered this alert (IPS mode only) Log attacker packets Logs all packets coming from the source IP address that triggered this alert Log pair packets Logs all packets that have the same source and destination IP address that triggered this alert Log victim packets Logs all packets that have the same destination address of the packet that triggered this alert Produce alert Logs this event to the event store as an alert Produce verbose alert Logs the content of the packet that triggered this alert Request block connection Sends a request to block this connection Request block host Sends a request to block this attacker host Request SNMP trap Sends a request to forward a trap to your SNMP to log the triggering of this alert Reset TCP connection Sends TCP resets to stop the current TCP flow
In the example in this chapter, you turn on all alarm policies and tell the ASA/PIX to drop the traffic. Subsequently, you turn on all the informational policies and ask the ASA/PIX to report to syslog when a policy triggers. The following steps walk you through how to enable alarms on the ASA/PIX. One thing to keep in mind when enabling alarms is that you don't want to try to do too much and waste CPU cycles. For this example, you create a policy to drop and report packets that have triggered alarms and then report informational packets, which is where the ASA with the SSM card can really help. It is optimized for inline network intrusion prevention. It stops attacks without a high impact on the ASA/PIX Security Appliance CPU. To deploy IP Audit on your ASA/PIX, follow these steps: Step 1. | Set up the alarm policy. Navigate to Configuration > Features > Properties > IP Audit > IP Policy panel.
| Step 2. | Click Add.
| Step 3. | Name the policy AttackPolicy.
| Step 4. | Click the Attack option button in the Policy Type section.
| Step 5. | Click the Alarm and Drop option buttons in the Action section. Your screen should look like Figure 9-2.
Figure 9-2. IP Audit Attack Policy Setup 
| Step 6. | Click OK. You should see your policy in the IP Audit policy list.
| Step 7. | Set up the informational policy. Navigate to Configuration > Features > Properties > IP Audit > IP Policy panel. Click Add.
| Step 8. | Name the policy InfoPolicy.
| Step 9. | Click the Information option button in the Policy Type section.
| Step 10. | Click the Alarm option button in the Action section. Your screen should look like Figure 9-3.
Figure 9-3. IP Audit Info Policy Setup 
| Step 11. | Click OK. You should see your policy in the IP Audit policy list.
|
You now need to take the following steps to apply the policies to the outside interface: Step 1. | Next to the Outside Interface tag, click the Attack Policy pull-down menu and select AttackPolicy.
| Step 2. | Next to the Outside Interface tag, click the Info Policy pull-down menu and choose InfoPolicy.
| Step 3. | Click Apply to save the changes to the ASA/PIX Security Appliance.
|
You have now successfully deployed IP Audit on your ASA/PIX Security Appliance. When you complete the preceding steps, the IP Audit Policy Panel should look like Figure 9-4. Figure 9-4. Completed IP Policy Panel 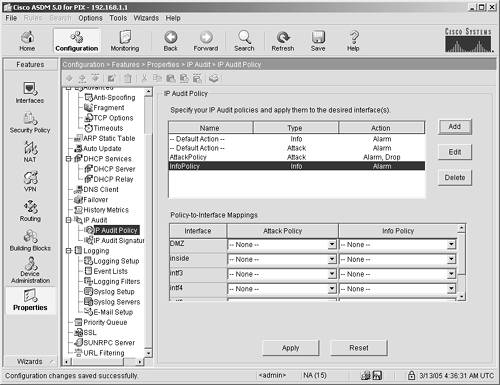
Monitoring the Triggering of IP Audit Policies While using IP Audit, it is important to track any alarms that might be triggered. An alarm doesn't mean that an attack was successful, but it does warrant follow-up on your part just in case. The chances are quite high that you didn't experience any problems as a result, because the alarms are set to drop the packet. A best practice to follow to ensure that attacks were not successful on your network is to do the following: View and store your alarms in case a forensic investigation is required in the future. Look at the dates and times of all IP Audit alarms. Many times, if you are under attack, you will see repetitive time occurrences. Compare security appliance alarms to alarms that might have been generated by your host intrusion prevention software (CSA) to ensure that CSA caught any attacks that weren't dropped.
The best way to view ASA/PIX IP Audit alarms is to do so through syslog. Syslog best practices are discussed in Appendix A, "Deploying Effective Security Management." Syslog works best if you send the data to a remote computer. From there, you can save it as a text file and run search utilities on it to find certain data strings. The following procedure shows you how to enable syslog and how to look at IP Audit syslog messages: Step 1. | Using ASDM, navigate to the following panel: Configurations > Features > Properties > Logging > Logging Setup. Click the check box Enable Logging, and then click Apply to activate the logging of syslog data.
| Step 2. | Navigate to Configuration > Features > Properties > Logging > Logging Filters and enable the ASA/PIX device to report IP Audit or IPS events.
| Step 3. | Using ASDM, navigate to the following panel: Monitoring > Features > Logging > Live Buffer.
| Step 4. | Choose Informational for the logging level.
| Step 5. | Click View.
| Step 6. | To trigger some events, ping to the outside IP address of your web server 199.199.199.203. Your ping will fail. It fails because you don't allow pings through your security appliance. However, the pings still trigger an alarm.
| Step 7. | In the text search box at the top of the panel, enter IDS and click Find Next. You will see an error message similar to this:
400014: IDS:2004 ICMP echo request from 199.199.199.200 to 199.199.199.203 on interface outside
| Step 8. | If you are running the ASA with the SSM card, you can navigate to the Monitor > View panel to see the alarms that were generated.
|
To view syslog messages, you can create a script that runs on your syslog server to search for the string IDS: This will give you a good idea of whether anyone is trying to get into your system and triggering any of the signatures deployed in the ASA/PIX. As another alternative, ASDM has a feature called Live Log that enables you to view desired syslog messages in real time. To use Live Log, follow these steps: Step 1. | Navigate to the following ASDM panel: Monitoring > Features > Logging > Live Log.
| Step 2. | Click the View button.
| Step 3. | When the Syslog screen displays, choose Filter by Text in the Incoming Messages section.
| Step 4. | Enter IDS next to the Filter button. Now only IDS messages will display.
|
As an alternative to syslog, you can set alarms in real time by completing the following procedure: Step 5. | Navigate to Monitoring > Features > IP Audit > Miscellaneous Graphs > IP Audit.
|
Here, you can select a grouping of signatures to graph and watch what's happening on your system in real time. Set up the ping scenario again, but view it by graph this time. Step 6. | Choose ICMP Requests and click Add.
| Step 7. | Click Show Graphs.
| Step 8. | Trigger the same event. Ping to the outside IP address of your web server 199.199.199.203.
| Step 9. | View the graph in real time as data traverses the security appliance.
|
|