Installing the ASAPIX Security Appliance
Installing the ASA/PIX Security ApplianceInstalling the ASA/PIX Security Appliance is a straightforward and easy procedure. Regardless of the security appliance model, all its components are shipped in the same box. The contents of the box include the following:
Most ASA/PIX Security Appliances are installed directly, as is, out of the box. This discussion does not cover memory upgrades or power requirements for special-case installations, but does cover the basics required to get your security appliance up and running, including the following:
Because PIX/ASA Security Appliances are not yet on the market, installation instructions and back-panel diagrams are not published in this book. If you purchase one of these devices, the diagrams and instructions come with the device. Understanding the ASA/PIX Hardware PortsBefore discussing installation of the ASA/PIX Security Appliance, this chapter briefly introduces you to the interfaces. This interface information will establish a foundation of knowledge you might find necessary as you work through this book. The PIX 515E has several different types of ports on its backplane, as follows:
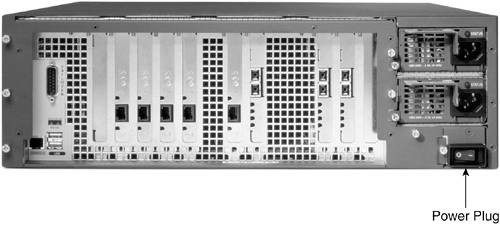
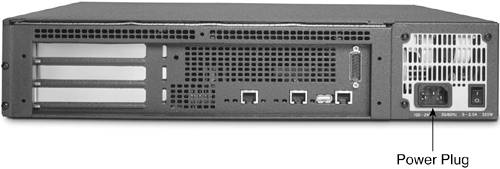
Ethernet PortsThe PIX 515E can have up to six 10/100-bps Ethernet ports. This book covers with three Ethernet ports: an inside port, where your protected user network will be located; an outside port, which will be connected to the Internet; and if you plan to house a web server or a mail server, you will have a third port, referred to as a DMZ port. The ASA 5500 Security Appliance is capable of 10/100/1000-bps Ethernet speeds. Console PortThe console port isn't used in this book except to install the initial ASA/PIX version 7 operating system. For reference, however, it is a management serial port where you can plug in a PC using terminal emulation and enter or view commands on the ASA/PIX Security Appliance. Failover PortThe failover port is a specialized port that connects two security appliances together and is used to keep the configuration in sync between the primary and secondary appliance. This book does not cover failover technology. Installing PowerTo apply power to the PIX 515E, PIX 525, and PIX 535, it's simply a matter of plugging the power cable into the back of the units. Notice that the PIX 535 has dual power supplies. To enable power-supply failover, you can plug two cables into the back of the PIX 535. See Figures 3-1 through 3-3 for backplane layout and power-receptacle locations for the various models of the ASA/PIX Security Appliance. Figure 3-1. PIX 515E Back Panel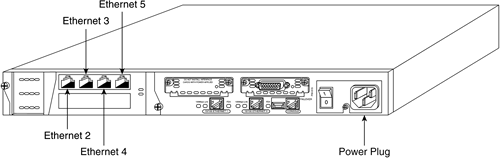 Figure 3-3. PIX 535 Back Panel
Figure 3-2. PIX 525 Back Panel
|
EAN: 2147483647
Pages: 120