Choosing How to Create Your Database
| Before you can create your database tables and actually enter data, you must create a database file. The database is really just a container file that holds all the database objects, such as the tables, forms, and reports that I introduced in Lesson 1. You have three options for creating a new database: You can create a blank database from scratch, create a new database based on a database template, or you can create a new database based on the structure of an existing database file. This option actually creates a copy of the existing database file including the database's structure and the objects contained in the database (minus the data it contains). The third alternative would be great in situations where you want to share the structure for a database with a colleague and also show them how your data is organized in the database.
Creating a new database based on a template (a template other than the Blank Database template) means that you take advantage of a Database Wizard, which not only creates your new database file but also helps you quickly create tables, forms, and other objects for the database.
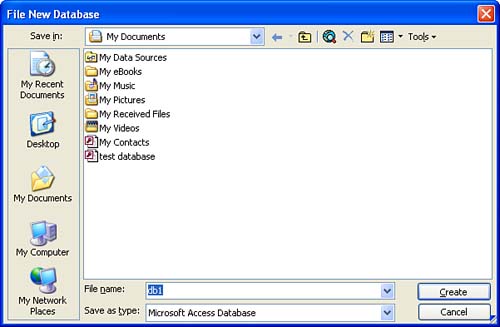
Whether you create your new database from scratch or use one of the database templates depends on how closely one of the Access templates meets your database needs. If one of the templates provides you with the type of tables and other objects necessary for your database, it makes sense to use a template. For example, if you want to create a database that helps you manage your company's inventory, you can take advantage of the Inventory Control template that Access provides. This template provides you with the basic tables and other objects to start the process of getting a handle on your inventory database. In some cases, the templates might not meet your needs. For example, if you want to create a complex database that allows you to track sales, customers, and employee performance, it might be easier to create a blank database and then create each table for the database as needed. Let's start the overview of database creation with creating a blank database. Selecting a Database File TypeOne thing to discuss before you look at creating a new database is the database file format. By default, new databases created in Access are created in the Access 2000 file format. This makes your database files compatible with earlier versions of Access, such as Access 2000 and Access 97. Saving the database in the Access 2000 file format does not prevent you from using any of the tools or features available in Access 2003. If you use your database files only in Access 2002 or 2003, you can set the default file format for new databases to Access 2002-2003. You must have a database (blank or otherwise ) open to access the Options dialog box. Select the Tools menu, and then select Options . The Options dialog box opens. Select the Advanced tab on the Options dialog box. Click the Default File Format drop-down box and select Access 2002-2003 . Now let's take a look at creating new databases. Creating a Blank DatabaseCreating a blank database is very straightforward. As mentioned previously, you are just creating the container file that holds all the objects that actually make up the database. To create a blank database, follow these steps:
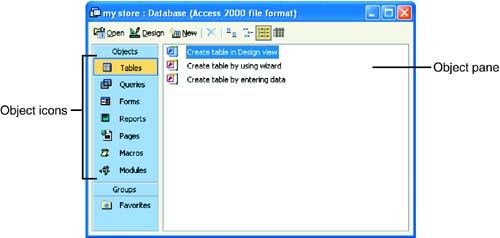
The database window provides you with a set of icons that enable you to select a particular object type. For example, the Tables icon is selected by default after you create the new database (which makes sense, because you need to create at least one table before you can create any of the other object types, such as a form or a report). Shortcuts for different methods of creating tables are provided at the top of the Object pane. After you create a new table for the database, it is listed in this pane. In Lesson 3, "Creating a Table with the Table Wizard," and Lesson 4, "Creating a Table from Scratch," you will take a look at creating tables. The database window enables you to view the different objects that you've created for a particular database (or those that were created when you used the Database Wizard). When you want to switch the database window's focus to a different Access object, all you have to do is click the appropriate icon in the Objects list.
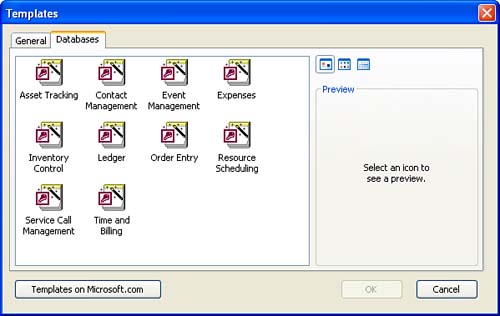
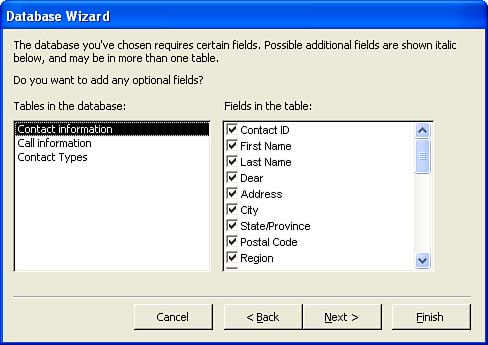
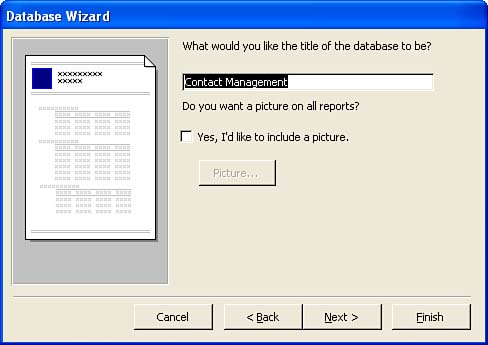
Creating a Database from a TemplateAnother option for creating a new database is using one of the Access database templates. Templates are available for asset tracking, contact management, inventory control, and other database types. Another perk of using an Access template to create a new database is that a Database Wizard creates tables and other objects, such as forms and reports, for the new database. The wizard also sets up the relationships between the various tables (making your database relational). Your interaction with the Database Wizard is somewhat limited; the wizard allows you to select the fields that will be used in the tables that it creates for the database. However, you don't have a say about which tables are initially created (tables can always be deleted later if you don't need them). You are, however, given the opportunity to select the format for screen displays (for forms and reports) and select the format for printed reports. To create a database from a template, follow these steps:
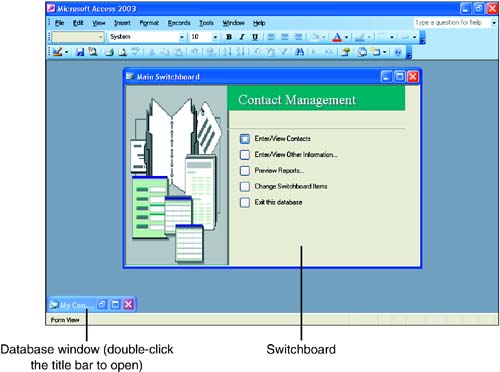
When the wizard has finished creating the database, the database's Main Switchboard window appears (see Figure 2.6). The Main Switchboard opens automatically whenever you open the database. Figure 2.6. The Switchboard window is a database navigation tool provided by the Database Wizard. All the databases created using one of the Access templates (other than the Blank Database template) include a Main Switchboard. The Switchboard is actually a form with some programming built into it. It enables you to perform common tasks related to database management by clicking a button. It is very useful when a person is unfamiliar with how to manipulate the various objects in a database. For example, to enter or view contacts in the database shown in Figure 2.6, you would click Enter/View Contacts . This action opens a form (which is used to view and edit data into a database table) that allows you to view and enter contact information. If you click the Preview Reports button, a second Switchboard opens and you are provided with a list of ready-made reports that are available for you to view. Again, these reports were created by virtue of the fact that you used a template to create your new database. Using the Main Switchboard for a database is a quick and straightforward way of quickly getting data into a database and taking advantage of a number of ready-made objects that were created for you. You will find, however, that as you become more familiar with Access, you will probably want to work with your database objects directly (such as tables, forms, and reports) and will no longer use the Main Switchboard. To close the Switchboard, click its Close ( X ) button.
After you close the Switchboard window, you will find that the database window has been minimized in the Access workspace. Just double-click its title bar (at the bottom-left corner of the screen) to open it. To see the tables that the wizard created, click the Tables object type. Click the other object types (such as forms) to see the other objects that were created by the wizard. The tables that the wizard creates are, of course, empty. After you fill them with data (either inputting the data directly into the table or using a form), you will be able to run queries and create reports. |
EAN: N/A
Pages: 660
- The Effects of an Enterprise Resource Planning System (ERP) Implementation on Job Characteristics – A Study using the Hackman and Oldham Job Characteristics Model
- Context Management of ERP Processes in Virtual Communities
- Distributed Data Warehouse for Geo-spatial Services
- Data Mining for Business Process Reengineering
- Healthcare Information: From Administrative to Practice Databases