Aligning Text Using Tabs
| Although the left and right alignment of text in your document is governed by the margins set in the document, there are times when you want to align the text to emphasize a list of items or otherwise offset text from the rest of the items on the page. In Chapter 5, "Changing How Text Looks," you worked with centering and justification as a way to change the alignment of text. Another way to align text in a document is to use tabs. Tabs are set every half inch by default in a new document. Every time you press the Tab key on the keyboard, you offset the text line from the left margin one tab stop. You can customize tab stops to align text lines in columns . Word gives you complete control over where the tab stops are set in your document. Word also provides different tabs that enable you to align text in different ways:
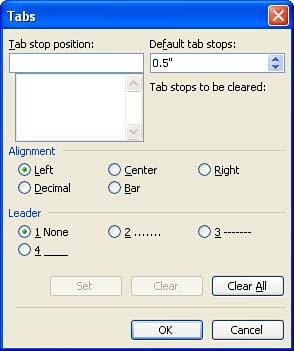
Each of these tab types makes it easy for you to create lists that are offset from other text elements in the document. Your tab stops fall between the left and right margins on each page of the document. Each paragraph in the document can potentially have a different set of tab stops with different kinds of tabs set at the stops. Setting Tabs in the Tabs Dialog BoxOne way to set tabs in your document is using the Tabs dialog box. Select the Format menu, and then select Tabs . The Tabs dialog box requires that you specify a tab position in the Tab Stop Position box (the position you specify is the number of inches from the left margin); use the spinner box arrows to specify the position for the tab or type a position directly in the box. After the tab stop position is set, click the appropriate Alignment option button to select the type of tab you want to create at the tab stop (see Figure 7.1). If you want to have a leader (a repeating element, such as a dash) fill the empty space to the left of the tab stop, select one of the leader option buttons in the Leader box. After you have specified a position and a tab type (and an optional leader), add the tab by clicking Set . Figure 7.1. You can set and remove tab stops in the Tabs dialog box. As you create the tabs, they will appear in the Tabs list on the left of the dialog box. If you want to remove a particular tab from the list, select it, and then click the Clear button. If you want to clear all the tabs listed (and start over), click the Clear All button. After you have finished setting your tabs, click OK . Although you can certainly set all the tabs for a document or section in the Tabs dialog box, it is not necessarily the best place to quickly set the tabs for your documents. It does not provide you with a visual display of how the tabs will look in the document. However, if you are creating tabs that include leading characters (such as dot leaders often seen in a table of contents) and you want to precisely set the tab positions to previously determined settings, the Tabs dialog box gives you complete control over all the settings. Setting Tabs on the RulerAn excellent alternative to setting tabs in the Tabs dialog box is to use the Word Ruler and actually set the tabs on the Ruler itself. This enables you to visually check the position of the tab stops and makes it easy for you to change the type of tab at a particular tab stop and delete unwanted tabs. To view the Ruler in the Word document window, select View , and then Ruler . The Ruler appears at the top of your document.
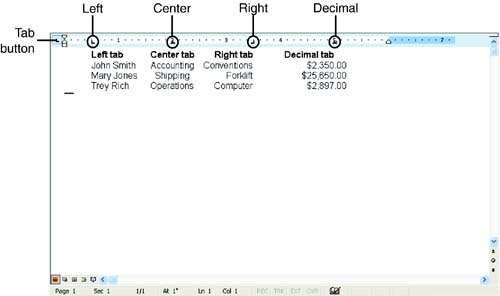
To set a tab on the Ruler, click the Tab button on the far left of the Ruler to select the tab type (Left, Center, Right, or Decimal). Each time you click the Tab button, you are cycled to the next tab type. If you go past the type of tab you want to set, keep clicking until the tab type appears on the Tab button. After you have the appropriate tab type selected on the Tab button, place the mouse pointer on the ruler where you want to create the tab stop. Click the mouse and the tab is placed on the ruler. It's that simple. Figure 7.2 shows the Ruler with each of the tab types set. The figure also shows how text aligns at each of the tab types. Figure 7.2. Setting tabs on the Ruler allows you to view their position and type.
|
EAN: N/A
Pages: 660