Selecting and Configuring Network Protocols
Selecting and Configuring Network ProtocolsNo matter what operating system you run on your peer computers, the computers participating in the peer-to-peer network need to be configured with at least one common LAN protocol. TCP/IP is the default protocol on pretty much every current client operating system including Windows XP, Mac OS X, and the various distributions of Linux (such as Lycoris Desktop and Red Hat). Since most PCs in a peer-to-peer network also need to access the Internet, the configuration of the TCP/IP protocol on the computer is essential. We look at configuring TCP/IP on a Windows XP computer later in the chapter (more about TCP/IP is discussed in Chapter 12, "TCP/IP Network Administration"). At one time in the Windows environment, the most-often used and simplest LAN protocol for use on a small network was NetBEUI. With the release of Windows XP, NetBEUI is no longer a supported protocol on a Microsoft Windows-based computer. NetBEUI is available on the Windows XP CD and can be installed if you wish to set up a small network that does not use TCP/IP or NWlink (IPX/SPX). NetBEUI is fine for a small, isolated network that does not require Internet connectivity. In situations where you don't want to configure peer computers with IP addresses (in a situation where Internet isn't an issue), you can actually use the NWlink protocol, which is Microsoft's implementation of Novell's IPX/SPX protocol stack. It's not necessary to have a NetWare server on the network; the computers "talk" via NWlink. This protocol can be added to a Windows computer as discussed in the next section. For more information on the IPX/SPX protocol stack see Chapter 5, "Network Protocols: Real and Imagined." Note
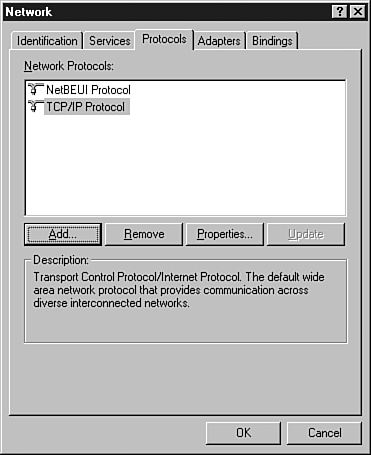
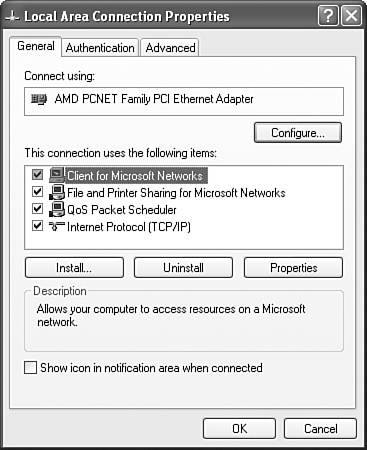
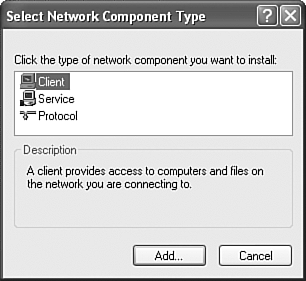
Windows and LAN ProtocolsAll the recent flavors of Microsoft Windows (9x, 2000, and XP) all handle protocol configuration in pretty much the same way. In the Windows 9x and Windows NT environments, the process is begun by right-clicking the Network Neighborhood icon on the Windows desktop. In the shortcut menu that appears, you select Properties. This opens the Network dialog box. In the Windows 9x environment, protocols are managed on the Configuration tab of the Network dialog box. In the Windows NT environment, the Protocols tab of the Network dialog is used to add, remove, and configure protocols. Figure 6.1 shows the Protocols tab of the NT Network dialog box. Figure 6.1. Windows 9x and Windows NT provide the tools for configuring protocols in the Network dialog box. Adding a protocol to either Windows 9x or Windows NT clients is just a matter of clicking the Add button and then selecting the protocol from the list provided. Windows 2000 and Windows XP provide a similar set of steps for adding protocols. Let's take a look at adding a protocol to a Windows XP computer. In Windows XP you get to the Local Area Connection via the Control Panel (select Start, then Control Panel). In the Control Panel, select Network and Internet Connection. In the Network and Internet Connection window, select Network Connections. In the Network Connection window, right-click on the Local Area Connection and select Properties from the shortcut menu. The connection's Properties dialog box will appear as shown in Figure 6.2. Figure 6.2. Windows XP provides the Local Area Connection Properties dialog box for configuring protocols. Make sure that the General tab is selected on the Properties dialog box. To add a new protocol, click the Install button. The Select Network Component Type dialog box will appear, as shown in Figure 6.3. Figure 6.3. Use the Select Network Component Type dialog box to add protocols and other components to the computer's network settings. The Select Network Component Type dialog box provides you with three choices: Client, Service, and Protocol. Although this particular section covers adding and configuring protocols, let's take a moment to break down each of these components individually and then we can return to our discussion of protocols:
To add a protocol to the computer's configuration, click Protocol in the Select Network Component Type dialog box and then click Add. The Select Network Protocol dialog box will open , as shown in Figure 6.4. Figure 6.4. Select a protocol to add to the computer's configuration. Select the protocol you wish to add and then click the OK button. The protocol will be added to the protocol list in the Local Area Connections dialog box. Note
TCP/IP IssuesTCP/IP is added to the network configuration of Windows 9x and the more recent version of Windows by default. The TCP/IP settings are also configured on these Windows operating systems so that the IP address, subnet mask, and other TCP/IP settings, such as the default gateway and primary DNS server, are received automatically from a network DHCP server. If you are putting together a peer-to-peer network where the computers are also connected to the Internet (through a DSL or cable modem connection), you can leave TCP/IP settings so that all the IP settings are configured by your Internet service provider's DHCP server. If you have multiple computers connected to the Internet (for example, using a DSL router or a cable modem), your Internet service provider will provide IP addresses in a particular range to the computers in your peer network. So the computers should be able to use TCP/IP to communicate locally as well. (We will discuss connecting multiple computers to a single Internet connection in Chapter 15, "Connecting a Network to the Internet," in the section "Sharing an Internet Connection.") In cases where you are connecting your peer-to-peer network to the Internet using a single connection, or if you are not going to connect the peer network to the Internet at all but still want to insist on using TCP/IP as your network protocol, you have two choices for coming up with the IP addresses for your computers:
Windows operating systems such as Windows XP provide a feature related to IP addressing called Automatic Private IP Addressing (APIPA) . To explain: A Windows XP computer is by default configured to get its IP information (such as address and subnet mask) from a DHCP server, and so the computer will try to contact a local DHCP server. When it doesn't find a DHCP server on the network (because you wouldn't be running one on your peer-to-peer network), the APIPA kicks in and the computer assigns itself an IP address from the range 169.254.0.1 through 169.254.255.254 (Microsoft's private range of addresses, which are not used on the Internet) and a subnet mask of 255.255.0.0. Because the computers all end up with addresses in the same Class B range, they don't have any trouble communicating with each other using the TCP/IP protocol (more about TCP/IP is discussed in Chapter 12). The alternative to APIPA is to statically configure the computers with IP addresses. Because a peer-to-peer network won't have any specialized servers such as a DNS server (it won't have any servers at all), you won't have to configure any of the IP settings other than the IP address and the subnet mask. The question is what should the range of IP addresses be and which subnet mask should you use for the computers in the peer-to-peer network? The answer is pretty straightforward: Three ranges of IP addresses have been reserved to use for "private" addressing. These ranges of addresses have not been assigned to computers on the Internet, so if you use IP addresses in one of these ranges, your addresses will not potentially conflict with IP addresses already assigned to computers on the Net. There is a range of addresses reserved in each of the three classes: Class A, Class B, and Class C. These ranges and the subnet mask you would use with each range are shown in Table 6.1. Table 6.1. Private IP Address Ranges
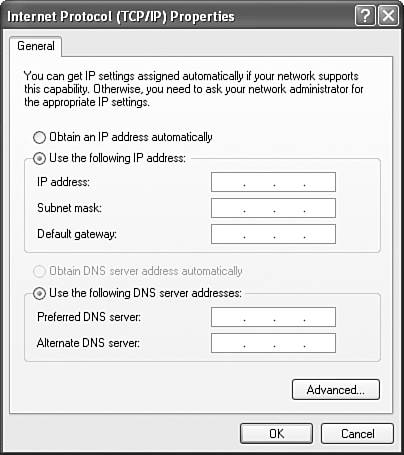
Obviously, the Class A range gives you a very large number of available addresses (it's pretty much overkill for a peer-to-peer network), but you can set up your small peer-to-peer network as a Class A network if you like. You need to limit yourself to one class of private addresses, however, if you want the computers to talk to each other. To manually configure the IP address and subnet mask, select Internet Protocol (TCP/IP) in the Local Area Connection Properties dialog box and then click the Properties button. Figure 6.5 shows the Internet Protocol (TCP/IP) Properties dialog box that opens. Figure 6.5. Enter the IP address and subnet mask for the computer in the Internet Protocol (TCP/IP) Properties dialog box. In the Internet Protocol (TCP/IP) Properties dialog box, click the Use the Following IP Address option button and then enter the IP address and the subnet mask for the computer. Then all you have to do is click OK and close the various open dialog boxes. Some Windows clients will require that you restart the system for the new networking configuration to take effect. |

EAN: 2147483647
Pages: 188