Routing and Subnetting IP Networks
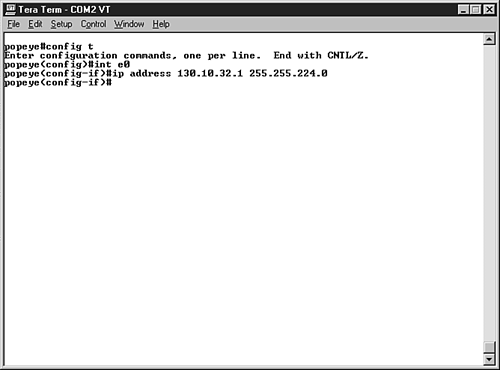
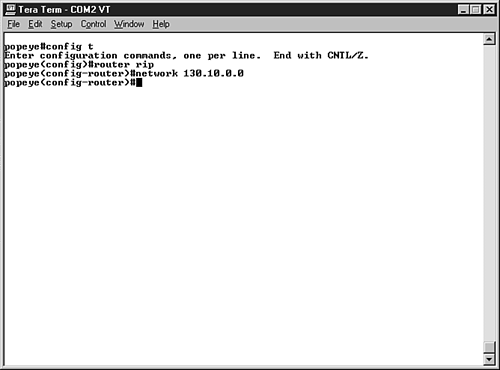
| Local area networks often grow beyond a single physical location. For example, your company may start out with one office location but then decide to expand the business and locate a satellite office in another part of town (or in another state, or in another country). When networks grow to the point where they are a collection of connected LANs at different locations, they are referred to as internetworks. So, an internetwork is a network of networks. And how are these different networks connected? They are connected by internetworking devices such as routers. We discussed routing briefly in Chapter 3, "Networking Hardware," in the section "Working with Network Connectivity Devices." Routers such as Cisco routers use their own proprietary operating systems. In the case of Cisco routers, the OS is called the Internetworking Operating System or IOS. The IOS is used by the network administrator to configure the router and its interfaces and monitor the traffic on the internetwork. Routers use their interfaces to connect the various segments of the network. For example, an Ethernet interface would be used to connect one segment of an Ethernet network to the router. Ethernet interfaces have MAC hardware addresses just like network interface cards. As with network computers, each network interface on a router must be configured with an IP address and a subnet mask (remember the router interface functions as the router's NIC). Let's take a quick look at how a router interface would be configured on a Cisco router and then we can tackle some of the basics if IP subnetting. Configuring a Router InterfaceTo configure a Cisco router, a computer is physically connected to the router by a console cable. The cable is connected to a console port on the router and a serial port on the PC. You talk to the router using any terminal emulation software (this software is command-line communication software that allows you to talk to the router's operating system). Configuring an Ethernet interface on a router for IP is just a matter of configuring the router interface with an IP address and a subnet mask. Figure 12.12 shows the command sequence that is used to configure an Ethernet interface on a Cisco router. Figure 12.12. Configure the router interfaces with IP addresses. Each router interface will be configured with its own IP address and subnet mask. The IP address for each interface would need to be an address from the subnet that the router interface connects to. We will discuss how to create the subnet IP addresses in the next section. Routers must also be enabled for routing by configuring a routing protocol on the router. A number of IP routing protocols exist, including RIP (Routing Information Protocol) and OSPF (Open Shortest Path First). The routing protocol builds the routing table that is used to move the data traffic to the router interface, which allows the data to travel on to its final destination. Figure 12.13 shows the router command for enabling the RIP routing protocol on a router. Figure 12.13. Enable a routing protocol on the router. Obviously there is more to configuring and monitoring routers than just configuring the interfaces and the routing protocol. For more about Cisco routers, the Cisco IOS, and internetworking, check out the book Practical Cisco Routers from Que. Okay, so the router interfaces and the PCs on the network (that connect to the various router interfaces via hubs or switches) need to be configured with appropriate IP addresses. This is where subnetting comes in. Subnetting IP Address PoolsRouted IP environments require that your pool of IP addresses be subnetted . This allows each subnet to see itself as a separate segment of the larger internetwork. The router then ties together the various subnets into one network. The router knows how to route traffic to the correct segment because it builds a routing table. The routing table is basically the networks roadmap. IP subnetting is fairly complex, and so to make this discussion informative but still digestible at an introductory level, we will limit our exploration of subnetting to one class of IP addresses; we will look at an example of subnetting a Class B range of IP addresses. The mathematical tricks that we use to subnet the Class B network can also be used to subnet a Class A or Class C network (although subnetting Class C networks greatly limits the number of usable IP addressed that you end up with). Subnetting is a two-part process. First you must determine the subnet mask for the network (it will be different than the default subnet masks; for example, the default for Class B is 255.255.0.0). After figuring out the new subnet mask for the network, you must then compute the range of IP addresses that will be in each subnet. Okay, let's cheat a little before we do the math of subnetting a Class B network. I think it will aid in the overall understanding of the subnetting process. Table 12.2 shows the new subnet masks, the number of subnets, and the number of hosts per subnet that would be creating when using a certain number of bits for subnetting (the Bits Used column). Table 12.2. Class B Subnetting
So, what's the deal with "bits used?" Well normally when you have a Class B network to work with such as 130.1.0.0 (this would be the network address assigned to you by InterNIC or other IP address provider; see Chapter 15 for more about acquiring IP addresses), you have the third and fourth octet available for host addresses; 130.1 is the network designation assigned to you. To create subnets on the Class B network (130.1.0.0) we would actually "borrow" bits from the third octet and use them to create the subnets. So the Bits Used column in Table 12.2 shows the number of bits borrowed and the resulting subnet mask, number of subnets that can be created, and the number of hosts created. Notice when you borrow more bits (such as 7) you get more subnets but fewer host addresses. So the creation of the subnets does cost you bits and therefore reduces the number of usable addresses for devices on the network. Note
IP addresses are actually seen by devices on the network as a bit stream; for example the IP address 130.1.16.1 would be represented in binary as 10000010 00000001 00010000 00000001 Notice that the bits have been divided into four groups of 8, or octets. just as the dotted decimal version of the address was (130.1.16.1). This is how you convert dotted decimal numbers to binary (bits). Each octet has 8 bits. The decimal value of the bits in an octet from left to right are 128 64 32 16 8 4 2 1 So the decimal number 130 (the first octet in our address) is 128 + 2. This means the first bit (the 128 bit) and the seventh bit (the 2 bit) are both turned on (they are represented by 1s in the binary format). So to convert the decimal to the binary, you mark the bits that are on with 1s and the rest with 0s. This gives you 10000010 (which is what we see above in the binary format of the IP address). Now about subnetting: Since the network ID portion of IP addresses is fixed (it is provided by your Internet service provider or another provider of IP address ranges), you will actually borrow some bits from the host ID portion of the address to create subnets (remember, you can't mess with the network ID portion of the IP address because it is assigned to you). Let's walk through an example of subnetting. Let's say that we want to divide the Class B network 130.1.0.0 (this is the network address we were assigned by our IP address provider) into 30 subnets. You can't touch the first or second octets because they have been assigned. But you can borrow bits from the third octet. So, you have to determine how may bits you must borrow from the third octet to create 30 subnets. The number of bits that you borrow will determine the new subnet mask for your network (which lets all devices on the network know that 30 subnets have been created) and the bits you borrow will also help you determine the range of IP addresses that will be in each subnet. Borrowing BitsFirst let's borrow the bits; you use the decimal values of the bits in the third octet to do this. We want to come up with 30 subnets. And the formula that we use to do this is the sum of lower order bits, minus 1. Look at the bit values again (shown below). The lower order bits are the ones on the right (1, 2, 4, and so on). So you add 1 + 2+ 4+ 8 + 16, which equals 31. Then we subtract 1; we get 30. So we used the 1, 2, 4, 8, and 16 bits; we borrowed 5 bits. 128 64 32 16 8 4 2 1 <- low order bits Note
Okay, so we borrowed 5 bits. Now the next thing we need to do is determine the subnet mask for the subnetted network. The bits on the left of our decimal values (the 128, 64, 32, 16, and so forth) are referred to as the higher order bits. So, you take the first 5 higher order bits and add them together: High order bits -> 128 64 32 16 8 4 2 1 128 + 64 + 32 + 16 + 8 = 248 The default subnet mask for a class B network is 255.255.0.0. We borrowed 5 bits from the third octet, so our new subnet mask is 255.255.248.0. If you check Table 12.2, when you borrow 5 bits from a class B network you get the subnet mask that we have derived. Computing the number of host addresses available per subnet is very straightforward. The formula you use is 2 x -2; where X is the number of bits left for host addresses after bits have been borrowed for subnetting. Computing Host Address Per SubnetWe have 30 subnets (remember that what we decided to divide our IP address range into at the outset of this problem). So, now let's find out how many addresses we will get for each of our 30 subnets. Normally on a Class B network we have two octets reserved for host addresses. Our network address is 130.1.0.0, so we originally had two full octets (the third and fourth) available for node addresses. This would be 16 bits total (8 bits from each octet). Now we borrowed 5 bits from the third octet, so 16 5 = 11. So we have 11 bits left over for node addresses after borrowing 5 bits to create the 30 subnets. Now we use the formula 2 x - 2. 2 to the 11th 2 on my trusty calculator is 2048 2, which equals 2046 (just as Table 12.2 shows). We get 2,046 addresses per subnet. Computing Host RangesSo, we have 30 subnets with 2,046 addresses each. Now we need to figure out the starting and ending IP address for each subnet. This is rather easy compared to what we've been through so far. What was the lowest of the high order bits that we used to create the new subnet mask for our subnetted network? We used 128, 64, 32, 16 and 8, so the lowest of the high order bits is 8. This number, 8, becomes the increment for your subnet address ranges. Our network address is 130.1.0.0. So the first subnet would start with the address 130.1.8.1 (you can't have a 0 in the last position of the address). This subnet would end with 130.1.15.254 (you can't end an address with 255 in the last octet). Table 12.3 shows the range of addresses for the first five subnets (of 30) using our network address of 130.1.0.0. Table 12.3. Address Ranges for First Six Subnets
Notice that you can easily come up with the start of each subnet range by simply adding 8 to the third octet. The end of range addresses are just 1 less (in the third octet) than the start of the next subnet. You could easily continue this table to show all 30 subnets (why don't you consider it "homework"). Class A and C network addresses can be subnetted in a like manner. Just remember that Class A networks provide you three octets of node address space (the second, third, and fourth), where a Class C network address only supplies one octet (the fourth). |

EAN: 2147483647
Pages: 188