Section 6.2. Simple Edge Detection: Conditionals with Two Options
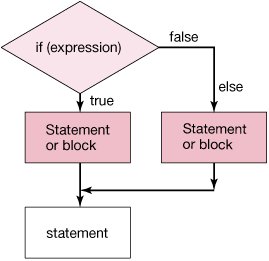
6.2. Simple Edge Detection: Conditionals with Two OptionsWhat if we want to look for areas of high contrast between a pixel and the pixel below it? If the contrast is high, we can make the pixel black, and if the difference is low, we can make the pixel white. This is a simple form of edge detection. It results in a picture that looks like a pencil sketch. What does high contrast mean? It means that the difference between the two colors is high. One way to calculate this is to average the red, green, and blue values in the top pixel and subtract this from the average of the red, green, and blue values in the bottom pixel. If the absolute value of the difference is greater than some amount, then there is high contrast. If there is high contrast set the top pixel color to black and if not set it to white. 6.2.1. NegationYou have seen a way to execute a statement or block of statements if some condition is true using an if. But how do you execute a statement or block of statements if a condition is false? One way is to use an if but negate the condition using the '!' (logical not) operator. > !true false > !false true So if we wanted to check whether a value was less than 20 and if it is print out "Yes, the value is less than 20" and if it isn't print out "No, this value is not less than 20" we could test for the value being less than 20 and also test for the value being not less than 20 using the '!' operator. > int x = 30; > if (x < 20) System.out.println("Yes, the value is less than 20"); > if (! (x < 20)) System.out.println("No, not less than 20"); No, not less than 206.2.2. Testing for Both ConditionsAnother way to test that a value isn't less than 20 is to test whether it is greater or equal to 20. > int x = 30; > if (x < 20) System.out.println("Yes, the value is less than 20"); > if (x >= 20) System.out.println("No, not less than 20"); No, not less than 20The problem with this approach is that we have to run both tests every time. But if the first test is true, there is no reason to run the second test (x can't be both less than 20 and greater or equal to 20). We would like a way to say that if the first test is true, execute one statement or block of statements, and if it is false, then execute a different statement or block of statements. 6.2.3. Conditionals with Two OptionsThe way to do this is with if (expression) and else. As before, the if part will execute the statement or block of statements following the if when the expression is true. But, if we add an else this will also execute the statement or block of statements following the else when the expression following the if is false (Figure 6.6). And it will also mean that the else is skipped if the if test was true. Figure 6.6. Flowchart of an if with an else.
To enter the following in DrJava's interaction pane, use SHIFT-ENTER after the if statement to let DrJava know that there will be a following else. > int x = 30; > if (x < 20) System.out.println("Yes, the value is less than 20"); else System.out.println("No, this value is not less than 20"); No, this value is not less than 20As you can see, the statement following the if didn't execute, but the statement following the else did. Try the same thing but this time give x a value less than 20. > x = 15; > if (x < 20) System.out.println( "Yes, the value is less than 20"); else System.out.println("No, this value is not less than 20"); Yes, the value is less than 20Notice that this time the statement following the if did execute but the statement following the else did not. 6.2.4. Simple Edge DetectionTo do simple edge detection, we will loop through the pixels with the outer loop incrementing y from 0 to less than picture height-1. Usually we have been looping while y is less than the height, so why stop at height-1? We are comparing the value at a y position with the pixel below it so the last y value that still has another row below it is at height-2. The inner loop will increment x from 0 to less than the picture width. The top pixel will be set to the pixel at the current x and y location. The bottom pixel will be set to the pixel at the current x but y+1. We will compare the absolute value of the difference between the intensities (average of color values), and if it is less than some passed limit, we will change the top pixel color to white, and otherwise we will set the top pixel color to black. The Pixel class has an object method getAverage() that returns the average of the three color values. Program 37. Edge Detection |
 /** * Method to do a simple edge detection by comparing the * absolute value of the difference between the color * intensities (average of the color values) between a * pixel and the pixel below it. If the absolute value * of the difference between the color intensities is * less than a passed amount the top pixel color * will be set to white. Otherwise it is set to black. * @param amount if the absolute value of the differences * in the color average is less than this * set the color to white, else black */ public void edgeDetection(double amount) { Pixel topPixel = null; Pixel bottomPixel = null; double topAverage = 0.0; double bottomAverage = 0.0; int endY = this.getHeight() - 1; /* loop through y values from 0 to height - 1 * (since compare to below pixel) */ for (int y = 0; y < endY; y++) { // loop through the x values from 0 to width for (int x = 0; x < this.getWidth(); x++) { // get the top and bottom pixels topPixel = this.getPixel(x,y); bottomPixel = this.getPixel(x,y+1); // get the color averages for the two pixels topAverage = topPixel.getAverage(); bottomAverage = bottomPixel.getAverage(); /* check if the absolute value of the difference * is less than the amount */ if (Math.abs(topAverage - bottomAverage) < amount) { topPixel.setColor(Color.WHITE); |
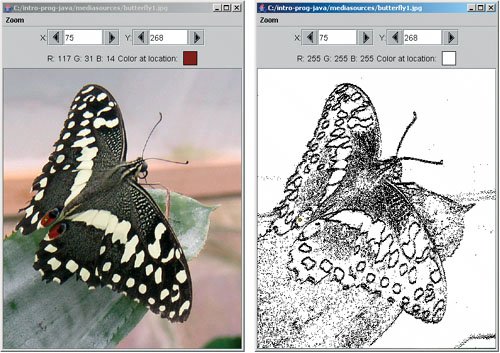
To execute this method and see the result (Figure 6.7) use:
> String fileName = FileChooser.getMediaPath("butterfly1.jpg"); > Picture p = new Picture(fileName); > p.explore(); > p.edgeDetection(10); > p.explore();Figure 6.7. Original picture and after edge detection.
|

EAN: N/A
Pages: 191