Section 11.2. Defining a Class
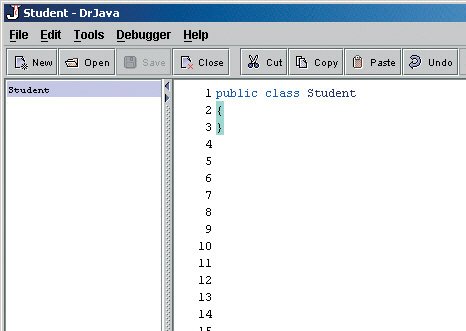
11.2. Defining a ClassThe computer doesn't know what we mean by a student, so we need to define it for the computer. We need to specify the name of the class, the data that objects of the class will have, how to initialize each object's data when a new object of the class is created, and what methods the object will know how to do. We do this by creating a class definition. A class definition for a Student class looks like this: public class Student { }We could also write this as: public class Student { }This declares a public class called Student. Public classes can be used by all other classes. By convention, class names start with an uppercase letter and the first letter of each additional word is uppercase. Notice the curly braces. They enclose a block of code that is associated with this class. All fields, constructors, and methods should be inside the open '{' and close '}' curly braces for the class. We also indent the code inside the curly braces to make clear that the code is inside the class definition. This class must be saved in a file called Student.java.
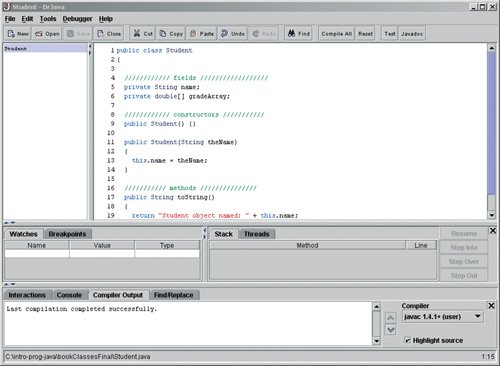
Create a new class in DrJava by clicking on the New button. This will create a blank area in the definitions pane. Type your class definition there. When you are ready, you can save it to a file by clicking on the SAVE button. Use the directory chooser to pick where to save the file and give it the same name as the class name. When you have saved the file, you will see Student in the file pane (Figure 11.1). Figure 11.1. DrJava with the class definition for Student.
11.2.1. Defining FieldsNext, we want to add the fields that each student object will have. Each student should have a name and some grades. We next need to decide what type to use for each of these. A name can be represented by a String object. What type should we use for the grades? Let's say that there will be at most five grades and they can have a decimal point in them. We could name these grade1, grade2, grade3, and so on, but it is easier to store them in an array. Remember that you can declare a variable that will refer to an array object using: type[] name; or type name[];
We declare fields by specifying the visibility, type, and name of the field. visibility type name;private String name;We can also specify an initial value for the field as the result of some expression. visibility type name = expression;private String name = "Unknown";The visibility for fields is usually private so that an object can control its own data. Would you like objects of other classes to directly access and change a Student object's data? You certainly wouldn't want this for your bank account! Objects are responsible for their data, and to be responsible they need to control who has direct access to their data. So you should nearly always make your fields private. The type is a class name if the field is an object or one of the primitive types (int, double, boolean, etc). Remember that you can declare an array by adding '[]' after the type. You can have arrays of primitives or objects. The name should be appropriate for what the field represents. The convention for field names is to start with a lowercase letter and uppercase the first letter of each additional word. Fields are automatically initialized if no other initialization is specified in the declaration. The default is to initialize object references to null, numbers to 0, and boolean variables to false. Let's add a field of type String for the name, and a field which is an array of type double for the grades to the Student class. Program 95. A Student Class
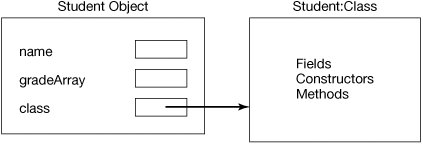
We have now defined a class, Student, and when an object of that class is created it will have two fields in it: name and gradeArray. The Student object will also have a reference to the object that defines the class (an object of the class named ClassFigure 11.2). Thus, it will know that it is an object of the class Student. Every object has a reference to the class that created it. When an object is sent a message, it first looks in the class that created it for the method to execute. If it doesn't find it there, it will look in the parent class of the class that created it. If it doesn't find it there, it will look in the grandparent of the class that created it. It will keep looking up the ancestor tree until it finds the method to execute. Figure 11.2. Showing a student object with a reference to its class.
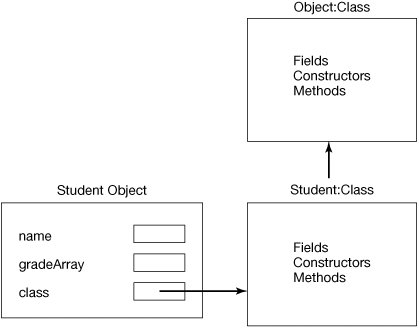
11.2.2. Inherited MethodsWhat would happen if we compile this and create a student object and print it out using System.out.println()? > System.out.println(new Student()); Student@2bd3a Well, it looks like a Student object was created, but what are the strange numbers and letters after the '@'? By default, when you print out an object you just get the class name followed by the unsigned hexadecimal representation of the hash code of the object. What does that mean? It is used to tell whether two objects are the same object or different objects, and may be based on the address of the object in memory. > System.out.println(new Student()); Student@3ae941 > System.out.println(new Student()); Student@1e4853f Notice that the hash codes for the two student objects above are different because two distinct Student objects were created. > Student s1 = new Student(); > Student s2 = s1; > System.out.println(s1); Student@676437 > System.out.println(s2); Student@676437 Notice that in this case we see the same hash code. Both s1 and s2 refer to the same Student object. How did the Student objects know to print this out? Every class inherits this ability from the class Object. We didn't specify that the class Student inherits from the class Object, but if you don't specify a parent to inherit from in your class definition, your class will inherit from the class Object. When one class inherits from another, it gets all the methods and fields from that parent class. So, since the Object class has a toString() method in it that prints out the class name and the hash code, and the class Student inherits from the class Object, all Student objects also know how to do this. You could have explicitly named the parent class for Student by using the extends keyword on the class definition followed by the name of the parent class. The parent class is the class the child class is inheriting from. So Object is the parent class of Student, and Student is a child class of Object. A parent class is also called a superclass or a base class. A child class is also called a subclass or a derived class. public class Student extends Object { } A class is only allowed to have one parent class, and if none is specified the default will be Object. When you call the method System.out.println and pass it any object, it will call the method toString() on that object. When the toString() method is invoked on a Student object, first the runtime environment will look for that method in the Student class. If that class has a toString() method, it will be executed. Since the Student class doesn't have a toString method, it will next check the parent class of Student which is Object. The Object class does have a toString() method, so it will be executed. This method prints out the name of the class for the object and the hash code. Because each object keeps a reference to its class, you can get its class using the getClass() method inherited from Object. This returns an object of the class named Class which represents the Student class. Each class also knows its parent class, and you can get that by using the method getSuperclass() (Figure 11.3). > Student student1 = new Student(); > Class studentClass = student1.getClass(); > System.out.println(studentClass); class Student > Class parentClass = studentClass.getSuperclass(); > System.out.println(parentClass); class java.lang.Object Figure 11.3. Showing a student object with a reference to its class and a reference from the class to its parent class. |

 public class Student { /////////////// fields /////////////// private String name; private double[] gradeArray; /////////// methods /////////////// public String toString() { return "Student object named: " + this.name; } } |
If you create a student object and print it out you will get:
> System.out.println(new Student()); Student object named: null
|

11.2.4. Default Field Initialization
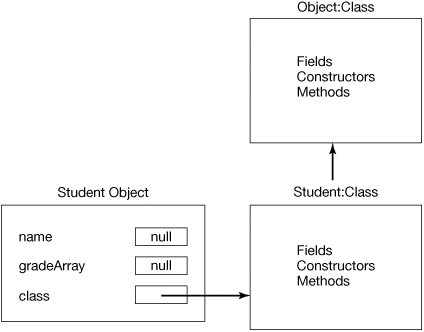
When an object is created, all of the fields of the object are initialized. Object fields that aren't explicitly initialized by assignment statements in the declaration will be null, number fields will be 0, and boolean fields will be false. In Figure 11.4, we see that the default for name is null since it is an object reference. This will also be the default value for the gradeArray since an array is also an object.
Figure 11.4. Showing a student object with the default initialization of the fields.
How do we set the values of the fields so that one student object is different from another? To do this we create constructors to initialize the values of the fields.
11.2.5. Declaring Constructors
A constructor is automatically called after a new object is created using the new operator. The constructor sets up the object, which usually means initializing the fields. You might say, "Wait a minute, we didn't define a constructor in the Student class, so how could one have been called?" If the compiler doesn't see any constructors it creates one that doesn't take any parameters and doesn't change the value of the fields. A constructor that doesn't take any parameters is called the no argument constructor. To create a constructor use:
visibility ClassName(paramList)
Notice that this looks like a method declaration except it doesn't have a return type and the name is the same name as the class. Constructors usually have public visibility.
|

Let's create a constructor for a Student object that takes the name to use for that Student object as a parameter.
Program 97. Student Class with a Constructor
public class Student { //////////// fields ////////////////// private String name; private double[] gradeArray; //////////// constructors /////////// public Student(String theName) { this.name = theName; } /////////// methods /////////////// public String toString() { return "Student object named: " + this.name; } } |
Now when we create a Student object, we can initialize the name.
> System.out.println(new Student("Amy Clark")); Student object named: Amy ClarkWhat happens now if we try to use the no argument constructor?
> System.out.println(new Student()); java.lang.NoSuchMethodException: Student constructor
Notice that we got a compiler error (the error that you get may be somewhat different if you are using Java 5.0) that says that there is no constructor that doesn't take any arguments in the class Student. What happened to the no argument constructor? Well, since we now have at least one constructor in the class Student, the compiler will no longer add the no argument constructor for us. If we want one, we will need to add it ourselves.
Here we have added a no argument constructor that leaves all the field values alone:
Program 98. Student Class with Multiple Constructors
public class Student { //////////// fields ////////////////// private String name; private double[] gradeArray; //////////// constructors /////////// public Student() {} public Student(String theName) { this.name = theName; } /////////// methods /////////////// public String toString() { return "Student object named: " + this.name; } } |
11.2.6. Using a Debugger
How do you figure out what your program is doing (if it runs)? This is the process of debugging. Debugging is figuring out what your program is doing, how that differs from what you want it to be doing, and how to get it from where it is to where you need it to be.
One of the ways to trace what is happening in your programs is to add print statements using System.out.println(). It is often a good way to start debugging when you aren't certain what is happening. You can print out the value of variables at particular points in a method to see if you are getting what you expect. We could add a System.out.println(this.name) before we set the current object's name to the passed name in the constructor. This should show that it was initialized to null originally.
|
Another way to walk through your code with even more control is to use a debugger. A debugger is a tool that helps you walk through your program and see exactly what is happening. Most integrated development environments (IDEs) have a debugger with similar capabilities. A debugger can save you hours of frustration, so it is worth spending some time learning to use one!
To use the debugger in DrJava, you need to click on DEBUGGER in the menu and then check the DEBUG MODE checkbox. This will modify the way the DrJava windows look (Figure 11.5).
Figure 11.5. DrJava with debug mode turned on.
The debug mode adds some windows for debugging. Don't worry about these for now. The most common thing to do in a debugger is set breakpoints. This is a place that you want to stop execution so that you can see what is going on. Let's set a breakpoint in the constructor at the line that assigns the value of the name in the current object. Execution will stop before this line is executed.
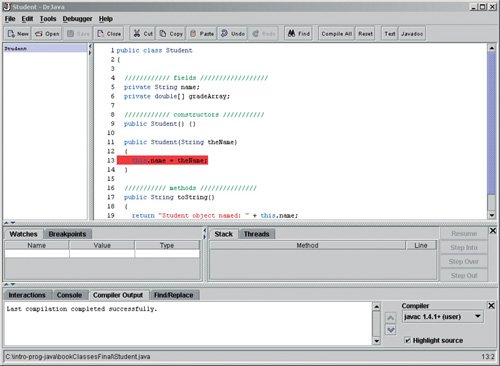
To set a breakpoint in DrJava you can right-click on a line of code and then click on TOGGLE BREAKPOINT in the popup menu. You can also click on a line of code and then click on DEBUGGER and then on TOGGLE BREAKPOINT ON CURRENT LINE. In DrJava, once you set a breakpoint the line is highlighted in red (Figure 11.6), other IDEs may use another way to show a breakpoint. The key point is that alldebuggers allow you to set breakpoints.
Figure 11.6. A breakpoint highlighted in red. (This item is displayed on page 354 in the print version)
Now when you execute the following:
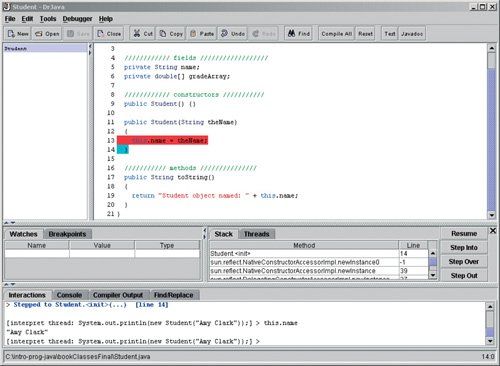
> System.out.println(new Student("Amy Clark"));You will notice that the execution will stop and the breakpoint line will be highlighted in blue (Figure 11.7). The STACK tab will show the line number and the method name where we have stopped. We have stopped at line 13 in the class Student. The <init> is the name the debugger gives to constructors.
Figure 11.7. Execution stops at the breakpoint. (This item is displayed on page 355 in the print version)

Now what do we want to do? At this point we can type things in the interactions pane to investigate the values of the variables and fields that are in scope.
> this.name null > this.gradeArray null > theName "Amy Clark"
From these values we see that the fields did get assigned the default values. And, we see that the parameter theName has a value of "Amy Clark". Let's let execution go forward by one step and then stop again. We do this by clicking on the STEP OVER button.
We can check the value of the current object's name using the interactions pane (Figure 11.8).
> this.name "Amy Clark"
Figure 11.8. After clicking on Step Over.
We can let execution continue from here by clicking on the RESUME button. We can also stop debugging at anytime by clicking on the 'X' at the upper right of the debugging windows (to the right of the RESUME button).
EAN: N/A
Pages: 191