Networking in Python
| [ LiB ] |
Networking in Python
For Python to send or receive information between two computers, it needs both of those computers to understand a common address. This address consists of two things: an Internet address (or IP address) and a port number.
IP addresses are 32-bit numbers represented by four decimals and separated by dots (for example: 10.124.220.13). These numbers range from 0 to 255. Each IP address for each network card or connector in a network must be unique.
A port is an entry point into an application or service that resides on the computer. Ports are numbers represented by 16-bit integers, ranging from 0 to 65-535. Certain ports on any
NOTE
The OSI Model
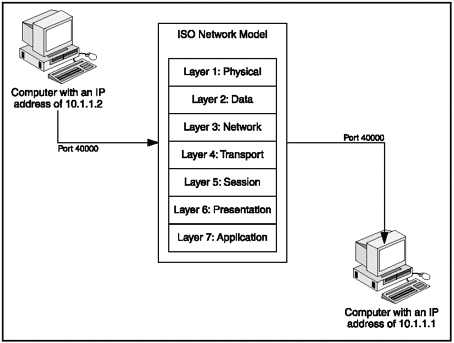
Systems of networking are defined by the OSI/ISO ( Open Systems Interconnection/International Standards Organization) model. The OSI model is made up of seven layers. Most of today's networking protocols (like TCP/IP and UDP) span a few of these layers .
-
Physical Layer.
Defines the information needed to transport data over physical components (cables).
-
Data Link Layer.
Defines how data is passed to and from the physical components.
-
Network Layer.
Organizes the network by assigning addresses to each network element (IP).
-
Transport Layer.
Packs data and ensures transfer on the network (TCP, UDP).
-
Session Layer.
Handles each individual session or connection made.
-
Presentation Layer.
Used to handle problems with different formats and platforms.
-
Application Layer.
The actual applicationthe FTP client, HTTP browser, e-mail handlers, and so on, that run on the network.
Figure 4.22. Sample communication between two computer stations
Python uses a construct called a socket to send and receive data between addresses. Sockets were originally introduced by UNIX BSD way back in the early 80s and are used today to provide network-application connections. Basically, each end of a network application needs to have a socket object of some type established on an address in order to send and receive data or communicate. Establishing a socket on an address is called binding .
Python has a socket() module to create object-based socket-style connections, and socket()
Table 4.30. socket() Methods
| Method | Purpose |
|---|---|
| accept() | Accepts a new connection and returns two values: a new socket object to be used to transfer data and the address of the socket that this object is talking to |
| bind() | Binds the socket to a port address |
| close() | Closes the socket |
| connect() | Connects to another socket |
| getpeername() | Returns an IP address and the port to which the socket is connected |
| getsocketname() | Returns an IP address and the port of its own socket |
| listen() | Starts listening on a given port, waiting for other sockets to connect |
| makefile() | Creates a file object that you can use read() and write() on |
| recvfrom() | Returns the data string received from the socket and the IP address that has originated from the socket |
| send() | Sends the date string to the socket |
| sendto () | Sends the data string to the socket hosted by hostame at the provided port |
| setblockingflag() | Blocks all read/write operations |
| shutdown() | Shuts down the client sockets or the server sockets or both |
can be used to create both sides of a connection (which are usually referred to as the client- side and server-side ). The socket() module implements a number of functions, as listed in Table 4.29.
Table 4.29. socket() Functions
| Function | Purpose |
|---|---|
| socket() | Creates and returns a new socket object |
| gethostname() | Returns the hostname of the local machine |
| gethostbyname() | Converts hostname to an IP address |
| gethostbyaddr() | Returns a tuple containing the hostname, hostname alias list, and hostname IP list |
| getprotobyname () | Returns a constant value equivalent to the protocol name |
| getservbyname() | Returns the port number associated to the service and protocol pair |
Once created, each socket object has access to a number of methods, as listed in Table 4.30.
NOTE
socket.ssl() can be used to set up a secure SSL connection. The secure connection uses OpenSSL, which is also supported in the socket module.
Let's get Python to create a network connectionin this case, a TCP connection (see the upcoming sidebar for more information on TCP and UDP). In order to set up the server side of the connection, Python needs to take the following steps:
-
Create a socket.
-
Bind the created socket to an available port.
-
Start listening on that port.
-
Check the port periodically for new connections coming in.
-
When a connection comes in (from the client side), the server processes the request and sends it back to the client.
Taken one at a time, these steps are fairly straightforward to implement. To create a socket, you first import the socket module and then create an instance of a socket; this requires a call to the socket constructor. The code looks like this:
# Import the socket() module import socket # Call the socket constructor created_socket=socket.socket(family, type)
Typically, the family designated in the socket constructor is set as AF_INET , which is an Internet-type socket, or a socket that communicates between different machines. You may also run into the AF_UNIX family, which is used for a UNIX-type socket and is normally used when sockets communicate with each other on the same machine.
For a type designation you would see SOCK_STREAM for a stream or TCP connection or SOCK_DGRAM for a datagram or UDP connection. If you wanted an Internet TCP connection, the socket constructor would look like this:
server_socket = socket.socket(socket.AF_INET, socket.SOCK_STREAM)
After creating a socket, you need to bind the socket to a port. To do so, you use the bind() method:
socket.bind(address)
The socket is of course replaced with your socket instance, and the address is a two-part tuple in the form of ( host, port ). If you wanted to bind server_socket to host 10.100.100.201 and port 9000, do this:
server_socket.bind("10.100.100.201", 9000) Step 3 is to tell the server to start listening on the port, waiting for any connections. For this step you use the listen() method, like so:
socket.listen(backlog)
backlog lists the maximum number of clients that can request connections from the server. In this example, you will set server_socket with a maximum of 10 connections:
server_socket.listen(10)
Now you need to set up a loop that waits for the client to request a connection. The loop needs to run an accept method to receive the client requests:
connection, address = socket.accept()
Finally, you set up communications for the server and client using the send() and recv() methods. All of this inside of a while loop in Python looks like the following:
while 1: data_sent = "data to send client" client_socket, client_address = server_socket.accept() print "Connection established with", client_address client_socket.send(data_sent) client_socket.close()
The data_sent variable sets the data that will be sent to the client. Then the socket accept() method grabs the client address to print on the following line. The contents of data_sent are then sent to the client, and the connection is closed with the close() method.
The connection on the client side is even easier to code. There are only three things that need to be done:
NOTE
TCP versus UDP
TCP/IP is a connection-oriented form of networking. It was originally developed by the US Department of Defense as a form of communication with built-in redundancy. Layer 3 of the OSI model (the Network Layer) is provided by the Internet Protocol (IP), which provides the basic mechanism for routing packets back and forth on the Internet.
TCP is short for Transmission Control Protocol. It is the main form of communication over the Internet (working on OSI's Layer 4). IP needs TCP because on Level 3, IP doesn't understand the relationships between the packets it sends, and it doesn't perform any re-transmission. TCP handles the reliability by double-checking the packets' arrival and controling sequencing of packets by keeping track of when each one arrives. With TCP and IP, you can have two-way connections between machines over the physical OSI layers, and, thus, all the cable, wires, phone lines, satellites , and wireless stations that make up the Internet.
UDP is a different form of protocol that provides transport on OSI's Level 4 instead of TCP. UDP is faster because it doesn't track packets sent and it doesn't bother acknowledging their arrival. This, of course, is also less reliable. TCP guarantees delivery and the order of delivery, but UDP doesn't guarantee either, and since it doesn't have to waste time to double check, it can send packets to a destination more quickly.
-
First, create a socket.
-
Open a connection to the server socket via the address (the address being the host's IP and the port number it is listening on).
-
If any data comes through the connection, process it and close the connection.
Step 1 looks fairly identical to the server-side steps:
import socket client_socket = socket.socket(socket.AD_INET, SOCK_STREAM)
After the socket is created, Step 2 involves connecting via the server address; this is accomplished through the connect() method:
client_socket.connect("server_hostname", 9000) Finally, any data received is processed via the recv() method (capped at 512 bytes in this example), printed, and then the client connection is closed via the close() method:
data_received = client_socket.recv(512) client_socket.close() print "Received from host", data
Let's try the sample again, only this time initiate a UDP connection instead of a TCP connection. With UDP, the server still creates a socket and binds with the address and then begins listening. But at that point, the server's obligations stop, and the rest is handled by the client.
To start, when initializing the socket you must specify SOCK_DGRAM instead of SOCK_STREAM :
server_socket = socket.socket(socket.AF_INET, socket.SOCK_DGRAM)
And, in this case, the while loop action is shortened up to only receive the information from the client (with a maximum number of bytes again) and display it:
while 1: data_sent, address = server_socket.recvfrom(512) print address[0], "server sent: ", data_sent
It is the client, in this example, that does the rest of the work, Again, you need to specify that the socket is a UDP-type socket:
client_socket = socket.socket(socket.AD_INET, SOCK_DGRAM)
Then you specify the data to send, make the connection, send the data, and close the connection:
data_sent = my_input("Data to send") client_socket.sendto(data_sent, ("server_hostname", 9000)) client_socket.close() How about an actual example? How about setting up a socket client and a socket server and send text data between them? (This code can be found in the Chapter 4 source files, labeled UDP_Server.py and UDP_Client.py , on the CD.) For the server, start by importing socket and then designate a host and a port as variables :
# UDP_Server.py import socket My_Host = "127.0.0.1" My_Port = 5555
You are using the standard localhost address 127.0.0.1 because, by doing so, you can then test the server and client on the same machine. Next, establish a UDP socket instance as before, and bind the socket to My_Host and My_Port :
# Create the socket instance My_Socket = socket.socket( socket.AF_INET, socket.SOCK_DGRAM ) # Bind the socket to host and port My_Socket.bind( ( My_Host, My_Port ) )
And finally, add a while loop that receives the packet from the client:
while 1: Received_Packet, address = My_Socket.recvfrom( 1024 ) print "Packet received:" print "From host:", address[ 0 ] print "Host port:", address[ 1 ] print "Containing:" print "\n" + Received_Packet # Send data back to client print "\ndata to client...", My_Socket.sendto( Received_Packet, address ) print "Packet sent\n"
This time, you take advantage of the information that comes through the connection, print the data, and then send data back to the client. Afterwards, you close the socket connection.
Now for the client: Again you need to import the socket, set up the variables, and create an instance of the socket:
# UDP_Client.py # Import socket and set up variables import socket My_Host = "127.0.0.1" My_Port = 5555 # Create the socket instance My_Socket = socket.socket( socket.AF_INET, socket.SOCK_DGRAM )
Now you handle the sending of the data back and forth in a while loop:
# while loop that handles the sending of the packets while 1: # Send the data packet to the server My_Packet = raw_input( "Send Data to Server:" ) print "\nSending packet containing:", My_Packet My_Socket.sendto( My_Packet, ( My_Host, My_Port ) ) print "Packet sent\n" # Receive information back from the server My_Packet, address = My_Socket.recvfrom( 1024 ) print "Packet received:" print "From host:", address[ 0 ] print "Host port:", address[ 1 ] print "Containing:" print "\n" + My_Packet + "\n"
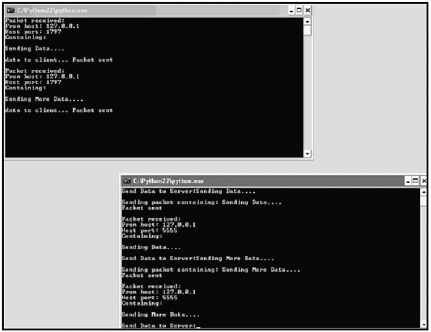
Data is received through Python's useful raw_input and sent to the server socket. The while loop stays open to receive information that it is expecting from the server, and then prints out the information. When you run the client and server, you are able to send a custom message back and forth; it looks something like Figure 4.23.
Figure 4.23. UDP client server connection using the socket() module
| [ LiB ] |