Chapter 29. Building a Basic ColdFusion Site
| CONTENTS |
| |
|

- Setting Up Your Workstation to Work With ColdFusion
- Setting Up a ColdFusion Site in Dreamweaver
- Setting Up a Database Connection
- Displaying Dynamic Data Using ColdFusion
- Summary
ColdFusion has been the center of quite a buzz in the web development community in recent years, and for good reason. It was the very first application server; its invention created the category. Designed specifically for building web applications, it is both extremely powerful and surprisingly easy to learn and use.
With Dreamweaver MX, developing ColdFusion applications just became a whole lot easier. For the web designer just venturing into data-driven web sites, Dreamweaver makes building ColdFusion applications possible without ever writing a line of code, and the more experienced developer will be pleased by the quality of code Dreamweaver produces.
Just what is ColdFusion? The term refers to two technologies that work together:
-
The ColdFusion Application Server, a piece of software that typically is installed on the same computer as the web (or HTTP) server.
-
The ColdFusion Markup Language (CFML), modeled after HTML.
This chapter explains how to set up a workstation for ColdFusion application development, how to set up a ColdFusion site in Dreamweaver MX, display dynamic data using ColdFusion, and how to create interactive pages using ColdFusion and the ColdFusion Markup Language (CFML).
Before building web sites that make use of application servers, such as ColdFusion, it's best to get a basic understanding of the technologies necessary and how they all fit together. Unless you are already very familiar with data-driven web applications, be sure to read Chapter 26, "Introduction to Dynamic Dreamweaver" before diving in here.
Setting Up Your Workstation to Work With ColdFusion
The process of building ColdFusion web applications demands that you have the ability to test your applications locally. You will need a setup on the computer where Dreamweaver is installed that enables ColdFusion to process pages and to communicate with a database. Both a web server and ColdFusion Server, two distinct pieces of software, are needed. You'll also need a database management system (DBMS). For Mac users: As of this writing, ColdFusion Server will not run on Mac, so you'll need to set up for remote development.
Setting Up the Web Server (HTTP Server)
First, you will either need a web server running locally or a connection to a remote computer running web server software. Any of the three servers outlined in Chapter 26 will work for ColdFusion development: Internet Information Server (IIS), Personal Web Server (PWS), or Apache. See Chapter 26 for details on obtaining, installing, and configuring these web servers.
Setting Up the Application Server (ColdFusion Server)
Next, you need to install ColdFusion Server. Fortunately, this is usually a simple process. A copy of the trial version, which reverts to a permanent single-user Developer Edition after 30 days, can be found on the Dreamweaver MX CD (Windows version only); alternatively, you can download it from www.macromedia.com. ColdFusion Server will run on Windows, Linux, and various other versions of UNIX. As of this writing, it is not available for Mac OS X.
During the installation process, you will be asked to indicate what web server you want ColdFusion Server to work with; ColdFusion Server will then be set up to receive requests from whatever web server you specify. You'll also be asked to specify a username and password for use with ColdFusion Server. Remember this information! You'll be asked for it when working in Dreamweaver.
Mac users will need to install ColdFusion Server on a remote computer. See the section in Chapter 26, "Setting up for Development on a Remote Computer" for more on this.
Setting Up the Database
To build sites that interact with a database, you'll need a database management system running on your local system. The most popular for small to medium-sized online databases is Microsoft Access; MySQL is also common. (See Chapter 26 for more details on DBMSs, and Appendix C, "Instruction to MySQL," for information about obtaining and installing MySQL.) Whichever you choose, it will need to be present on the remote server where you eventually publish your finished web site on the Internet. In addition to the DBMS, you'll need the database itself and a driver that allows the ColdFusion Server to connect to it.
The Antiques Database
Two databases are available for the exercises in this chapter, one for Access and one for MySQL. If you're using Access, you'll use the database file antiques.mdb; open the databases/antiques_access folder on the CD and copy antiques.mdb to any location on your hard drive. If you're using MySQL as your DBMS, open the databases/ antiques_mysql folder on the CD and copy the antiques folder to the computer where your web server is installed. The folder must be stored in the mysql/data directory.
The Driver
The driver allows the application server to communicate with the database. It can be set up only after you have properly copied the database to your host computer. Follow the instructions in the preceding chapter to set up your driver.
Once you have established your ODBC driver, you need take another step to let the ColdFusion MX server know how to communicate with the data.
-
Open the ColdFusion Administrator by choosing Start > Macromedia ColdFusion MX > Administrator.
-
Enter the password you established when you instaled ColdFusion MX.
-
In the Administrator, click the Data Sources link on the left side of the page
-
In the Data Sources page, type AntiquesBarn in the Data Source name field. For the Driver, choose Microsoft Access and click Add.
-
In the Data Source Definition box, click the Browse Server button next to the Database field. Browse to the antiques.mdb data base you copied from the CD.
-
Leave all the other fields blank and click Submit. You should now see your new ColdFusion MX data source in the list and the Status indicator should display "OK".
-
Logout of the Administrator and close the browser.
Setting Up Your Local and Remote Folders
Dreamweaver dynamic sites must have local and remote folders, just like any Dreamweaver site. If you have your web server installed on the same computer you're developing on, both folders will be on the same computer.
To set up your local root folder, copy the chapter_29 folder from the CD onto your computer. Its exact location doesn't matter for the exercises.
Your remote folder must be located on the same computer running the server, in a location that the server recognizes as a shared directory for web serving. Depending on which web server you will be working with, do one of the following:
-
If your web server is IIS or PWS, create a folder called antiquesbarn and store it on the same computer that is running IIS/PWS, within the c:/inetpub/wwwroot directory.
-
If your web server is Apache, create a folder called antiquesbarn and store it on the same computer that is running Apache, stored within the c:\Program Files\Apache Group\Apache\htdocs\ directory.
Setting Up a ColdFusion Site in Dreamweaver
The first step in using Dreamweaver to work with ColdFusion is defining a site that will use your web server and ColdFusion server to process its pages. The main difference between using Dreamweaver for static and for dynamic sites is how it previews your pages. In a static site, when you choose Preview in Browser (F12), Dreamweaver launches the browser and passes it the local address of the current page:
c:\Client Files\Web\My Local Site\index.html
or
file:///Client Files/Web/My Local Site/index.html
In a dynamic site, it's not enough just to view the pages in a browser. Dreamweaver has to activate the web server, passing it an HTTP request so that it processes the files. This requires an address like this:
http://localhost/mysite/index.html
or
http://192.128.164.123/mysite/index.html
That's why, when you define a dynamic site, you must go through the additional steps of making sure Dreamweaver can connect with your server and "serve" your pages.
Exercise 29.1 Setting Up the Antiques Barn Web Site
In this exercise, you define a dynamic ColdFusion site in Dreamweaver using the Site Definition dialog box. Make sure you've set up your workstation before going through the exercise.
-
In Dreamweaver, go to Site > New Site. In the Site Definition dialog box that appears, click the Advanced tab to bring it to the front.
What about the wizard? In this exercise, you're using the Advanced tab of the Site Definition dialog box. The information is more compactly presented using this method, easier to see and troubleshoot. After you have the site defined and working, check out where Dreamweaver has stored your site information in the Basic and Advanced tabs, to see how the two methods of site definition compare.
-
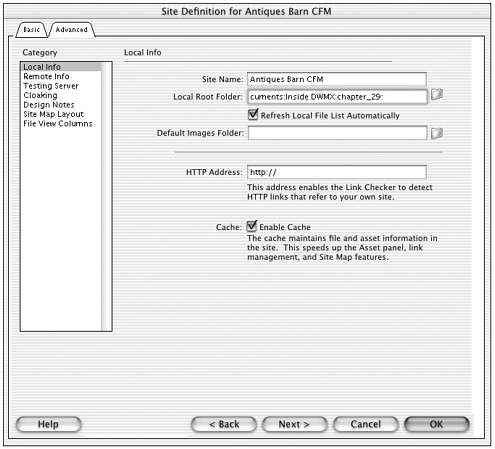
From the Categories list, choose Local Info. Local site information for a dynamic site is no different from any site information. Name your site Antiques Barn CFM. For the local root folder, browse to the chapter_29 folder you copied from the CD (see Figure 29.1).
Figure 29.1. Local Info settings for the Antiques Barn exercise site.
-
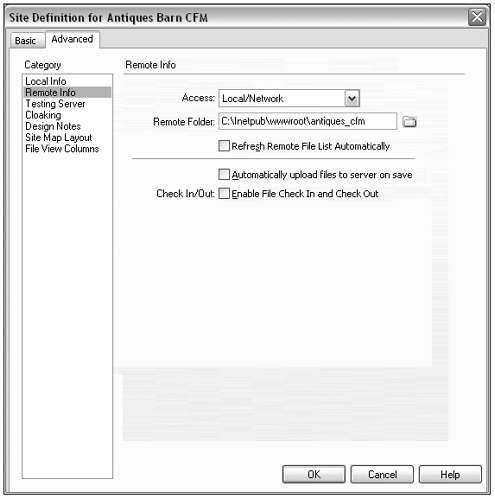
From the Categories list, choose Remote Info. You'll enter different information here depending on how you set up your workstation (as discussed earlier in this chapter).
If you're working on the same computer that's running your web server, set your access method to Local/Network and browse to the shared remote antiques_cfm folder you defined earlier (see Figure 29.2).
Figure 29.2. The Remote Info setup for the Antiques Barn CFM site, if your Dreamweaver site and your web server are on the same computer.
If you're connecting to a different computer for your web server, choose FTP access. Enter the IP address of the other computer and username password, if needed (see Figure 29.3). Refer back to the discussion on IP addresses in the preceding chapter, if necessary.
Figure 29.3. The Remote Info setup for the Antiques Barn site, if your web server software is on a different computer than your Dreamweaver site.
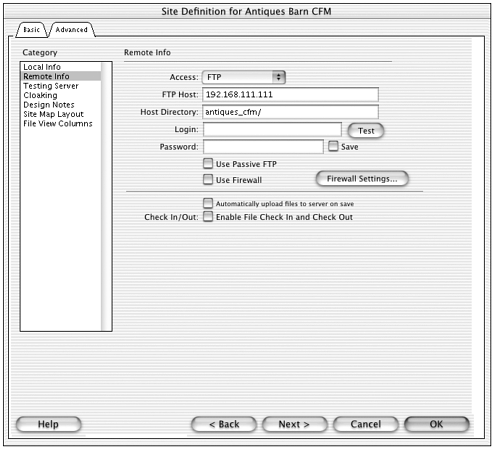
Note

Use FTP access even if your two computers are networked directly.
-
From the Categories list, choose Testing Server. From the This Site Contains pop-up menu, choose Dreamweaver MX pages only. If the access information hasn't been filled in for you, choose the same Local/Network or FTP access information you chose in the preceding screen (see Figure 29.4 or Figure 29.5).
Figure 29.4. The Testing Server setup for the Antiques Barn CFM site for a single workstation.
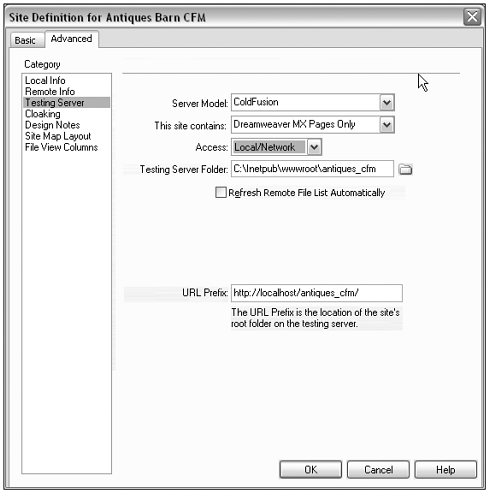
Figure 29.5. The Testing Server setup for the Antiques Barn CFM site for a computer networked to a web server.
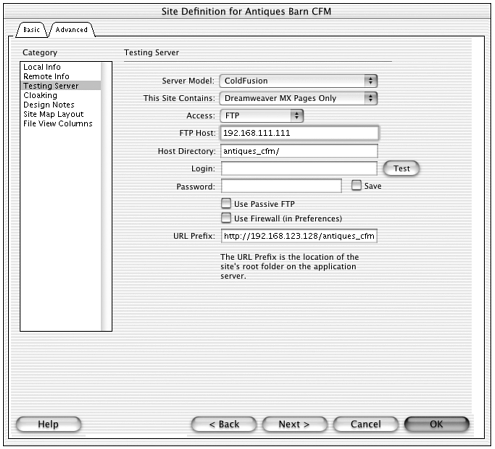
If you're using FTP access, you also have to enter the name of the FTP shared folder you or your network administrator created on the other computer. After you have done this, click the Test button to see whether you entered your settings correctly. (If you cannot connect successfully, double-check everything IP address, folder name, username, and password.)
Also in this screen, examine the URL Prefix field. Dreamweaver should have filled in this information based on your previous entries. If you're working on one computer, the address will include the localhost or 127.0.0.1 IP address. If you're working on two connected computers, the address will include the host computer's actual IP address. This is the URL information Dreamweaver will use every time you preview your pages in the browser. It must be correct!
When you think all the site information is correct, click OK to close the dialog box. It's time to test things out.
-
From your local root folder, open index.html and Preview in Browser (F12). You're probably in for a nasty surprise. Either the page will display with broken images or you'll get a File Not Found error. Why is this happening?
When you're working on a dynamic site, Dreamweaver uses the remote folder to generate its previews. (As explained earlier, this has to happen so that the page can be served rather than merely viewed.) Currently, your remote folder contains nothing! You must get in the habit of uploading files to the remote folder before previewing.
In the Site panel, select all the files in your site, and click the Put button to upload them all. Then try previewing again. If you entered the correct information in your Site Definition dialog box, you will be able to preview the page. The browser's Address field will show the http:// address of the home page, not its file location on your computer. (If you can't preview, keep double-checking those site settings until you can. You cannot keep working in Dreamweaver until you get this part right.)
Setting Up a Database Connection
In ColdFusion terms, the database connection is a script that calls on the driver to talk to the database. Dreamweaver creates this script for you and stores it in a special connections file when you choose data source name (DSN) from the Databases panel. Because this information gets stored in a special file that can be accessed by any page in your site, you have to define the connection only once for the entire site.
Exercise 29.2 Creating a Database Connection
In this exercise, you create the connection script that will allow your pages to communicate with the antiques database. You must already have installed your database and created a driver for it (as outlined in the preceding section) before continuing with this exercise.
-
Because Dreamweaver has to know what kind of connection to create, you must have a dynamic document open before you can create the connection. From your local site, open catalog.cfm.
-
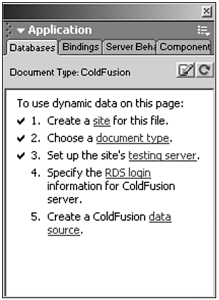
From the Application panel group, open the Databases panel. The panel will display help information letting you know what needs to happen before you can set up your connection. If you have catalog.cfm open, the display will indicate that your next step is to establish your RDS login to the ColdFusion Server (see Figure 29.6).
Figure 29.6. The Databases panel ready to log on to the ColdFusion Server.
Click the RDS login link and the Login dialog box appears. Enter the password you established when you installed ColdFusion Server and click OK.
-
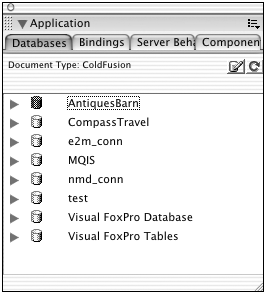
As soon as you click OK, Dreamweaver connects to the server and collects a list of available data sources. The AntiquesBarn driver you defined earlier will appear in this list, along with several other drivers (see Figure 29.7).
Figure 29.7. The Databases panel showing all databases available to the ColdFusion Server.
-
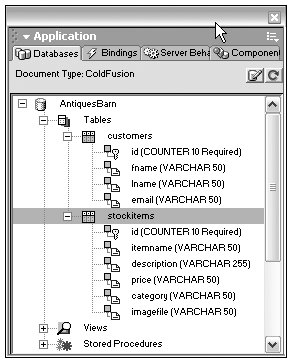
That's it! You're done. Congratulations! You can now use this panel to explore your database. Expand the AntiquesBarn connection icon to see Tables, Views, and Stored Procedures. The antiques database contains only tables. Expand the Tables icon all the way to see that the database contains two tables stockitems and customers and to see what columns (information fields) each table contains. You cannot see the records stored in the database from here, but you can examine its structure (see Figure 29.8).
Figure 29.8. The Databases panel showing the structure of the antiques database.
Note
What happened here? If you're used to working with ASP or other server technologies, you might be wondering where Dreamweaver has put your connection information. When working with ColdFusion, there is no need for specific connection scripts stored inside your site, because the ColdFusion Server keeps track of all this information. As long as you're logged in to the server, all DSNs that the server can see are available to you.
Displaying Dynamic Data Using ColdFusion
You're now fully set up to build the Antiques Barn web site! In Exercise 29.3, you begin building pages that interact with the database using ColdFusion.
Probably the most basic task you'll want your ColdFusion pages to perform is to display information from a database. This involves creating a framework of static page elements (banner, navigation controls, a table for layout, and so forth) and adding ColdFusion code that draws data from the database and places it on the page.
Displaying dynamic data involves several tasks. First, you must query the database to collect the information you want to display (which records, which fields, in what order, and so on). This collected information is called a recordset. Then you create a dynamic element for every field you want to display. (A field is a column in one of the database tables, remember.) Then, unless you want your page to display only information from the first record it finds, you must create special code that steps through all the collected records and displays them one after the other. In Dreamweaver language, this is called creating a repeated region.
Creating a Recordset
In Dreamweaver, you create a recordset with the Bindings panel, in the Application panel group. To create the recordset, follow these steps:
-
Open the Bindings panel, click the plus (+) button, and choose Recordset (Query).
-
In the Recordset dialog box that opens, choose whatever database elements (usually table columns, which translate into record fields) you want.
Note
When you choose items in the Recordset dialog box, you're actually telling Dreamweaver how to write a SQL query for you. To see the actual SQL syntax, click the Advanced button and examine the SQL input field. (Click the Simple button to get back to the standard dialog box.) See the preceding chapter for more on SQL.
-
After you have defined the recordset, the collected columns will appear in the Bindings panel. Because Dreamweaver has to write a script to collect the recordset, technically speaking the collection action is a behavior. It will appear in the Server Behaviors panel (in the Application panel group).
You also can create a recordset by going to the Application tab of the Insert bar and choosing the Recordset object. Doing this is exactly the same as using the Bindings panel. Think of it as a shortcut.
Exercise 29.3 Collecting Data for the Antiques Barn Catalog Page
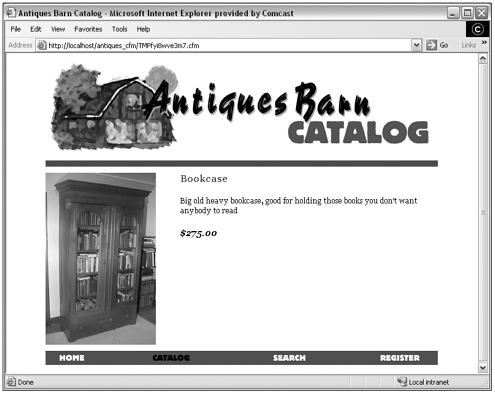
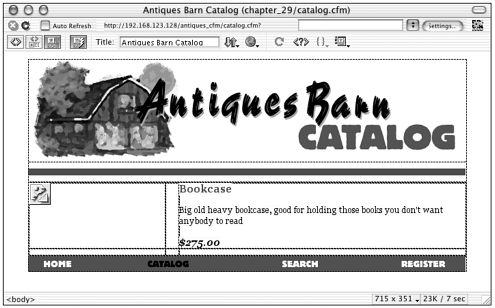
In this exercise, you add dynamic elements to the catalog.asp page, which already has its static layout elements in place. This page is meant to display all the items for sale at the Antiques Barn, so you'll collect information from the stockitems table of the antiques database. You'll display a picture, name, description, and price for each item (see Figure 29.9).
Figure 29.9. The Antiques Barn catalog page being served with one record displaying.
-
Begin by opening catalog.cfm. Examine the layout structure in Design view, and you'll see that the middle row of the main layout table is ready and waiting for a picture in one column and various text items in another.
-
First, you have to query the database to collect some data to play with. From the Application panel group, open the Bindings panel. Click the plus (+) button and, from the menu, choose Recordset (Query). The Recordset dialog box appears.
-
You can give your recordset a custom name or accept the default name. (For the examples shown here, the default name is used.) If the AntiquesBarn doesn't automatically appear in the Connections field, choose it from the pop-up menu. That will populate the rest of the dialog box with information from the antiques database.
-
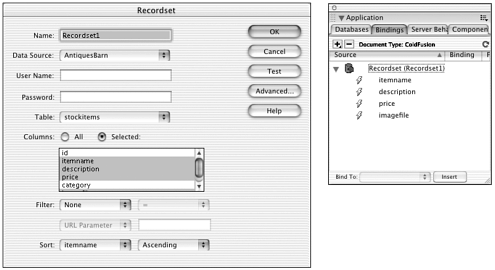
You want information from the stockitems table, so choose it from the Tables pop-up menu. You don't need to collect all the columns (fields). For columns to choose, select the Selected radio button. Then Ctrl/Cmd-click to choose itemname, description, price, and imagefile. Choose to sort the information based on itemname, ascending (from A Z) and click OK. Figure 29.10 shows the completed dialog box and resulting Bindings panel.
Figure 29.10. Collecting the recordset for the Antiques Barn catalog page and the resulting Bindings panel.
Tip
From within the Recordset dialog box, click the Test button to see what information your recordset will collect. This is a handy way to make sure you've collected the proper set of data, before you get too far in the process of making the page.
Inserting Dynamic Elements
Data from the database can be inserted anywhere in your document. Names, prices, and descriptions can become dynamic text elements you can even format them using all the standard HTML and CSS text options. Database fields also can be used behind the scenes, to help construct the HTML code of your page. Therefore, although most databases cannot contain images or other media elements, a field might contain a filename that can be used in the src parameter for an <img>. This is how you insert dynamic images into your pages. (For details on creating dynamic text, see the dynamic data sidebar in Chapter 4, "Working with Text." For more on dynamic images, see the sidebar in Chapter 5, "Working with Images.")
Most databases used for dynamic sites cannot contain actual media, such as images or sound files. They can contain only text.
Exercise 29.4 Displaying Dynamic Data in the Antiques Barn Catalog Page
In this exercise, you use the recordset you collected in the preceding exercise to create dynamic text and image elements for catalog.cfm. You also familiarize yourself with the Live Data previewing options in Dreamweaver.
-
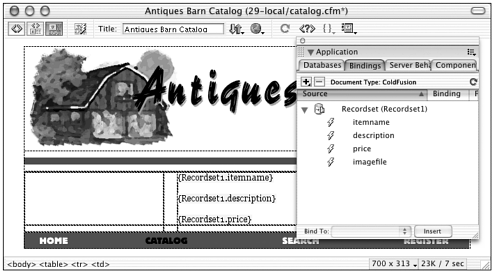
Open catalog.cfm, if it's not already open. In the Applications panel group, open the Bindings panel and expand the view of your recordset so that you can see the individual fields you have collected.
-
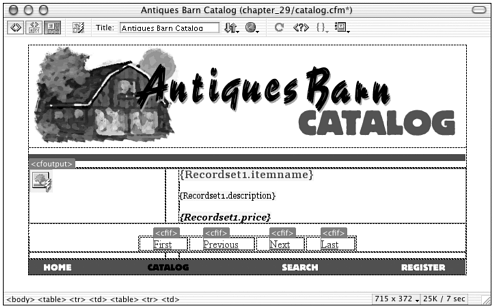
It's easiest to start with the dynamic text elements. As you can see from Figure 29.9, the rightmost column of the layout table should contain the item name, description, and price, each in its own paragraph.
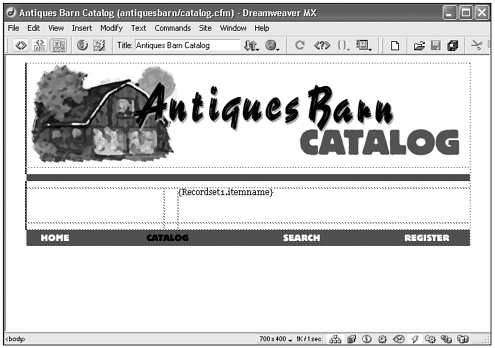
Inserting a dynamic text element can be done in various ways. By far the simplest is just dragging the desired field from the Bindings panel to the proper place in the Document window. Try that method for the first text element drag the itemname field into the layout table (see Figure 29.11).
Figure 29.11. Inserting a dynamic text element by dragging a field name from the Bindings panel.
When in the document, the dynamic element becomes a text placeholder. In Design view, it looks like {Recordset1.ItemName}. Switch to Code and Design view, and you'll see that the ColdFusion code looks like this:
<cfoutput>#Recordset1.itemname#</cfoutput>
You should already recognize the CFM tag structure. The <cfoutput> tag means "insert the following value here." The code within the tag pair refers to the information in the database's itemname column. When the server sees that code, it will substitute whatever text is in that field for the current record.
-
As far as Dreamweaver is concerned, this item is a stand-in for real text. To demonstrate that, stay in Code and Design view but use Design view to select the new placeholder. From the Property Inspector, apply paragraph formatting (choose Paragraph from the Format pop-up menu). Note that, in the code, <p> tags now surround the placeholder:
<p><cfoutput>#Recordset1.itemname#</cfoutput></p>
From the Design panel group, open the CSS panel. With the placeholder text still selected, choose the itemname style class. Then display changes to accept the new formatting, and your code changes to the following:
<p class="itemname"> <cfoutput>#Recordset1.itemname#</cfoutput> </p>
The placeholder is being treated as though it were real text.
-
Use the same method to insert the description and price into the layout, each in its own paragraph in the table cell. For the price, apply the price CSS class.
-
When you insert dynamic text, you're actually creating a ColdFusion behavior (a script that tells the server to insert certain text). In the Applications panel group, open the Server Behaviors panel, and you'll see one behavior for every dynamic text element you've added, plus a behavior for collecting the recordset (see Figure 29.12). Just like regular behaviors, you can double-click a server-side behavior in the panel to view its properties and edit it.
Figure 29.12. Dynamic text elements in catalog.cfm and the server behaviors used to insert them.
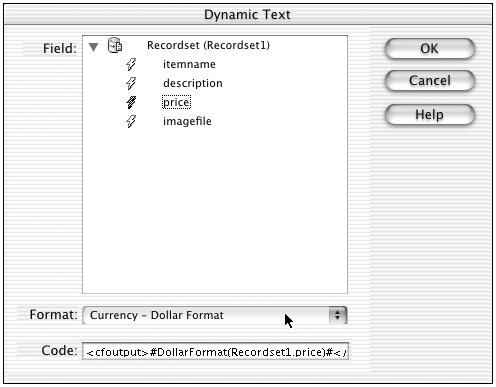
You can use the Server Behaviors panel to apply special formatting to dynamic text elements things such as changing capitalization and decimal point display. For the Antiques Barn catalog page, you probably want the item price to display a little nicer, with a dollar sign and some decimal values.
In the Server Behaviors panel, double-click the entry for the price to open it for editing. In the dialog box that appears, use the Formatting pop-up menu to choose Currency Dollar Format (see Figure 29.13). Click OK to close the dialog box.
Figure 29.13. Adding scripted formatting to a dynamic text element.
Tip
To delete any dynamic element in a document, it's safest to delete the server behavior that created the element, instead of just selecting its placeholder in Design view and deleting. (Dreamweaver will warn you if you try to delete an element the wrong way.)
-
Each catalog entry must also show a picture of the item. A look at the structure of your database (in the Databases panel) will show you that the stockitems table has a field called imagefile. These can be used as the src attribute of an <img> tag to create dynamic images.
To insert the dynamic image, start by placing your cursor in the page where you want the image to be located and then insert the image as you normally would. (Use the Image object from the Insert > Common panel.) When the Insert Image dialog box appears, however, choose the Data Sources option (see Figure 29.14). The list of image files is replaced with a list of fields from your recordset. Choose imagefile and click OK.
Figure 29.14. Inserting a dynamic image by specifying Data Sources, rather than File System, for the src attribute.

Design view now shows the image as a cute little image placeholder icon (with a lightning bolt for dynamic data). If you check your code, you'll see another <cfoutput> tag stuck right in the middle of the <img> tag:
<img src="<cfoutput>#Recordset1.imagefile#</cfoutput>">
Note that no width or height has been entered. That's because Dreamweaver can't determine the dimensions from this data because no actual image has been put here yet.
Previewing with Live Data
You're tired of placeholders! You want to see this page in action. After you've completely set up your site definition, Dreamweaver can send an HTTP request to your server and show you your page, with "live" data in place. As discussed earlier, the live preview originates from the shared remote folder you set up as an IIS/PWS directory. Therefore all image files must have been uploaded to the remote site before the preview will work properly. After you've done that, you can preview data in two ways:
-
Live Data view. In the Document toolbar, click the Live Data button to switch from viewing placeholders to viewing actual data.
-
Preview in Browser. Choosing this command, when you're in a dynamic site, will activate the server and "serve" your page in your primary, secondary, or another browser.
Exercise 29.5 Previewing and Troubleshooting Live Data in the Antiques Barn Catalog Page
In this exercise, you try some different previewing methods (if you haven't already experimented), and use them to troubleshoot your code.
-
With catalog.cfm open, click the Live Data view button. It might take a moment, but real data should pop into your Document window.
Note
If Live Data view doesn't engage properly, it means there's a problem with your site definition. If this happens to you, go back to the previous exercises and the preceding chapter if necessary, and troubleshoot.
You'll immediately notice that there's a problem; your lovely dynamic image isn't displaying properly (see Figure 29. 15). You might have guessed why but in case you haven't, it's time to visit the browser.
Figure 29. 15. Live Data preview of catalog.cfm, but there's a problem with the dynamic image.
-
Turn off Live Data view by clicking the Live Data button to toggle it off.
-
Preview your page in the browser (F12). You'll undoubtedly see the same problem: a missing image. Here in the browser, however, you have some troubleshooting tools at your disposal. If you're in Internet Explorer, go to View > Source. If you're in Netscape, go to View > Page Source.
Examine the code here. You might notice that it looks different from the code you viewed in Dreamweaver. There are no <cfoutput> tags. That's because the server has executed the script within those tags and used it to construct plain old HTML. The HTML code that was constructed to display your table row looks like this (dynamically generated code shown in bold):
<tr valign="top"> <td><img src="bookcase.jpg"></td> <td> </td> <td> <p class="itemname">Bookcase</p> <p>Big old heavy bookcase, good for holding those books you don't want anybody to read.</p> <p class="price">$275.00</p> </td> </tr>
There's your dynamic text! And there's your problem, in the <img> tag. If you examine your site's file structure, you'll see that all images have been stored in an images folder, so the correct relative URL to the clock image is images/ bookcase.jpg. However, the database entry doesn't include that extra folder name. No wonder the browser cannot find the image!
-
You could, of course, fix every single database entry to include a folder name. However, it's much easier to tweak your ColdFusion code, just a little, to do the job for you. When you get used to the way the server just adds the placeholders right into the main code, it'll be easy.
Back in Dreamweaver, select the dynamic image placeholder. Then open the Server Behaviors panel. The behavior that is creating your image will be highlighted. Double-click to open the editing dialog box. Because you know you have to add the folder name to the entry, manually fix the URL entry so that it looks like this (new code in bold):
<img src="images/<cfoutput>#Recordset1.imagefile#</cfoutput>"> -
After you've done this, try previewing your page in a browser again (F12). The image should show up! (If it doesn't, select View > Source to check your constructed code; and back in Dreamweaver, check Code view to make sure your <img> tag looks exactly like the one shown here.)
The only drawback to manually adding relative path information to your dynamic image source is that you have to know what the relative URL to your images should look like. You can't just browse to an image and let Dreamweaver do the thinking for you!
Displaying Multiple Records with Repeated Regions
A repeated region is any chunk of page code that you want to repeat for as many records as you want to show. A repeated region can be a line of text, an item in a list, a table row, or even an entire table. To create a repeated region, follow these steps:
-
Select the part of your page that you want to repeat.
-
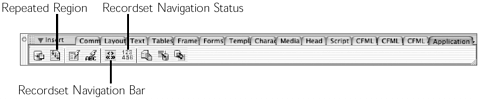
In the Server Behaviors panel, click the plus (+) button and choose Repeat Region; or choose the Repeated Region object from the Insert > Application bar (see Figure 29.16). A dialog box appears, asking which recordset you want to display and how many records you want to show. (Only choose to display all records if you know for sure your database won't have too many records to fit on a decent-sized web page.)
Figure 29.16. The Repeated Region, Record Navigation Set, and Record Navigation Status objects.
Navigating Through Multipage Displays
If you've set up the repeating region not to display all records simultaneously, you need to give your visitors a way to view the first group of records, the next group after that, and so on. Dreamweaver offers two tools to help with this: Record Navigation Bar and Record Navigation Status. Both are technically server behaviors, but also are easily accessible as objects from the Insert > Application bar (see Figure 29.16).
The Record Navigation Bar object (or server behavior) determines whether there are more records in the recordset than are displayed on the current page; and if so, displays previous page, next page, first page, and last page navigation controls. All the hard work is done for you. All you have to do is insert the object (or server behavior), and Dreamweaver creates the links and adds the scripting to display different records on your page.
The Record Navigation Status object (or server behavior) determines how many total records are in the recordset, and which are currently displaying on the page, and adds a text message to the page Records 1 to 10 of 56. Again, all you have to do is insert the object; Dreamweaver takes care of the rest.
Exercise 29.6 Displaying Multiple Records in the Antiques Barn Catalog Page
In this exercise, you build the catalog page further by displaying multiple records. You also add navigation controls that enable visitors to move between records easily.
-
Open catalog.cfm, if it isn't already open.
-
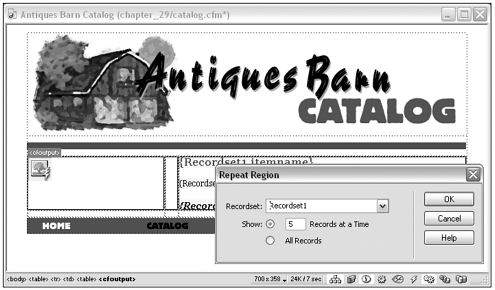
You want the table row containing your dynamic elements to repeat. Select that row. (Drag across the cells, or click inside a cell and use the tag selector to select the <tr>. It's important to make sure you get exactly the right table parts selected!)
-
From the Insert > Application panel, choose the Repeat Region object. The Repeated Region dialog box will appear, asking you which recordset to base the repeats on (you have only one recordset, so there's nothing to choose here) and how many records to show. Set the number of displayed records to 5 and click OK (see Figure 29.17). Note how the Design view display has changed to indicate the repeated region.
Figure 29.17. Inserting a repeated region that will display five records at a time.
-
Preview your work in the browser (F12). There are the first five records of your recordset!
Tip
If there's anything wrong with your ColdFusion code, you'll get a Page Cannot Be Displayed message from the server. Read through the text of this message and you'll find some very specific information on what's wrong with the page, including what line of code contains the error. Occasionally, even Dreamweaver-generated code generates errors. Examining these errors and troubleshooting them is a great way to increase your knowledge of ColdFusion!
-
This is great as far as it goes, but the visitor can never go beyond those first five records. You need some navigation controls. Back in Dreamweaver, the new elements should be added below the repeated elements but above the bottom navigation bar.
You need to add a new table row for the controls. Be careful here! If you place the insertion point in the table row that contains the dynamic elements, and insert a new row below it, Dreamweaver will assume that you want the new row to be part of the repeated region. Instead, you must position the cursor in the empty table row directly above the navigation bar and insert a row above. You'll have to be sneaky doing this, because that "empty" row is actually filled with transparent GIF images. Select one of the images. Then use the tag selector to choose the parent <td> tag. Then go to Modify > Table > Insert Row. (Unless you're very accurate with your mouse clicks, it's easier to choose the menu from the menu bar than to right-click to access the contextual menu.)
You want the new navigation elements to stretch all the way across the layout, so select all three cells in the new row and merge them (Modify > Table > Merge Cells).
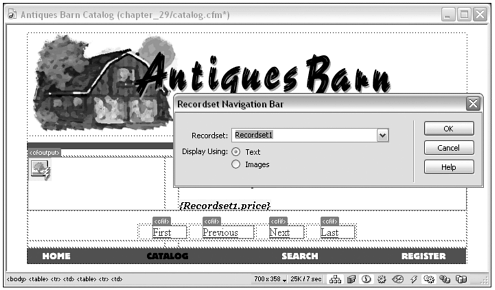
-
With the insertion point in the new merged row, choose the Recordset Navigation Bar from the Insert > Application bar. In the dialog box that appears, choose to use text navigation elements and click OK. Figure 29.18 shows the resulting insertion.
Figure 29.18. The Recordset Navigation Bar being inserted in the Antiques Barn catalog page.
-
Preview your page in the browser again (F12), and you'll see the navigation controls at work. You can click to move forward and back through pages of displayed records. Also note that the controls appear only if there are records to view you cannot go to previous or first, if you're at the first page already, for instance (see Figure 29.19).
Figure 29.19. The Antiques Barn catalog page with all recordset navigation elements in place.
Oops! If you inserted your new table row inside the repeating region, you'll get navigation controls after every single record. There is no easy fix for this, unless you're willing to tinker around in the code. The quickest solution is to Edit > Undo, or use the History panel, backing up to before you inserted the new table row. . .and start again.
-
The newly inserted elements are just dynamic text links in a table. Feel free to format them as you like you can even change the text, so long as you don't change the link information. To match the formatting in Figure 29.19, set the table width to 640 and apply the nav CSS class to each text element.
-
Finally, you can make your catalog page complete by letting visitors know where they are in the recordset ("Records 1 to 5 of 10"). For the Antiques Barn page, you'll add that information directly above the recordset navigation controls.
Start by adding a new row at the top of the nested table that contains the recordset navigation (see Figure 29.20). As long as you're working with this table, you're well outside the repeated region, so you don't have to worry about that.
Figure 29.20. Inserting a Recordset Navigation Status object.

-
Merge the cells of the new row so that it stretches across the entire table. Then, with the insertion point inside the new row, choose the Recordset Navigation Status object from the Insert > Application bar. There's your new dynamic text (see Figure 29.20). Preview in the browser to see it in action (F12).
As with any dynamic text element, you can format the status line as you like. You also can change any of the static text, as long as you don't disturb the placeholder text.
Congratulations! The Antiques Barn catalog page is now complete. You've built your first ColdFusion document.
Summary
In this chapter, you learned the basics of setting up a ColdFusion site in Dreamweaver and creating a page that displays dynamic elements. This is only a taste of what you can do with ColdFusion. Instead of displaying all stock items, you could tie the catalog into a search page so that visitors can choose what category of antiques to display. You could link small thumbnail images to separate pages containing detailed information about each item. You could have visitors sign in, so that when they revisit the site their favorite antiques will show at the top of the list. Dreamweaver provides objects and server behaviors for all this functionality, and more.
| CONTENTS |
EAN: 2147483647
Pages: 49