Chapter 22. Local Site Management
| CONTENTS |
| |
|

- How Dreamweaver Handles Local Sites
- Defining a Local Site
- Working in the Site Panel
- File and Link Management Within a Site
- Assets Management with the Assets Panel
- Summary
No web page is an island. In web development, each document you work on exists as part of a collective. In that collective might be linked pages, images, multimedia files, and other resource files. All of these parts must be tracked, uploaded, and maintained as a unit. Managing all of those files can be a daunting task. Exactly which files need to be part of the web site? How should they organized into directories and subdirectories? What colors are to be using sitewide? What about external style sheets or script documents? What if you decide, halfway through building the site, that you really should have been more consistent in naming your pages, or that you want your images in their own folder? You can't even think of uploading your site to a web server and sharing it with the world until you have these management concerns taken care of.
Luckily for those of us who are more creative than organized, Dreamweaver offers a whole set of easy-to-use, powerful tools to make local site management a breeze, from link checking to sitewide searches and diagnostic tools to keeping track of files for you. Dreamweaver will even help you visualize your site's logical structure as you build it. Is it magic? No, it's just good organization.
This chapter discusses the process of defining a local site in Dreamweaver, how to work with the Site panel, and Dreamweaver tools available for file and asset management.
How Dreamweaver Handles Local Sites
At the core of Dreamweaver site management is the concept of the local site. The local site is a complete version of your web site that exists on your computer. It consists of all the same documents and resources that will eventually become your published web site, in the same arrangement of files and folders. Your local site is your developmental testing ground. You store pages you are currently working on as well as any other resources in the local site. You create an organized folder structure for your elements and manage your page content from here. Local site tools built into Dreamweaver allow you to perform spell checks, find-and-replace operations, and consistency checks.
You define a local site in Dreamweaver by pointing Dreamweaver to the folder on your computer where you plan to store all of your local site files. This folder is called the local root folder. After you've designated a folder as the local root folder, Dreamweaver will treat any item placed within that folder as part of your site. To add a document or resource to your site, simply put it in this folder; to remove a document or resource without actually deleting it from your computer, move it out of this folder. All the while you're working on the various files in your site, Dreamweaver is watching the local root folder, keeping track of which files are being added or removed, noting whenever files or folders are renamed or rearranged, and examining the relationships between documents to make sure the site's relative links are accurate. The local root folder is integral to your Dreamweaver site-building experience.
If you've done any of the exercises in the book so far, you've already been asked to define a local site and work within a local root folder. If you tried to go through the exercise without defining a local site, you probably discovered that some of the exercise steps didn't work as expected. While it is possible to build individual documents without defining a local site, it's standard practice to always work within the framework of a local site, even for simple projects. Outside the context of a local root folder, Dreamweaver might not be able to calculate document-relative links between files.
Defining a Local Site
Creating and managing sites in Dreamweaver is done through the Edit Sites command. Setting up each site's options is done in the Site Definition dialog box.
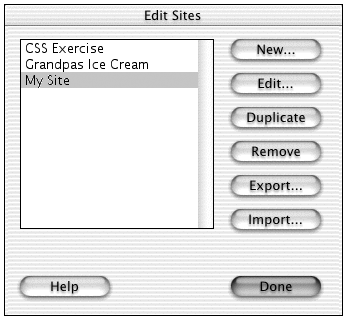
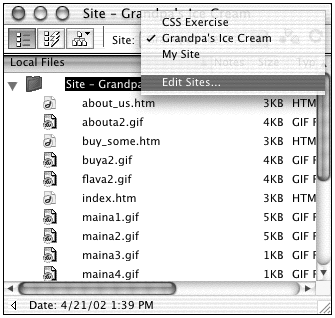
To create a new site or change the settings of an existing site, using the Site Definition dialog box. Choose Site > Edit Sites (or, in the Site panel toolbar, choose Edit Sites from the Sites pop-up menu). This opens the Edit Sites dialog box. This dialog box is the central launching point from which you can click New to create a new site or Edit to change the settings for an existing site (see Figure 22.1).
Figure 22.1. Managing sites through the Edit Sites dialog box.
To create a new site without going through the Edit Sites dialog box, you can also choose Site > New Site.
The Site Definition dialog box offers two modes for setting up your site information: Basic mode (also known as the Site Wizard) and Advanced mode. Each of these modes lets you assign settings for the local site, the remote site, application server connectivity, and a host of other categories. The basic core of site definition is always establishing the local site. While the Basic mode offers a friendlier interface, especially handy for defining complex dynamic sites, Advanced mode gives you more control over your settings and in the long run offers more efficient access to your site's information. Fortunately, the two modes are not mutually exclusive; it's simple to toggle between them and see your site definition from both perspectives. The following sections look at setting up a local site using each mode in turn.
Defining a Site in Basic Mode (the Site Wizard)
If you're brand new to creating sites (or if you're new to creating dynamic sites that involve complex server setups), the Site Wizard eases you into the process gently by asking you a series of fairly simple questions. Answer the questions and when you're done you'll have created a site with all basic settings in place. While the Site Wizard does not allow you to set any but the basic site information, it's a good place to begin and a great learning tool.
To define a local site using the Site Wizard, start by accessing the Site Definition dialog box (as described earlier, by choosing Site > New Site or Site > Edit Site and click the New button). Bring the Basic tab to the front to access the wizard. As the interface shows (see Figure 22.2), the site information is divided into questions about Editing Files, Testing Files, and Sharing Files. The local site is defined by answering questions in the three Editing Files screens.
Figure 22.2. The Site Wizard (Basic tab of the Site Definition dialog box) ready to begin defining a local site.

-
What would you like to name your site? (Editing Files)? This creates the name Dreamweaver will use to identify your site for its own internal purposes. Your site's name will appear in the Edit Sites dialog box and in the Site panel's Edit Sites pop-up menu. Because the name won't ever be used by the browser or web server, it can contain spaces and special characters. Choose a descriptive name that will be easy for you to recognize in a menu. When you're done, click Next to progress to the next screen.
-
Do you want to work with a server technology? (Editing Files, Part 2)? This determines what kind of default document Dreamweaver will associate with your site (HTML, CFML, ASP, PHP, JSP). Unless you're planning to create a dynamic site that uses database connectivity, answer no to this question. When you're done, click Next to progress to the next screen.
Note

See Chapters 26 and following for instructions on setting up dynamic sites.
-
How do you want to work with your files during development? (Editing Files, Part 3)? This determines where your local root needs to be created, and how it will be accessed. Since the whole point of a local site is that it is local, the recommended answer to this question is the default, "Edit local copies on my machine, then upload to server when ready." Don't change this option unless you really must work another way.
-
Where on your computer do you want to store your local files? (Editing Files, Part 4)? If you're going to edit your site using files on your computer, as recommended, you must then tell Dreamweaver which folder on your computer will be the local root folder. To answer this question, click the Browse button and use the Choose Local Root Folder dialog box to select a folder. (If you haven't yet created a folder to use for this, use the New button in the dialog box to do so now.) When you've answered this question, click Next to progress to the next screen.
-
How do you connect to your remote server? Assuming you are not working with a server technology (the question in Editing Files, Part 2 screen), the Site Wizard will skip past the Testing Files category and proceed directly to Sharing Files. You don't need to worry about sharing files until you're ready to define a remote site. Choose None from the dropdown menu and click Next to progress to the next screen.
-
Summary. The final screen that appears is the Summary. This shows you how the questions you've answered translate into settings for your new site. If you don't like any of the settings, use the Back button to change them. If you want to set further options not available in the Site Wizard, bring the Advanced tab to the front. If you're happy with your summary, click Done to close the dialog box and create your site. Dreamweaver creates the intial site cache for your new local site. What Dreamweaver is doing is looking at all the files you have in the folder you have designated as your root folder and creating an internal list of them for use later.
Defining a Site Using the Advanced Method
After you have the hang of defining sites, you'll probably find it more efficient to use the Advanced tab of the Site Definition dialog box to set up and edit your site information (see Figure 22.3). This tab allows you to set all the same basic information that the Site Wizard collects, plus many more options. The information is presented in logical categories, but without the friendly question-and-answer approach of the wizard.
Figure 22.3. The Advanced tab of the Site Definition dialog box.
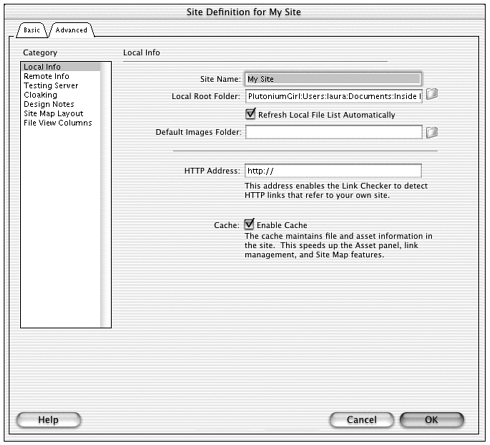
To define a local site using the Advanced method, start by accessing the Site Definition dialog box (Site > New Site or Site > Edit Sites > New) and click the Advanced tab to make it active. The site information is divided into categories covering all aspects of static and dynamic sites. To define a local site, only the information in the Local Info category (shown in Figure 22.3) need be filled in, and only two items from this category are absolutely required to define a site.
Required information in the Local Info category (this information is also collected by the Site Wizard):
-
Site Name. This enables you to specify the name with which Dreamweaver will associate with your site. This is the same information collected in the Editing Files screen of the Site Wizard.
-
Local Root Folder. This sets the local folder on your computer that will be used as the root for your site. Click the Browse button to select this folder. This is the same information collected in the Editing Files, Part 3 screen of the Site Wizard.
Optional information in the Local Info category (this information cannot be set in the Site Wizard) is as follows:
-
Refresh Local File List Automatically. Selecting this option automatically refreshes the local file list every time files are copied to your local site. This is a handy feature, so it's a good idea to leave it selected. If you choose to not enable it, however, you can manually refresh the local file list in the Site panel by choosing View > Refresh (Windows), or Site > Site Files View > Refresh Local (Mac). If you have used the Site Wizard to define your site, this item defaults to true.
-
HTTP Address. Enter the complete HTTP address your site will eventually have as its root when it is uploaded to the web server, for example http://www.mydomain.com. If your site uses absolute links between site documents, Dreamweaver can use this information to verify these links when you perform link checking operations. If you won't be using absolute links for internal site navigation, you can leave this field alone. (See the section on "Managing Links" later in this chapter for more information on this.) If you have used the Site Wizard to define your site, this address defaults to http://.
-
Enable Cache. As discussed earlier, Dreamweaver automatically keeps track of file and asset information for your local site as you work. It does this by maintaining a site cache, or temporary storage area, in your computer's memory. For small to medium sites, using the cache can significantly speed up sitewide operations like Find-and-Replace, Spell Check, and link management. For very large sites, the site cache can actually slow these operations down (because there's too much information for Dreamweaver to remember). A good general strategy is to enable the cache when you first define a site, and if you later notice that sitewide operations are sluggish, try disabling it. If you have used the Site Wizard to define your site, this item defaults to true.
If you like using the Site Wizard to set up your basic site information but want to customize these optional settings, remember that you can switch back and forth between the Basic and Advanced tabs of the Site Definition dialog box as often as you like.
Importing Sites from Other Programs
Sometimes you're not creating sites from scratch. You might inherit an existing site from someone else who may or may not have worked in Dreamweaver. You might have started building the site yourself in another web authoring program or text editor. You might be asking yourself, "How do I import that Front Page or GoLive or other site into Dreamweaver?"
Because most web file formats are non-proprietary, you don't need to do anything special to "import" the standard files in those sites for use in Dreamweaver. Just use File > Open to open any HTML, ASP, JSP, CSS, or other document in Dreamweaver and start working on it. To create a Dreamweaver site based on pages built in other programs, just create a local site as described in the previous sections and put your HTML and other documents in the local root folder. Those files are now official members of your Dreamweaver site in full standing and with full rights and privileges. Their code might not be written or formatted exactly like Dreamweaver code, but that won't stop Dreamweaver from handling it. Any code that a browser can understand, Dreamweaver can understand.
Note
| | There is a chance your imported pages might include code that Dreamweaver can't display in Design view. This is mostly true of hand-coded pages that include extensive embedded scripting ( JavaScript or server-side scripting) or CSS. |
The only files you won't be able to just open and use in Dreamweaver are application-specific files like GoLive stationary files or Front Page template files. Like Dreamweaver templates and library items, those files are not intended for use by the browser, so they're not in a standardized format the Dreamweaver can process. To re-create the functionality of these pages, you'll need to build Dreamweaver equivalents.
Tip
| | Tip for Mac users: After you've started working on pages in Dreamweaver, you might want to change their file creators to Dreamweaver so you can open them in Dreamweaver by double-clicking on them in the Finder. Various utilities, such as File Buddy and Creator Changer, are available for this. |
Managing Multiple Sites
Dreamweaver lets you create as many sites as you need. Each site has to have at least its local information specified, though it can also include remote and other information. your computer. You can also see a list of defined sites by opening the Site window and When you choose Site > Edit Sites, the Edit Sites dialog box will list all defined sites on selecting site > Open Site in the Dreamweaver 4 layout. If you are using the Dreamweaver MX layouts you can open the site panel and use the dropdown to switch between sites.
Unless you have no sites at all defined (for example, the Edit Sites dialog box shows no defined sites), there will always be a current site. The current site will show in the Site panel and its name will be checked in the Site > Open Sites submenu. To switch the current site to a different site, go to Site > Open Site and choose the desired site from the submenu, or use the Site pop-up menu in the Site panel toolbar.
To change the settings for an existing site, choose Site > Edit Sites to access the Edit Sites dialog box; then select the site you want to edit and click Edit.
To delete a site, choose Site > Edit Sites to access the Edit Sites dialog box; then select the site you want to delete and click Remove. Note that deleting a site does not delete any of the files that are part of that site from your computer, nor does it change the local root folder in any way. It only deletes the site information you specified when you created the site including the site name and the designation of a specific folder as the local root folder.
Exercise 22.1 Defining the Grandpa's Ice Cream Web Site
In this exercise, you'll turn start with a set of files that have already been created and define a site to let you work with them using the Dreamweaver site management tools.
Before you start, copy the files from the chapter_22 folder on the CD to your hard drive. These files will contain all the pages and resources for the Grandpa's site. But as of now, Dreamweaver doesn't know they're supposed to be thought of as a site. While you could work with the files individually in Dreamweaver, the program won't treat them as an organized site until you tell it to.
-
You'll start by setting the site up with the Site Wizard. In Dreamweaver, go to Site > New Sites to open the Site Definition dialog box. If the Basic tab isn't in front, click it to bring it to the front. (The Basic tab is the Site Wizard, remember!)
-
In the first screen, you're asked what you would like to name your site. Call your site Grandpa's Ice Cream. (Notice that you're allowed to use spaces and even an apostrophe in your site name. That's because it will only be used to identify the site within Dreamweaver, and special characters don't confuse Dreamweaver.) Click Next to proceed to the next screen.
-
In the next screen, you're asked if you want to use a server technology. Select the radio button next to No. Click next to proceed to the next screen.
-
In the next screen, you're asked where you want to edit your local files. Leave the default option selected (Edit Local Copies on My Machine, Then Upload to Server When Ready). Then click the Browse button to show Dreamweaver where your local files will be stored. Browse to the chapter_22 folder you copied from the CD before you began this exercise. Click next to proceed to the next screen.
-
Now you're asked about your remote server. Since you're not ready for that yet, choose None from the pop-up menu. Click next to proceed to the next screen.
-
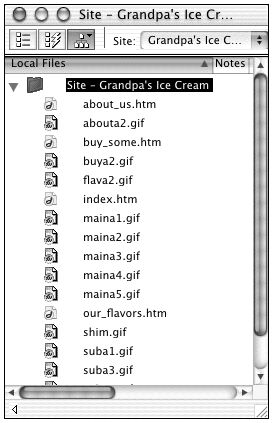
Dreamweaver now shows you a summary of the information you have entered (see Figure 22.4). Congratulations! You've defined a site. Click Done to close the Site Definition dialog box. You'll get an alert window telling you the site cache is about to be created. Click OK to close that. After a few seconds, your Site panel will look like the one shown in Figure 22.5. Your site is already full of files because the folder you defined as your local root folder (the chapter_22 folder) had those files in them. It doesn't matter whether or not those files were created in Dreamweaver.
Figure 22.4. The Site Definition Summary screen for the Grandpa's Ice Cream site.
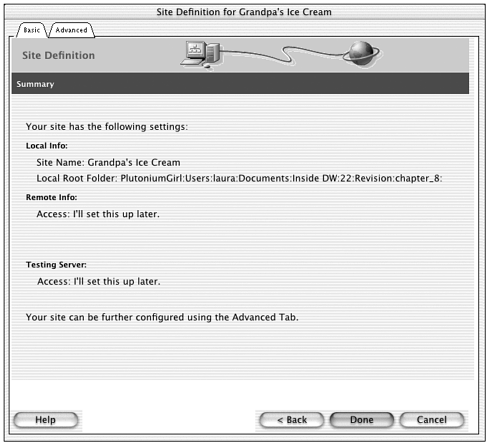
Figure 22.5. The Site panel for the Grandpa's Ice Cream site.
-
After you've defined the site, you can change any of its settings any time you like by returning to the Site Definition dialog box. To do this, choose Site > Edit Sites. When the dialog box appears, select the Grandpa's Ice Cream site and click Edit. Here you are, back in the Site Definition dialog box!
-
This time, click the Advanced tab to bring it to the front. From the categories list at the left, choose Local Info. Your local information has been gathered based on the questions you answered in the Site Wizard.
-
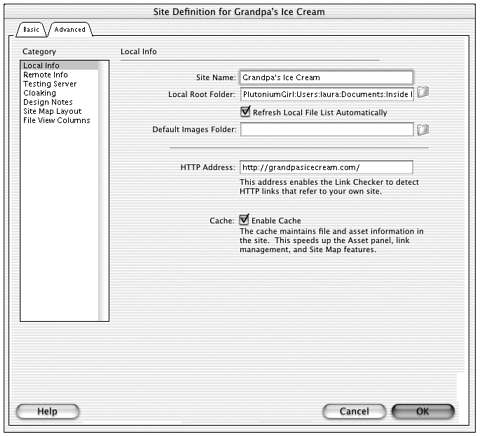
The Advanced tab offers you more settings than the wizard did. One new piece of information you can save is the absolute URL that Grandpa's site will have after it's up on the web server. In the HTTP Address field, type http://www.grandpasicecream.com (no spaces or special characters here!). The dialog box will look like the one shown in Figure 22.6.
Figure 22.6. The Local Info screen of the Advanced Site Definition tab for the Grandpa's site.
-
Click OK to close the dialog box. If Dreamweaver needs to re-create the site cache, allow it to do so.
Working in the Site Panel
After you have a site defined, the Dreamweaver Site panel is your interface for performing any and all site-related tasks. It's your window on the world of your site. It's a good idea to always leave it open while you work. Use this window to see your site's files and hierarchical structure at a glance, to perform file management tasks, and more.
Managing the Site Panel
The Site panel is a complex interface, packed to the gills with information and functionality. One of the most essential basic site management skills you can develop for working in Dreamweaver is managing the Site panel itself.
The Site Panel and the Integrated Workspace (Windows)
As introduced back in Chapter 2, Dreamweaver/Windows users now have the choice of viewing the Site panel as a free-standing window floating in front of the rest of the workspace or as a docked panel. To access the Site panel, choose Window > Site, or (Windows only) expand the Files panel group. To use the Site panel as a free-standing window, undock it from its panel group by dragging the Site tab out of the panel dock. To turn it back into a docked panel, drag it back into its group. Figure 22.8 shows the window in its docked and undocked states.
Figure 22.8. The expanded and contracted Site panel in Dreamweaver/Mac. Click here to view the site map Choose the active site here
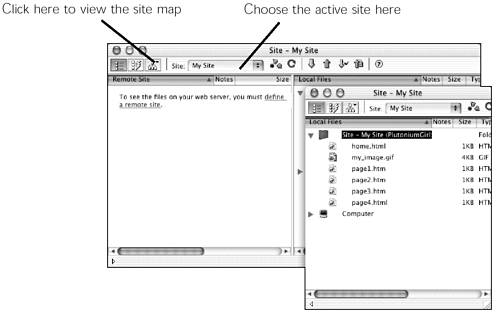
Figure 22.7. The Site panel as part of the integrated workspace (Windows only) shown being docked and undocked.
Expanding and Contracting the Site Panel
The Site panel with all of its information showing can take up a lot of screen real estate, which can be a problem unless you have a very large monitor or a dual monitor set up at your workstation. To alleviate this problem, the window can be shown in full or abbreviated form. The Expand/Collapse button, located in the Site panel toolbar (Windows) or at the bottom of the Site panel (Mac), toggles between full mode (where both left-side and right-side panes are visible) and abbreviated mode (where only the right-side pane is visible). Figure 22.8 shows both states of the window as they appear in Dreamweaver/Mac.
In the integrated workspace (Windows only): When it is docked in the Files panel group, the Site panel is abbreviated to show only its right-hand pane. Expanding the docked Site panel causes the window to take over the entire Dreamweaver application window (see Figure 22.9). When it is used as a free-standing window, the Site panel expands without taking over the entire application window. Note, however, that when the window is in its expanded (two-pane) state, the Site tab becomes a standard title bar. This means the window cannot be re-inserted into the dock while in expanded state.
Figure 22.9. The docked Site panel as it appears when expanded.
Note
| | Whether used as part of the integrated workspace or in the classic interface, the Site panel for Dreamweaver/Windows contains its own menubar with File, Edit, View, and Site menus. These menus contain a variety of commands for working with files in the site (File), editing something (Edit), setting view options for the Site panel (View), and performing sitewide operations (Site). For Dreamweaver/Mac, the Site panel contains no menubar. Instead, the various site-related commands can all be found under the Site > Site Files View and Site > Site Map View submenus. Most of these commands will be grayed out unless the Site panel has focus. |
Site Files View
The right-hand column of the Site panel (the only column, if the window isn't maximized) shows the Site Files list. This is a list of all the contents of your local root folder, arranged hierarchically as if you were viewing it in Windows Explorer or the Macintosh Click here to view the site map Choose the active site here Finder's List view. Just like the lists of files in your operating system, every folder shows with a plus/minus (+/-) sign (Windows) or triangle (Mac) to show or hide its contents. Most of the powerful file management features in Dreamweaver center around the Site Files view.
Working with the File View Columns
The Site Files list is more than just a list of names. It includes columns of information about each file: name, size, type, modified date, and more. If your Site panel is wide enough, you can learn a lot about your files by just looking at their column information. Just as you can with Windows Explorer or the Macintosh Finder List view, you can also choose to view your files organized by any column, by clicking on that column.
If the Site panel is not organized optimally for your work habits, you can change it. Dreamweaver allows you to customize how you view your Site panel by using the View > File View Columns command (Windows) or Site > Site Files View > File View Columns (Mac). When you choose this command, the Site Definition window opens with the Advanced Tab selected (see Figure 22.10) and the File View Columns category showing.
Figure 22.10. The Site Definition dialog box showing the File View Columns category.
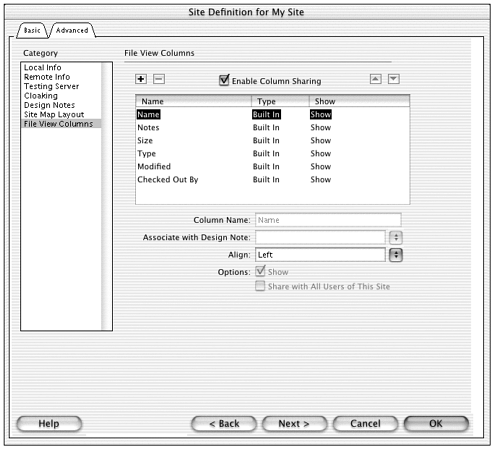
In this window, you can see all the names of the columns visible in the Site panel, whether the columns are built-in by Macromedia or created by you. You can also see if the columns are visible or not.
If you would like to add your own custom column, click the plus (+) button. You can then name the new column, whether you want to assign a Design Note to it, how the information in the column is to be aligned, and whether the column is visible or not. (Read Chapter 24 to learn how to use file view columns with Design Notes.) When you create your own column, its type will be Personal. To delete a column you have created, click the (Delete) button.
In order to understand where the new column you create appears in the Site panel, you will need to use your imagination. Visualize the Site panel. Recall that the first column in the window contains the names of files located in your local site. The next column holds Design Notes. The third column indicates the size of the files, and the fourth column tells you the types of files. Here, we see the names of the columns (which appear horizontally in the Site panel) vertically. Because Dreamweaver places the new column by default at the bottom of the list, which means the new column is placed on the far right of the Site panel. If you want to change the location of your new column, use the up and down arrows located in the upper-right portion of the Site Definition window. By clicking the up arrow, you are moving your column to the left in the Site panel. Click the down arrow if you want to move your column to the right of the Site panel. You can also move the built-in columns except for the Name column. That always must remain at the top of this list.
Note
| | You cannot delete a Dreamweaver default column. If you don't want to see it, however, you may deselect the Show option. This hides the column from your view, giving the appearance that it has been deleted. |
The File Explorer
| | New to Dreamweaver MX, the Site Files view also includes a special icon representing your computer's file structure. Expanding this icon gives you access to a hierarchical view of all the files in your computer just like the file lists in your operating system do. (If you have a very large hard drive or two, it might take Dreamweaver a few moments to generate the list of files when you expand the computer icon.) As you'll see later in this chapter, having access to your computer's files outside the local root folder is a blessing for quickly adding assets to your site. |
Site Map View
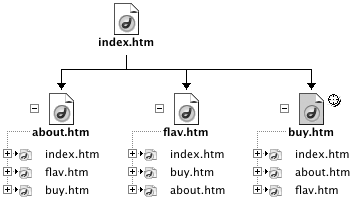
So far, you have looked at the elements of your site as a list. This list, however, doesn't tell you how the files relate to each other. Which file is the first one viewed when someone goes to your site? How many pages link to your first page? Dreamweaver gives you an easy way to answer all these questions Site Map View.
Designating a Home Page
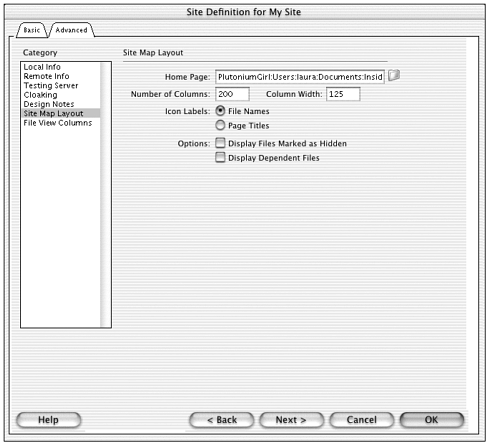
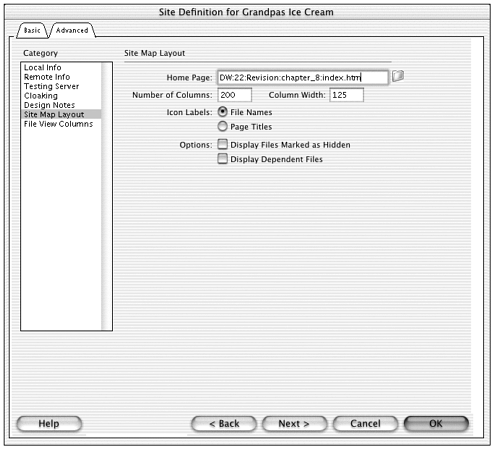
Before you can use the Site Map view, you need to tell Dreamweaver what your "home" page is. This is the page that is first visible when someone goes to your site. Just because it's called the home page doesn't mean the document itself needs to be named home.html. In fact, the home page is typically named index.html. To define a home page for your site, access the Site Definition dialog box (Site > Edit Sites > Edit) and go to the Site Map Layout category (see Figure 22.11). Click the folder icon to browse for your home page or type its name in the home page field. Then click OK.
Figure 22.11. The Site Definition dialog box ready to define a home page.
Note
| | If you named your home page index.html, you don't need to specify it as the home page like a web server, Dreamweaver assumes that any file with this name is the home page. |
Viewing a Site with the Site Map
After you have selected your home page, you can view the site map. With the Site panel expanded, press the Site Map button, and from the pop-up menu choose Map Only or Map and Files. Figure 22.12 shows the Site panel displaying map only.
Figure 22.12. The Site panel showing the site map for a simple site.
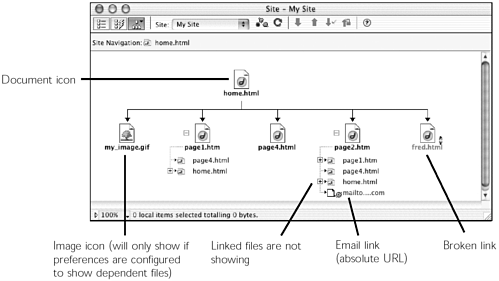
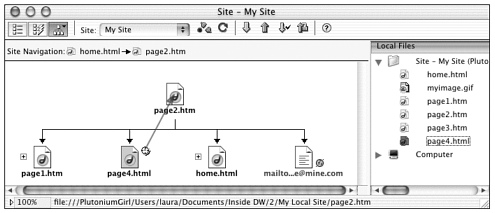
As Figure 22.12 shows, the Site Map view displays your site as a hierarchy of linked files with the topmost file being your home page. Below the home page are files linked directly from the home page. Included as well are email links, external links, and links to any sort of media embedded in the page.
Icons, Names, and File Types
The site map uses small icons to give visual clues to a file or link's status. After you get used to the visual language being used, a glance will tell you a world of information about your site:
-
Icons. Each kind of item in the site map has its own icon to represent it. Dreamweaver file icons with black labels represent files. A globe icon with a blue label represents absolute URLs and other special links. Broken links are represented by a broken chain icon with a red label.
-
Labels. A file is represented with a file icon and labeled with the filename. If you'd rather label your icons with page titles than file names, go to View > Show Page Titles (Windows) or Site > Site Map View > Show Page Titles (Mac). To change them back to filenames, use the same command to toggle Show Page Titles off.
What Shows and What Doesn't
By default, dependent files (such as linked media, and linked script and CSS files) don't display in the site map. If you want to see these items, go to View > Show Dependent Files (Windows ) or View > Site Map View > Show Dependent Files (Mac). To hide them again, use the same command to toggle Show Dependent Files off.
Showing the Hierarchy
If your site is complex, the site map might be difficult to read because of all the icons and links shown. But you can simplify the view by hiding and showing links.
To hide all the links coming from a particular file, click the minus (-) button next to the file icon. To show the links again, click the plus (+) button. (The button changes state depending on whether links are shown or hidden.)
To view only a portion of the site at a time (for instance, only show the Menswear section of a Clothing Catalog web site), select the file at the top of the hierarchy you want to view. (To view only the Menswear section, start by selecting the Menswear section main page.) Then choose View > View as Root (Windows) or Site > Site Map View > View as Root (Mac). The site map shifts so that the selected file appears as the new home page at the top of the hierarchy, with all of its child links showing. No other parts of the web site are visible. At the top of the site map window, a special icon shows the relationship of the current view to the home page (see Figure 22.13).
Figure 22.13. Viewing a page as the root of the hierarchy and returning to view the entire hierarchy.
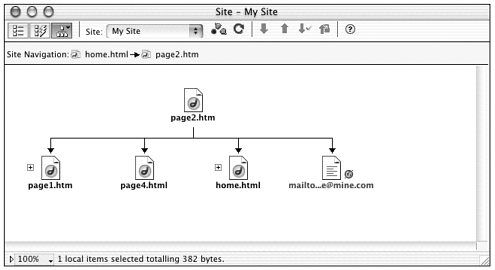
To return to viewing the entire web site, after you've switched to this temporary view, click the home page icon at the top of the site map window (see Figure 22.13).
Modifying the Site Map Home Page
Dreamweaver lets you change the existing home page to either an existing page or a completely new one, including non-HTML files such as an image or a SWF file. Select Site > New Home Page on Windows or Site > Site Map View > New Home Page to create a new home page document. This brings up the New Home Page dialog box. You can enter the filename and page title of your new home page here. After creating this new page, you can re-create your links using the Link to Existing File command as well as the Point-to-File icon. This process was discussed in the previous sections of this chapter.
To set an existing page as the new home page in the site map, select that file from the local Site panel (you must be in Map and Files View mode to do this). Then select Site > Set as Home Page on Windows or Site > Site Map View > Set as Home Page on the Macintosh. This re-creates the site map with the newly defined home page and its links. You can also select the file in the Site panel; bring up the context menu by right-clicking on Windows or Ctrl-clicking on the Macintosh and then choosing Set as Home Page.
Customizing Site Map Layout
To customize your current site's site map, do the following:
-
Select Site > Edit Sites. From the Define Sites dialog box, select the current site and click Edit.
-
Select the Site Map Layout section of your site definition.
From this window, you can select the number of columns and the column width for your site map display. This number specifies the number of pages to display on each row; the default is 200. You will typically not need to adjust this value because you will rarely have more than 200 pages linked to from your main page.
Next you can select whether the site map should represent documents by their filenames or their page titles. If you have been diligent in creating effective page titles, using the page titles in the Site Map view might be a good way to display your site. Displaying your site files by their page titles also gives you an idea of whether the titles are easy to understand. You might be surprised how confusing some page titles can be when you're not looking at the page itself.
Finally, you can choose options that you want to include in your site map. The first option enables you to specify whether the site map should show files marked as hidden. When this is checked, hidden files will be shown. The other option, Display Dependant Files, displays all dependant files (such as images and other files linked in the HTML) in the site map. These files are listed in the order in which they are located in the HTML code.
Creating an Image from the Site Map
How handy would it be if you could save your site map as an image that you could then email to or print out for your client? Dreamweaver makes this task incredibly easy!
To save the site map in Dreamweaver/Windows, choose File > Save Site Map. In the Save Site Map dialog box, name your image and choose the location in which to save it. In the File Type pop-up menu, choose .bmp to save the file as a bitmap or .png to save it as a PNG file. Click Save.
Note
| | PNG format is Macromedia Fireworks' native file format. |
To save the site map in Dreamweaver/Mac, choose Site > Site Map View > Save Site Map as PICT, or Site > Site Map View > Save Site Map as JPEG. A Save As dialog box will appear. Choose a name for the file image and a location in which to save it. Click Save.
Exercise 22.2 Creating a site map for the Grandpa's Ice Cream Site
In this exercise, you'll build on the Grandpa's Ice Cream site you defined in Exercise 22.1. You'll define a home page, generate a site map, and create an image of that site map. (If you haven't yet done Exercise 22.1, go back and do that now!)
-
Before Dreamweaver can generate a site map for you, it needs to know which file in your site is the home page. The site map is built by following links from the home page. You specify a home page in the Site Definition dialog box. To access this dialog box, at the top of the Site panel click the Site pop-up window and choose Edit Sites (see Figure 22.14).
Figure 22.14. Choosing Edit Sites from the Site pop-up menu in the Site panel.
-
In the Edit sites dialog box, select Our Site and click Edit. In the Site Definition dialog box, choose the Site Map Layout category from the categories on the left (see Figure 22.15). When the category options appear, look at the input field for Home Page. The information has already been filled in! If you examine the entry in this field, you'll see that Dreamweaver recognized that your site contained a file called index.htm like a web server, Dreamweaver assumes that this is your home page. Which it is! So your home page is already defined. Click OK to close the Site Definition dialog box.
Figure 22.15. Setting a home page for the Grandpa's site.
-
Now it's time to look at your site map. Expand the Site panel so both panes of it are showing.
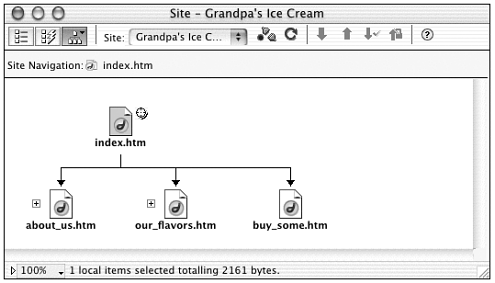
In the expanded Site panel, press the Site Map button. From the pop-up menu that appears, choose Map Only. There's your site map, showing links from index.htm to the other three pages in the site. Figure 22.16 shows this happening.
Figure 22.16. Viewing the Grandpa's site map.
To see your site map and your list of files at the same time, press the Site Map button (at the top left of the window) and from the pop-up menu choose Map and Files.
-
You might want to use the site map in some of your printed materials, or maybe even use it as a graphic on one of your web pages. Windows users: To save your site map as an image, go to the Site panel menu bar and choose File > Save Site Map; in the Save dialog box that appears, set the Save as Type popup menu to PNG. Navigate to you chapter_22 folder and call the file sitemap.png. Click OK to close the Save dialog box. Mac users: From the main menu bar, choose Site > Site Map View > Save Site Map > Save Map as JPEG. In sitemap.jpg. Click OK to close the Save dialog box.
-
Check your Site Files list. You'll see the new sitemap.jpg file in place.
File and Link Management Within a Site
The biggest ongoing chore of web site development is site management keeping track of all the files in the site, making sure the folder structure is logical, the file names make sense, the links all work, and that everything is where you can find it quickly for editing and upload. After you've defined your Dreamweaver site, all the formidable power of its local site management tools is at your disposal. Working from your "central command window" in other words, the Site panel you can keep your finger on the pulse of your site and control your files like a general marshalling her troops.
Managing Files and Folders
Think of the Site panel as a substitute for Windows Explorer or the Macintosh Finder. Leave it open all the time as you work on your site. Use it to perform all basic file operations across your site. Site Files view is your key to managing the file structure of your site; Site Map view is your key to managing its links.
Opening Files
As always, there's more than one way to open files in Dreamweaver. The first and perhaps most popular method is to select File > Open from the menu. You can then use the Open dialog box to navigate to the file that you want and click Open. A faster method is through the Site panel. You can double-click a file in the Site panel (Site Files of Site Map view) and it will open. It's as simple as that! Now that you know this snazzy new way to open a document in one step, will you ever use the old way again?
Creating Files and Folders
Note
| | Always close all documents before performing any file management operations on them. Dreamweaver can't properly update links, change file names, and so on, if the files are open. |
To create a new file or folder from Site Files view, do one of the following:
-
Click on the folder that you want to contain the new item and Choose File > New File or File > New Folder (Windows), or choose Site > Site Files View > New File or Site > Site Files View > New Folder (Mac).
-
Right-click (Windows) or Ctrl-click (Mac) on the folder that you want to contain the new item and, from the contextual menu, choose New File or New Folder.
A new, untitled file or folder will appear in the Site Files list. (For new files, Dreamweaver creates files of the default document type for this site.)
Duplicating Files
Sometimes you might want to save the same document as two different files. You don't have to copy and paste the HTML code into a new document and then save it. Instead, you can select File/Save As from the menu. This enables you to save a copy of the current file with a different name. Be sure to remember that after you do this, the document to which you return will be this new copy of the original document. If you want to return to the original copy, you must open it as discussed in the previous section. As with normal saving, make sure that you save the document somewhere inside the local root folder; otherwise, your links could become broken.
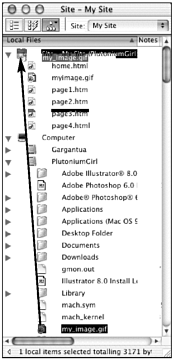
Copying Files from Outside Your Site
| | New to Dreamweaver MX, the Site Files list puts the entire file structure of your computer at your disposal. Have you ever wanted to use that particular graphic or page in a web site, and then remembered at the last minute that it's not stored in your local root folder? In the bad old days, this would have meant leaving Dreamweaver, moving or copying the needed file into the local root folder, then coming back to Dreamweaver to find it now available in the Site Files view. |
In Dreamweaver MX, to copy a file from outside the local root folder, do this:
-
In the Site Files pane of the Site panel, expand the Computer icon to show the contents of your hard drive.
-
From this hierarchy of choices, find the file you want to move into the Dreamweaver site.
-
To copy the file into your site, do one of the following:
-
Drag-and-drop the file from the Computer hierarchy to the local root folder hierarchy (see Figure 22.17).
Figure 22.17. Dragging-and-dropping to copy a file into the local root folder.
-
Select the file in the Computer hierarchy and Ctrl/Cmd-C to copy it; then select the folder within your local root folder and Ctrl/Cmd-V to paste it.
-
Select the file in the Computer hierarchy and right-click (Ctrl-click) to access its contextual menu, and choose Copy; then select the folder within your local root folder and right-click (Ctrl-click) to access its contextual menu, and choose Paste.
-
Renaming and Rearranging Files and Folders
Regular humans who aren't super-organizers rarely get the best possible organization system going until they're halfway into a site development project. They might also come across the perfect naming scheme after already creating a half dozen files with useless names that must be changed. The nightmare of this scenario is that, after you've started building a web site complete with links to graphics and links between files any little change in the location or name of a file will mean having to update every single relative link that points to or comes from that page.
If you use the Dreamweaver Site Files view to perform any of these naming or organizing tasks, Dreamweaver will automatically update all links as needed.
To move a file or folder from one location in the file structure to another, just drag the item to its new location in the Site Files view.
To rename a file or folder, click twice on its name in Site Files view or Site Map view, or right-click (Ctrl-click) on it and choose Rename from the contextual menu; then type in a new name. Note that, if you change the filename of the home page, the site map won't be able to display properly until you refresh it by choosing Site > Recreate Site Cache.
If your change will require any links to be updated, Dreamweaver will present you with the Update Links dialog box showing you all the files that will need to be updated as a result of your action. From here, simply click Update and Dreamweaver will change all links in the listed files, so none of your links are broken.
Note
| | Why would you ever not want to update links? Imagine a scenario where you have two alternate home pages maybe one for when the company is having a sale, and one for other times with identical links coming from them but different content. You might leave both home pages in the local root folder, one called index.html and the other called index-sale.html. The next time there's a sale going on, you can easily switch home pages by renaming them index-nosale.html and index.html. When you change the name of index.html to index-nosale.html, Dreamweaver will offer to update your links for you. Don't do it! You still want all links in the site pointing to index.html. When you change the name of index-sale.html to index.html, all links in the site will now point to the alternate home page. |
Managing Links
You've already seen some pretty wonderful link management, in the way Dreamweaver updates links when you update your file structure. But that's only the first step in a comprehensive link management system. By utilizing the site map, various Site menu commands, and Site Reports, you can truly be in command of your site's link structure without once moving from your command chair.
Creating Links with Point-and-Shoot
Do you like dragging-and-dropping? Is it your dream to create a sitewide navigation system quickly and easily, possible without even opening a single file? You're going to love point-and-shoot.
Point-and-Shoot from Within a File
If you have a document open and the Site panel at least partially visible on your computer screen, you can create a link from within that file to another file in your site using point-and-shoot. Do it this way:
-
Open the file that you want to contain the link. If you're using the integrated workspace, and the Site panel is docked with the rest of your panels, make sure it's expanded so you can see it. If your Site panel is free-standing, make sure you can see at least a corner of it peeking out from behind your Document window and other panels.
-
Make sure the document you're going to link to is closed. (Always do this before performing file management tasks.)
-
Select the text or image that will become the link.
-
In the Property inspector, find the Link field, but instead of clicking the Browse button or typing a name in the input field, find the Point-and-Shoot button.
-
Press down on this button and drag over to the Site panel. (If the Site panel is free-standing, just drag so you're over some portion of it and it will pop to the front so you can see the whole window.) Keep dragging until you're on top of the file to which you want to link. This file will highlight when you're in the right position.
-
Let go of the mouse button. If your hand-eye coordination was working right, your open document now contains a link to the item you pointed to. It's point-and-shoot! (See Figure 22.18.)
Figure 22.18. Using point-and-shoot to create a link.
Point-and-Shoot from the Site Map
If you're in a hurry to create some navigation controls in your site, and don't even want to open the files to do it, you'll love the ability to point-and-shoot from the site map. Just do this:
-
Close all documents. (Always do this before performing file management tasks.)
-
Open Site Map view in the Site panel.
-
In the site map, select the file you want to link from. A little point-and-shoot icon appears beside the file.
-
Press down on that icon and drag to the file to which you want to link. You can drag to another file in the site map or to a file in the Site Files list. When you're on top of the desired file and it highlights, let go. Your link is created! (See Figure 22.19.)
Figure 22.19. Using point-and-shoot to link two files in the site map.
The site map changes to show that a link has been added between the two files. But what kind of link is it? Open the file you linked from and scroll down to the bottom of the page. You'll see that Dreamweaver has added a text link to the other file, with its text derived from the other file's filename. If you continue adding links from this same file, Dreamweaver will eventually create a whole text-based navigation bar along the bottom of the page. It's not fancy, but it's accessible, and it works. And you didn't have to open a single file to do it. (You just opened the file to see the results.)
Creating Links with Menu Commands and the Site Map
If pointing-and-shooting isn't your cup of tea, you can still quickly add links from one file to another without opening either file by using menu commands. You must be in Site Map view to do this, but there's no dragging-and-dropping involved.
Linking to an Existing File with the Site Map View Menu
To link one file to another existing file without opening either file or using point-and-shoot, do this:
-
In Site Map view, select the file you want to link from and choose Site > Link to Existing File (Windows) or Site > Site Map View > Link to Existing File (Mac); or right-click (Ctrl-click) on the file you want to link from and, from the contextual menu, choose Link to Existing File.
-
When the Select HTML File dialog box appears, browse to the file you want your file to link to. Click Choose to close the dialog box.
That's it! Your link is in place and will show up as an additional link in the site map. To see how the link was created in the originating file, open that file and scroll to the bottom of the page. You'll see that, just as with the point-and-shoot links described above, Dreamweaver has added a text link to the other file, with its text derived from the other file's filename.
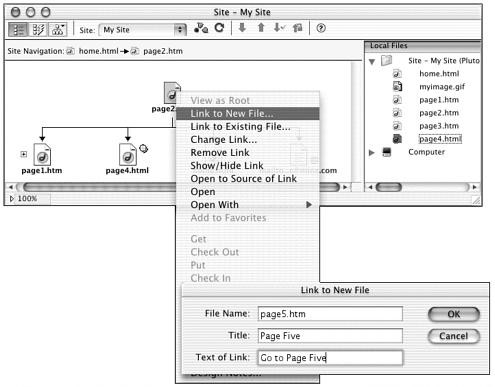
Linking to a New (Non-Existent!) File with the Site Map View Menu
This little feature is the unsung hero of Dreamweaver site management. From the site map, you can determine what files your site will need and which should be linked to which and essentially build the entire site without opening a single file. To create a new file and link to it all in one process, do this (see Figure 22.20):
Figure 22.20. Linking to a new file in the site map.
-
In Site Map view, select the file you want to link from and choose Site > Link to New File (Windows) or Site > Site Map View > Link to New File (Mac); or right-click (Ctrl-click) on the file you want to link from and, from the contextual menu, choose Link to New File.
-
When the Link to New File dialog box appears, fill in the following information:
-
Filename. Dreamweaver is about to create a new file for you. What would you like it to be called?
-
Title. What would you like the page title (contents of the <title> tag) of the new file to be?
-
Text of Link. After the new file is created, Dreamweaver will create a text link in the original file pointing to the new file. What would you like it to say?
-
-
When you've got all the information entered, click OK to close the dialog box. There's your link! And there's your new file! Open the original file, and you'll see that the link has been added as a simple text link after all other page content. If you keep repeating this process, you can build an entire web site starting from one lowly home page. And all without ever leaving the Site Map view.
Changing Links
You've created your site and you've linked several pages to the gallery.html page. But then you have a brainstorm and decide those pages should link to the slideshow.html page instead. Are you in for an afternoon of opening files and changing link field information? No! With Dreamweaver, you can modify what links point to either individually or all at once across the site and again, all without opening a single file.
The Change Link Command
To change all links in a site that point to one page, to make them point to another page instead, follow these steps:
-
Select the linked page that you want to modify. The linked page is the page you navigate to, not from. (In the example cited above, this would be the gallery.html page.)
-
Choose Site > Change Link (Windows) or Site > Site Map View > Change Link (Mac). This brings up the Select HTML File dialog box.
-
Select the new file you want your site's links to point to. (In the example above, this would be the slideshow.html page.) When you're done, click Select.
-
The Update Files dialog box appears, displaying a list of all the files in the site that should be updated. To change all links and close the dialog box, click Update.
The Change Links Sitewide Command
The Change Link Sitewide command operates in much the same fashion as the Change Link command, but with a few crucial differences. Like the preceding command, its purpose is to change all links within a site that point to one file so that they point to another file instead. To use this command, do the following:
-
Optional: Select the linked page that you want to modify. The linked page is the page you navigate to, not from (the gallery.html page, in the previous example).
-
Choose Site > Change Link Sitewide.
-
When the Change Link Sitewide dialog box appears (see Figure 22.21), enter the following information:
Figure 22.21. The Change Link Sitewide dialog box.
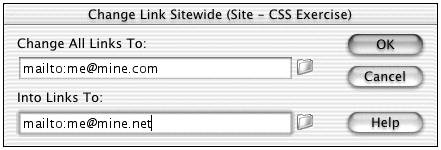
-
Change All Links To. If you selected a file before choosing the command, this information will be filled in for you. Otherwise, enter the link here.
-
Into Links To. Enter the new link that you want to replace the old link with (in the previous example the slideshow.html page).
-
-
Click OK to close the dialog box.
-
The Update Files dialog box appears, displaying a list of all the files in the site that should be updated. To change all links and close the dialog box, click Update.
How is the Change Links Sitewide command different from the Change Links command? The purpose of Change Links is to recalculate the document-relative links between two documents in your site, and that's all the command does. Change Links Sitewide is more of a straight Find and Replace command, simply replacing the href attribute for certain links from one value to another. This has the following ramifications:
-
Change Links Sitewide can only be used with absolute or root-relative links, not document-relative links. If you browse to choose a link for the Change Link Sitewide dialog box, Dreamweaver will calculate that link's root-relative URL. If you type in a document-relative link, you'll get an error message. If you want to change all references to a document within your site, and you're not using root-relative paths, use Change Links.
Note
For more on root-relative versus document-relative links, see Chapter 6, "Links and Navigation."
-
Change Links can only be used to change links that point to documents. Change Links Sitewide can be used to change any href attribute into any other href attribute. For instance, you can update mailto: links when your email address changes or change all null links from # to the safer javascript:; with Change Links Sitewide. Any time you're changing links that are not document-relative links within your site, use Change Links Sitewide. (For more on null links, see Chapter 16, "Getting Interactive with Behaviors.")
Checking and Repairing Links
In the next few sections, you will learn how to check all of your links with Dreamweaver.
Then you'll see how to fix any errors it finds.
Checking Links
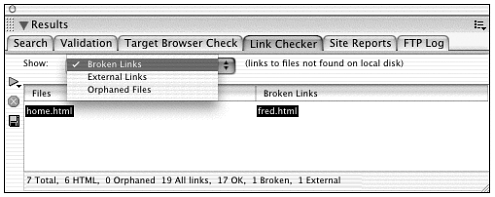
You can check links one file at a time, several files or folders at a time, or check the entire site in one massive sweep. The Dreamweaver Check Links function reports three types of possible problems:
-
Broken links. These are files that have links located internally that don't contain the proper path for the link to work correctly. This means that Dreamweaver could not find internal links referenced on paged of your site.
-
External links. External links are perhaps the most notorious for creating broken images and the dreaded Error 404: File not found message. These are files that are located outside your site (and look like http://www.somesite.com). External links are displayed so that you are aware of the possible problems associated with them. Note that a link on the external links list does not mean that the link is broken; it simply means that it's beyond the scope of Dreamweaver's link management system to check these links.
-
Orphaned files. These are files that have no incoming links pointing to them. In other words, these are files in which there is no navigation to get to them. Typically these files are older versions and aren't in use anymore. However, you can't just assume that all orphaned files are not used. Be careful to make sure that orphaned files aren't necessary before deleting them.
Whether you check all of your site's files simultaneously, or only check one or two files as needed, the procedure is basically the same.
To check your site's links all at once, do this:
-
Save all open documents.
-
Choose Site > Check Links Sitewide (Ctrl/Cmd+F8); or right-click (Ctrl-click) any file or folder in the Site Files list and choose Check Links > Entire Site from the contextual menu.
To check links for only a few files in the site, do this:
-
Save and close all open documents.
-
In the Site Files list or site map, select the file(s) you want to check. Shift-click or Ctrl/Cmd-click to select multiple files.
-
Right-click (Ctrl-click) any selected file and from the contextual menu choose Check Links > Selected Files/Folders.
To check links for only one document, do this:
-
Open the document you want to check, and save it if needed.
-
Choose File > Check Page > Check Links.
Whichever method you choose, Dreamweaver checks your links and then shows you the results by opening the Results window with the Link Checker tab displayed (see Figure 22.22). Using the pop-up menu at the top of this window, you can view any of the three type of links reported (Broken Links, External Links, Orphaned Files). On the left side of the window, the file that has the problematic link is displayed. To the right is the specific link with which Dreamweaver is having a problem. The Orphaned Files section doesn't have a second column because there is no link associate with it.
Figure 22.22. The Results window showing the results of checking links across a site.
From here you can either close the Results/Link Checker window or save the list as a tab-delimited text file. This saves all three link types as one file. You can then import the list into a page by using the File/Import/Import Tabular Data option or import the text file into a word processor to be printed out for reference.
Note
| | It is possible to lose track of the Report window where your Link Checker information is stored. This is because although the box appears in the Site panel initially (if you are currently viewing the Site panel), it moves to the Document window if you switch from the Site panel or even click the menu. The only way to get back to the Report window is to switch to the Document window. It might even be necessary to open a document if there isn't one currently open. |
Fixing Links
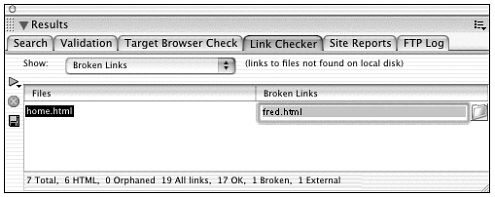
Two methods exist for fixing broken and external links (if they actually need fixing). Both are accessed via the Results/Link Checker window.
The first method is to double-click the filename of the file with the broken or external link. This opens the file in a Document window and highlights the suspect link. If your Property inspector is open, the link also is highlighted in the Link or Src section of this inspector. You can then manually type the correct reference or use the folder icon or Point-to-File icon to select the correct file you want to link to.
The second method is probably quicker and easier, if you know your site well. From the Link Checker window, click once on the link in question in the right column. This makes the link manually editable (see Figure 22.23). If you're currently troubleshooting the broken links section, a folder icon appears that enables you to easily browse to the correct link. If there are other broken links with the same reference, Dreamweaver asks you if it should update them as well. Now, could that be any easier?
Figure 22.23. Fixing a broken link with the Results window.
Note
| | If you are using the file Check In/Check Out system on your site, Dreamweaver attempts to check out the file so that it can change the link. If it cannot do so, Dreamweaver displays a warning message and leaves the link as broken. For more on Check In/Check Out, read Chapter 24. |
Exercise 22.3 Rearrange Files and Manage Links in the Grandpa's Site
In this exercise, you'll build on the Grandpa's Ice Cream site you created in previous exercises. (If you haven't yet done Exercise 22.1, go back and do that now!) You'll rearrange your file structure, allowing Dreamweaver to update links for you. You'll create new files and folders. And you'll see how to use the Site panel to add links, correct links, and change links.
-
Expand your Site panel so you can see the list of Site files on the right and the Site map on the left. Have you noticed that the organization of files within the Grandpa's site is not too good? This is what's called a flat structure all the files are loose in the main folder. Not too easy for finding things. You want to create an images folder in the local root folder and put all of your images in there. But you don't want to break the links when you do so.
-
In the Site Files pane of the Site panel, select the folder icon that represents your local root folder (it's the one at the top of the list). Right-click (Ctrl-click) on this folder to access the contextual menu, and choose New Folder.
A new untitled folder appears in your site list, with its name selected and ready to change. Rename the folder images.
-
Now it's time to move all of your image files into that folder. To make this job as easy as possible, from the column names at the top of the Site panel click the Type column. This arranges your files by type. Now all of your images (type: GIF) are displayed together in the list.
Select the top image in the list. Then Shift-click to select the bottom image in the list. Then release the Shift key and drag the selected images into the images folder. Dreamweaver will ask if you want to update your files. Click Update. After a few seconds, your images are moved! (See Figure 22.24.)
Figure 22.24. The Grandpa's site with all images moved to a special images folder.

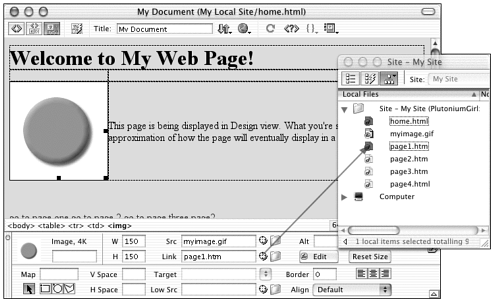
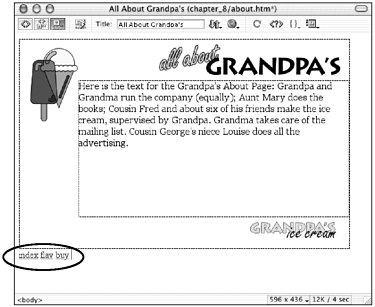
To test this out, double-click the index.htm file to open it. When the home page opens, all the images still display. Select the ice cream cone image and examine the Src field of the Image Property inspector. The src attribute is images/maina1.gif, indicating that the image is in an images subfolder.
-
Now it's time for some link management. Open index.htm, if it's not already open, and Preview in Browser (F12). Notice that, in the browser, you can navigate to any of the three subpages, but after you're there you can't navigate back home. A definite limitation.
Back in Dreamweaver, close all open files. (Never perform file management chores when files are open!) In the Site panel, go to the Site Map pane and select about.htm. Note that, when the file is selected, the point-and-shoot icon appears next to it. Press down on that icon and drag back up to index.htm. When you let go of the mouse (if you were on top of index.htm when you let go), a new link appears under about.htm.
Repeat this same procedure to add links from flav.htm and buy.htm back to the home page. Then add links from each of the three subpages to each other. This creates a complete site navigation system. When you're finished, your site map will look like the one shown in Figure 22.25.
Figure 22.25. The Grandpa's site map showing links added.
You'll also notice that it looks like you suddenly have a lot of pages in your site. If you expand all the plus (+) icons to view the entire hierarchy, your site looks immense! But you still only have four files in there. This is because the site map has no way to represent reciprocal links (such as two pages that link to each other).
-
After you've done all this, open about_us.htm and examine the new text links that have been added at the bottom of the page. There they are serviceable but not too pretty (see Figure 22.26). You're going to fix that up.
Figure 22.26. The automatically added links in about_us.htm.
Choose Edit > Find and Replace. In the dialog box that appears, set your options to match those shown in Figure 22.27. You'll be searching all the text in the current site for the word index, and replacing it with the word Home.
Figure 22.27. Finding and replacing the index links with Home.
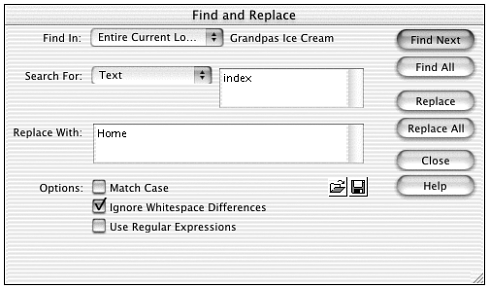
Click the Replace All button. Dreamweaver will warn you that this is dangerous, because it's going to search all the files of the site and you won't be able to undo its changes. For the current exercise, be brave and allow it to do so. When you're working in the real world, you might want to be more circumspect and click the Replace button instead, to change one instance at a time. Replace All is much faster, but more dangerous.
Repeat this process three more times, changing flav to Our Flavors, buysome to Buy Some, and aboutus to About Us.
-
When you've finished all this finding and replacing, open one of your pages and Preview in Browser (F12). How does your navigation system look and work?
Assets Management with the Assets Panel
The Assets panel keeps track of and enables you to easily update or insert certain elements used in the site, such as images, colors, rich media files (Flash, Shockwave, and so on), and scripts. This is particularly helpful if you plan to reuse one of these items on many pages throughout your site.
To open the Assets panel, click Window > Assets, or expand the Files panel group in your panel dock and bring the Assets tab to the front (see Figure 22.28). The panel consists of two main sections: the assets list (the lower half of the panel) and the display area (the upper half). Selecting an asset in the assets list will display it in the display area. Since assets are organized by type rather than by the hierarchical directory structure used in the Site panel, you'll only ever be looking at one type of asset at a time. To switch between different asset types, click the buttons along the left side of the panel. Types of assets are:
Figure 22.28. The Assets panel.
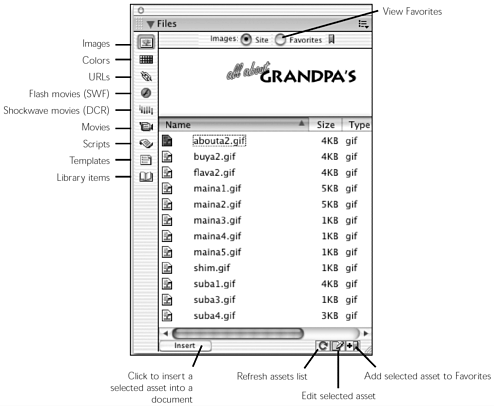
-
Images. These are image files such as GIF, JPEG, or PNG contained in your site. (For information on handling and using images, see Chapter 5, "Working with Images.") These are image files that are in your root site folder, regardless of whether they are currently linked to a document or not.
-
Colors. These are all the colors used in your site, including background colors as well as text and link colors.
-
URLs. These are external URLs found linked to by documents in your site. These include HTTP, HTTPS, FTP, JavaScript, local file, email, and gopher links. (See Chapter 6, "Links and Navigation," for more information on links and linking in your documents.)
-
Flash movies. These are Flash movies found in your local root folder. Only the SWF files are listed here, not FLA source files or the SWT template files.
-
Shockwave movies. These are Shockwave movies created with Director or Authorware found in your site.
-
QuickTime and MPEG movies. These are movies in either Apple QuickTime (.mov or .qt files) or MPEG format.
-
Scripts. These are JavaScript and VBScript files found in your site. Only independent script files are listed. JavaScript located in your pages is ignored.
-
Templates. When used correctly, templates provide an easy way to build and edit similar pages quickly and easily. Before relying too heavily on template-based design, be sure to spend time learning them inside and out.
-
Library. Libraries are similar to templates in that you only change one instance to update many. These are typically small content elements that are used on many pages throughout a site such as a company logo or a default navigation panel.
Note
| | To learn more about using Flash assets, see Chapter 20, "Building Web Pages with Flash." To learn about using Templates and Library items in the Assets panel, see Chapter 25, "Templates and Libraries." |
Tip
| | The site cache determines the contents of the Assets panel. If you have recently added a media element, color, URL, or other asset to your site, yet it doesn't show up in the Assets panel, click the Refresh button at the bottom of the panel to get an updated list of assets. |
Inserting Assets
Why are assets so wonderful? For one thing, the Assets panel makes it easy to find and insert images and other assets quickly into your documents as you work.
Inserting Media Elements from the Assets Panel
Images and other media elements (Flash movies, Shockwave movies, and more) are the simplest to insert from the Assets panel. It's all a matter of drag-and-drop, or select-and-click. To insert a media element into a document using drag-and-drop, do this:
-
Open the Assets panel and click the desired icon to view the type of asset you want to insert.
-
In the Document window, make sure Design view is active.
-
From the assets list, grab the item you want to insert and drag it to the desired location in your document. Note that even though you can drag-and-drop an asset anywhere within your page, its final position within the document will depend on the flow of content around it. Dragging an image into the middle of a paragraph of text will cause the text to wrap around it. Dragging it to the right side of the page will not position it on the right if the page contents are aligned left. (For ultimate positioning control, you'll have to drag items into layers. See Chapter 14 for more on this.)
To insert a media element using the Insert button, do this:
-
In the Document window, make sure Design view is active. Click to position the cursor where you want the asset to be inserted.
-
Open the Assets panel and click the desired icon to view the type of asset you want to insert.
-
In the Assets panel, select the asset you want to insert. Then click the Insert button.
Inserting URLs from the Assets Panel
Inserting URL assets is slightly trickier than inserting media elements, because the URL must be inserted as the href for a link. To insert a URL asset, follow these steps:
-
Open a document and make sure you're in Design view.
-
In the document, select the text or image that you want to link to the URL.
-
Open the Assets panel and click the URL icon to show URL assets.
-
Do one of the following:
-
Find the URL you want to apply, and drag it to the selected item in the Document window.
-
Select the URL you want to apply, and click the Apply button.
-
Inserting Color Assets
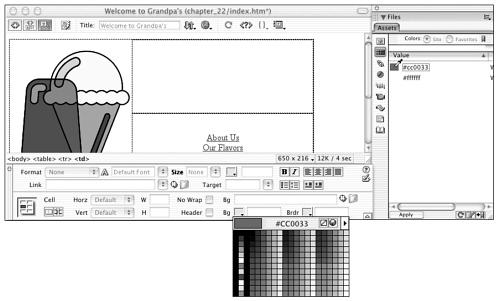
In one way, color assets aren't quite as useful as you might think, because they can't be inserted or applied to very many document elements. The only kind of page element that will accept application of a color asset is text, and when text is colored using this method the color is added as part of a <font> tag (which has been deprecated in favor of CSS formatting). But used in conjunction with the Dreamweaver color picker and its sampling tool, color assets can be very handy indeed.
To use a color asset to color text, do this:
-
Open a document and make sure you're in Design view.
-
In the document, select the text that you want to colorize.
-
Open the Assets panel and click the color swatch icon to show color assets.
-
Do one of the following:
-
Find the color you want to apply, and drag it on top of the selected text in the Document window.
-
Select the color you want to apply, and click the Apply button.
-
To use a color asset to colorize any other element in a Dreamweaver document, do this (see Figure 22.29):
Figure 22.29. Sampling a color from the Assets panel.
-
Open the Assets panel and click the color swatch icon to show color assets.
-
Open the document you want to work on, and either select the item you want to colorize (layer, table, table cell, and so forth.) or open the dialog box from which you'll be choosing a color (Page Properties, CSS Style Definition, or another option).
-
Colors are always chosen in Dreamweaver using the color button and color picker. From whatever dialog box or Property inspector you're in, find the color button and click on it to activate the color picker.
-
Instead of choosing from the color swatches in the color picker, move the eye-dropper cursor over to the Assets panel and click on the color asset swatch you want to sample. There's your color!
Your Favorite Assets
Your site's assets list contains every single asset in the site, including colors, images, and URLs you might only use once in the entire site. Typically, as your site becomes larger, the number of assets in your site will increase as well. When you begin handling a 30-page site, you can easily have 50 or 60 different images, if not more! As you can imagine, this makes the assets list rather cumbersome and slow to navigate through.
To solve this problem, Dreamweaver has Favorite Assets. From all the assets in your site's assets list, you can choose only those that you know you'll be using over and over, and declare them to be Favorites. Favorite assets show in the Assets panel when you switch to Favorites view (see Figure 22.28). Not only is it easier to navigate a list of 10 favorites than a list of 100 site assets, but also the Favorites view can even be organized into folders for easier and more logical access. This section shows you how to organize and use Favorite-specific features.
Viewing and Working with Your Favorite Assets
All of the functionality of the Assets panel can be applied to favorite assets just as it is to site assets. To see and work only with your favorite assets, click the Favorites radio button at the top of the Assets panel.
Note
| | The Favorites section begins completely empty. You must build it up as you go. This can be a slow and tedious process, but it can result in large pay-offs in the end, depending on the structure of your site. |
You can add a site asset to your Favorite assets by doing one of the following:
-
In the Assets window, select the asset(s) that you want to add to the Favorites list then click the Add to Favorites button at the bottom right of the window. This button looks like a plus (+) symbol and a purple ribbon.
-
Select the asset(s) that you want to add to the Favorites list in the Assets window. Access the context menu by clicking the right arrow button on the upper-right corner of the panel. You can also bring up this menu by right-clicking (Windows) or Ctrl-clicking (Mac) on the asset(s).
-
In Design view of the Document window, select the asset(s) (or object) that you want to add. Right-click (Windows) or Ctrl-click (Mac) the object(s) to access the context menu. Select Add to [Asset Type] Favorites.
Note
| | Note that when adding text to your Favorites, Add to Color Favorites will appear if the text does not contain a link; otherwise, Add to URL Favorites will appear. |
The Favorites list wouldn't be worth much if you couldn't change your mind and delete an item from the list. To remove an asset from your Favorites list, follow these steps:
-
Select the asset(s) that you want to remove from your Favorites list.
-
Click the Remove from Favorites button. You can also right-click (Windows) or Ctrl-click (Mac) the asset and select Remove from Favorites from the context menu that appears. Alternately, you can also select the asset in the favorites list and press the Delete key. You can remove the entire Favorites folder as well, which removes all the folder's contents along with it.
Assets that you remove from the Favorites list are not actually deleted from your site in any way; they're simply removed from your Favorite Assets list.
Grouping Your Favorite Assets
To reduce clutter even further, you can group your assets in folders. This enables you to keep images that are part of your main navigation in their own folder, while keeping other commonly accessed images in another.
Creating Favorite folders and placing assets inside them does not change the location of the actual file in the directory structure of your site. It simply offers an easy way to further organize your assets.
To create a Favorites folder and place assets inside it, simply do the following:
-
Access your Favorites listing.
-
Click the New Favorites Folder button located at the lower-right corner of the panel. You might also select the New Favorites folder from right-clicking (Windows) or ctrl-clicking (Mac) the asset.
-
Name the folder and drag the desired assets into the folder (see Figure 22.30).
Figure 22.30. Creating a group of favorite assets.
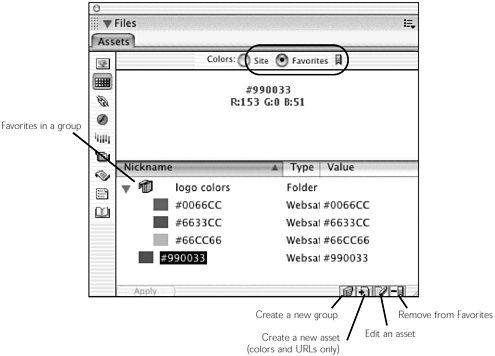
Customizing the Assets Panel
Like most things in Dreamweaver, you can customize the Assets panel in many ways. You can use the Favorite Assets feature to keep a separate list of the assets that you use most. If you have a company logo that you use on multiple pages, you can add the logo image to your Favorites listing and then don't need to wade through all the images that you use only once or twice to get to the one that you use all the time. Favorites are so handy that they've been given their own section in this book. Read "Your Favorite Assets," later in this chapter, for more information about them.
Another method is to change the listing order of the assets. By default, the assets are listed in ascending alphabetical order (from A to Z) by name or value. You can change the order of the listing by clicking the column heading with which you want to sort. This sorts the assets ascending alphabetically by that column's attribute. Clicking a column header a second time sorts the listing alphabetically still, only in descending order (from Z to A). If you sort a column of numbers, such as file size, the ordering will be sorted numerically rather than alphabetically, from smallest to largest (ascending) initially.
You can also change the width of the columns in the Assets panel, as shown in Figure 22.28. To do this, simply hold your cursor directly over the divider line that separates two columns. You will notice that the pointer changes to a double-headed arrow column. You can now click and drag the column to any width that you want. This typically holds true for most windows that use columns.
Using Assets Throughout Your Site
Dreamweaver allows you to use assets in many ways. It even allows you to copy assets and share them among various sites.
To copy an asset from one site to another, follow these steps:
-
Select the asset(s) that you want to copy to another site. You can copy entire folders of assets in your Favorites listing.
-
Click the right arrow button located in the upper-right corner of the panel.
-
Select Copy to Site from this menu. A submenu will appear with a list of the possible sites to copy the asset(s) to. Choose one of these sites listed.
The selected asset(s) is copied into the specified site and placed in folders that correspond to their locations in the current site. Any folders that don't already exist are created automatically. It's also important to note that assets copied in this fashion are automatically added to the other sites' Favorite Assets listing.
After the site on which you are working becomes rather large, you might forget where certain assets have been used. Dreamweaver will help you find them. If you would just like to find where a certain asset (or group of assets) being used in the local site, follow these steps:
-
In the Assets panel, select the asset or assets that you want to locate.
-
Right-click(Windows) or Ctrl-click (Mac) to bring up the context menu. You can also access this menu by clicking the right arrow button located in the upper-right corner of the panel.
-
Choose Locate in Site from this menu. The Site panel will appear, and the assets you searched for will be highlighted.
The Locate in Site option is not available with colors and URLs. This is because these two asset types do not have files associated with them; they are simply strings of text inside files.
Editing Your Assets
The Assets panel provides an easy way to edit assets as well. This can come in handy when you want to edit multiple pictures but don't want to wade through the complex directory structure of the Site panel.
To edit an asset through the Assets panel, do one of the following:
-
Double-click the asset name. This launches the default editor (as specified in your preferences see Chapter 34, "Customizing Dreamweaver," for more details).
-
Select the asset and then click the Edit button found in the lower-right corner of the panel.
The type of asset that you want to edit dictates what happens next. With assets such as images and Flash movies, an external application is launched with the file in question open inside that program. In this case, simply edit the asset and then export it again to your local site folder, overwriting the older version.
Colors and URLs will not launch a separate application. In fact, you can edit these types of assets only if they are in your Favorites section. Editing a color brings up a swatch box, where you can choose a new color. Editing URLs brings up an Edit URL box, where you can change the URL as well as the nickname that the Assets panel uses to describe the URL. Library items and templates will be opened for editing directly in the Document window.
Note
| | If you are editing a color, you can get out of the color swatch box without choosing a new color by pressing the Esc key. |
Note
| | If nothing happens after you double-click an asset to edit it or use the Edit button, be sure to check the File Types/Editors section of your preferences to see if there's an application associated with that type of file. |
Creating New Assets
While you cannot create every type of asset from the Asset panel, You can create new color, URL, template, and library assets. (Image, Flash and Shockwave assets are created outside of Dreamweaver.) You must be viewing your Favorites to create new colors and URLs.
To create a new color, make sure that the Favorites listing is currently being viewed, and select the Colors section. Click the New Color button in the lower-right corner of the panel. You can also use the context menu, either by right-clicking (Windows) or Ctrl-clicking (Mac) in the list or by selecting the right arrow button in the upper-right corner of the panel, and selecting New Color. This brings up a color swatch, where you can pick out your new color (see Figure 22.31). After you have selected a color, you can give it a nickname.
Figure 22.31. Creating a new color asset.

To create a new URL, make sure that the Favorites listing is currently being viewed, and select the URLs section. Click the New URL button in the lower-right corner of the panel. You can also use the context menu, either by right-clicking (Windows) or Ctrl-clicking (Mac) in the list or by selecting the right arrow button in the upper-right corner of the panel, and selecting New URL. This brings up the Add URL dialog box, where you can define both the nickname and the URL path for this new asset.
Note
| | Notice that any colors or URLs you create in the Favorite Assets listing won't appear in the site listing until they've actually been used in the site. For a full discussion of creating templates and library items, see Chapter 25. |
Summary
This chapter showed you the wide and wonderful world of Dreamweaver local site management. Before you ever even think of uploading your site to a web server for publication, all the behind-the-scenes work of file, link, and asset management has to take place. In this chapter, you learned how to use the Site panel including the Site Files and Site Map view to rearrange, rename, create, and delete files within a site. You learned how Dreamweaver can help you manage links across an entire site easily and painlessly. And you learned about managing media elements, colors, and URLs through the Assets panel. In the next chapter, you'll take your show on the road, by publishing your site masterpiece to a remote web server.
| CONTENTS |
EAN: 2147483647
Pages: 49
- Chapter II Information Search on the Internet: A Causal Model
- Chapter VI Web Site Quality and Usability in E-Commerce
- Chapter VIII Personalization Systems and Their Deployment as Web Site Interface Design Decisions
- Chapter IX Extrinsic Plus Intrinsic Human Factors Influencing the Web Usage
- Chapter XIV Product Catalog and Shopping Cart Effective Design