Chapter 13. Using Cascading Style Sheets
| CONTENTS |
| |
|

- What Are Cascading Style Sheets?
- Styles, Style Sheets, and Where They're Kept
- Creating Cascading Style Sheets in Dreamweaver
- Interview: Nick Bradbury
- Working with Redefined HTML Tags
- Working with Custom Classes
- CSS Selectors
- Combining Style Sheets
- Summary
Cascading Style Sheets (CSS) offers a way to extend the formatting capabilities of your web page beyond the limitations of HTML. CSS enables you to define and change the look of your web site quickly and easily.
This chapter discusses CSS: what it is, why it is, and how to use it.
What Are Cascading Style Sheets?
A Cascading Style Sheet at its most basic is a set of instructions that define how an HTML document is going to display. The great thing about CSS is that it can be defined in an external file, or sheet. This external sheet is first read by the browser, then applies the rules to the specified content on the page. In this way, the style and formatting of the page are separate from the content. This is an important concept in designing web pages. It also gives you a powerful and detailed way to update your entire web site.
You can create a style sheet that defines your text as Arial, 12 point, red, bold, and left-justified with a blue background. Attach your sheet to all the pages on your site, and all your text will appear that way. If you have a change of heart, you can change that one style sheet and make the text Times, 28 point, green, italics, and right-justified. Save that new sheet, and the entire web site is automatically updated.
CSS also enables you to do things that HTML just can't do. You can set a layer on your page to be scrollable. This way you can have a window in the middle of your page with scrollable content. You can define different colors for every facet of a table border. You can set custom graphics for bullets and you can remove the underline from hyperlinks.
Note
| | While browser support is getting better with every release, some browsers do not display all CSS elements, nor do they display some elements in the same way. It is always a good idea to test your page in multiple browsers. One important idea of CSS is that if the style is not supported in the browser, the information will still be there it will just not show the offending styles. IE 5 and above and Netscape 6 do a fine job of displaying most CSS elements. Netscape 4 has some limitations. |
CSS gives you unprecedented control over your page. The W3C is now recommending the use of CSS for page formatting. It has even deprecated the <font> tag in deference to CSS. It would do you well to explore the possibilities of CSS in your web design.
A note about semantics:
-
A style is generally defined as a set of parameters for a tag or a class.
-
A sheet is the file that contains the styles. A sheet can contain many styles.
Format of a CSS Style
The format of a style sheet has a few basic parameters and can be further subdivided depending on the complexity of the sheet.
CSS Selectors
The easiest of the styles to understand is the CSS selector. A selector is any HTML element or tag. To affect the appearance of the tag you apply a set of rules, that set of rules defines how the tag should display in the browser.
The basic format of a selector style is as such:
selector {property:value} The selector is the tag being changed. The property is the name of the property being set. The value is the value of the property being set.
A basic CSS example is this:
p {color: green} This sets any text within the <p></p> tags to green for any page that uses this style.
You also can group several settings into one style:
p { color: green; text-align: right } This will set the green text to the right of the page.
Note that CSS is frequently written in separate lines for clarity, but can be combined on one line if you prefer.
If you want to assign multiple tags the same style, you can list them in the selector:
p, div, H2 { color: green; text-align: right } Notice that a comma separates each tag, a full colon separates the property from the value and semicolons separate properties (with the far right semicolon being optional in the example above, it is not present).
Contextual Selectors
Contextual selectors are another way of applying styles to specific tags. This is a bit more specialized, because a selector works by only being applied when a certain condition or set of tags are present.
For instance, you can create a CSS selector that you only want to be applied to table headings that are boldfaced. So you would set up a selector that looks for a tag combination of B TH (bold, table heading) and would then apply the style. Table headings that are not bold would be left alone by this style.
Classes
You can have more than one set of styles for a tag. The most flexible method of defining more than one set of styles is to specify classes. A class is a set of style rules that can be applied to any element, unlike a redefined HTML tag, which is automatically applied to all specified elements. Define a custom class, and it will then show up in the list on the Apply Styles tab. You then highlight an element on the page and specify which class you want to use in your tag:
.red {color: red} h2.green {color: green} When you want to specify a particular class in a tag, it would look like this:
<H2 class="green">This is Green text</H2>
This tells the tag to use the green class. As this is applied directly to this tag, it will influence this tag only. <h3 class="green">This is not green text</h3> would not be affected because the .green class is directly associated with the <h2> tag.
You can use the red class with any tag and it would apply because it is not assigned to a specific tag, so the following would actually display properly:
<h2 class="red">This is Red Text</h2> <h3 class="red">This is Red Text</h3>
Pseudo-Classes
The most common usage of pseudo-classes is to display links in different states, those states being Link, Visited, Hover and Active. These are preset definitions for link styles. It differentiates between Links, Active (links that are being clicked on), Hover (when mousing over a link), and Visited (links that have already been visited). You can use selectors to define a style for each of these states. (This is what is used to remove the underline from links.) These four selector styles are available in the Name drop-down field when you select Use CSS Selector. Order of their use in the CSS file is important: It must be Link, Visited, Hover, Active, or their functionality will not work as desired. An example could be:
a:link{text-decoration:underline} a:visited{text-decoration:overline} a:hover{text-decoration:none} a:active{text-decoration:none;cursor:wait} Psuedo-classes work with IE 4+, Netscape 6+ but not with Netscape 4.x, so if you are experiencing problems with Netscape 4, wonder no more.
Styles, Style Sheets, and Where They're Kept
Styles can exist in a document as individual styles placed inline with the document, or they can be grouped together in collections called style sheets. A style sheet can be internal or external, depending on where it is stored relative to the document that it's formatting. The following sections discuss the relative advantages and disadvantages of inline styles, internal style sheets, and external style sheets.
Inline Styles
Inline styles are those defined directly within the tag on the page. The CSS is written right into the tag as an attribute. Although this style will take precedence over all other styles, they are applied only on a tag-by-tag basis. Therefore they can be edited only by directly editing the HTML page. Imagine though, having to edit a page with 50 inline CSS references on it; it would be time-consuming and also take more bandwidth to serve your page. This way of applying a style is limited and therefore should be used for changing specific tags on a case-by-case basis.
An inline style looks like this:
<div id="Layer1" style="position:absolute; width:200px; height:115px; z-index:1; left: 121px; top: 103px;">
This is the code for a layer in Dreamweaver. A layer is really a CSS block element. The style is written into the tag because it is unique to this <DIV> tag. It clearly specifies the properties of the layer within the actual tag.
Internal Style Sheets
Internal style sheets are defined within the actual HTML page in the <head> region using the <style> block. This way, the styles are available to the whole page without being dependent on another file.
A typical internal style will look like this (see the browser rendering in Figure 13.1):
Figure 13.1. Internal Style Sheet in browser.
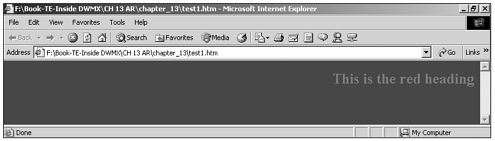
<head> <style type="text/css"> body {background-color: blue} h2 {text-align: right; color: red} </style> </head> <body> <h2>This is the red heading</h2> As you can see, the background is blue, the h2 text is red and right-aligned as we have specified using CSS.
As you can see, if you want to put the headings on the left and change the color, just edit the CSS in the head and the changes will be made automatically to all headings in the document (see Figure 13.2).
Figure 13.2. The modified Internal Style Sheet in browser.
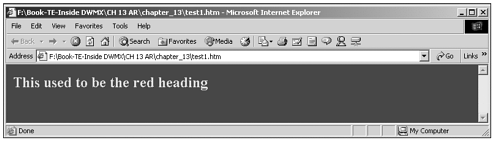
The referenced file above appears after applying a change of Text Alignment to left and changing the text color to blue.
If multiple pages all had the same styles, however, the change to a style would have to be made to all of the pages. Again, this isn't very efficient, but it's better than using inline styles.
External Style Sheets
External style sheets enable you to take full advantage of the capabilities of CSS. External style sheets contain all the styles and definitions in an external file, usually with a .css extension. This is arguably the best way to store your styles. Using this method, the style information is completely independent of the HTML code. You can change the look and feel of your entire site just by editing this external file. The site will automatically update depending on the information in that sheet after it is uploaded to the server. After you learn all the options that CSS presents to you, you can take full advantage of this functionality.
A typical external style sheet is linked to the page by code like this:
<link rel="stylesheet" type="text/css" href="mainstyles.css">
Where:
-
rel="stylesheet" defines the relationship between the open page and style sheet. Style sheets can be persistent, preferred, or alternate. A persistent style sheet is always used when style sheets are enabled. A preferred style sheet is automatically applied. Giving the style sheet a title attribute in the link field specifies this. An alternate style sheet is one that can be set by the user. Used for giving users a choice of styles.
-
type="text/css" defines the file format (MIME type) of the CSS file. This is used so that browsers can ignore CSS files that it cannot understand. "text/css" will almost always be used.
-
href="mainstyle.css" is the path to the actual CSS file. It can be either relative, as in the example, or absolute.
The actual style sheet file will just have a list of selectors and classes listed, as follows:
p { color: green; text-align: right } .red {color: red} h2.green {color: green}
Warning
| | HTML tags should never be included in external CSS files as they can cause your CSS to not be interpreted correctly in the browser. This includes HTML comment tags: <!--HTML Comment--> CSS has its own type of comment tag: /* CSS Comment */ |
After you link the external style sheet to your site, you just change the settings in the file and everything updates. This is the tremendous advantage of using CSS!
Cascading and Inheritance
One of the advantages of CSS styles is that they all work together if needed and can overwrite each other as needed. Cascading and inheritance work together to make this cooperation happen.
Cascading refers to the use of multiple styles and sheets and the order in which they are read. The order in which the styles appear within the code determines which particular trait will display. If the external style sheet says that <h2> text should be blue, but there is an inline style on a particular <h2> tag that says the text should be yellow, the yellow will win because it is closer to the actual text code.
Inheritance means that in styles that cascade, the closer style will overwrite only those parameters that both styles share. In the preceding example, if the external style says that the <h2> tag should be right justified, the inline style will not overwrite that because it does not have a parameter that controls justification. Therefore, the <h2> tag will be yellow because of the inline style, but it will inherit the right-justification from the external style.
Creating Cascading Style Sheets in Dreamweaver
You can use Dreamweaver to create style sheets or you can use and modify existing sheets. Dreamweaver displays most CSS formatting in Design view. Probably the easiest way to work with styles in Dreamweaver is by utilizing the CSS Styles panel; you can also choose File > New, and choose to create a CSS document with your own manually entered code, if you prefer (see Figure 13.3).
Figure 13.3. Creating a new CSS file.

You can create a new blank CSS file or use a style stationery that is available from the new document interface.
Working with the CSS Styles Panel
Styles are manipulated and controlled in the CSS Styles panel, part of the Design panel group (see Figure 13.4). You can access this panel by going to Window > CSS Styles (Shift+F11).
Figure 13.4. The CSS Styles panel showing the Style Editor and Style Applier.
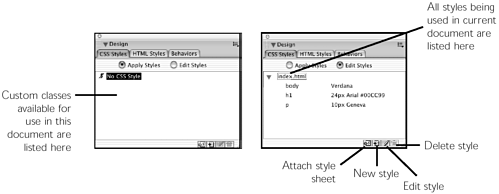
| | An update has been made to the CSS Styles panel in Dreamweaver MX; the Style Editor view has been added. This view shows the structure of all styles on the page. This view also shows both linked and internal styles, along with the list of parameters for the styles. In this view, double-click the style to bring up the editor. To apply a style in this view, right-click (Ctrl-click) and from the contextual menu choose Apply. This new view makes it much easier to see your style definitions. |
| | The Style Applier view is also new, and is found in the classic Dreamweaver panel. This panel will only show custom classes. To apply a custom class in this view, simply highlight the portion of the page and click on the style in the list. It will automatically be applied. Click on the (none) class to remove any style applied to the selection. |
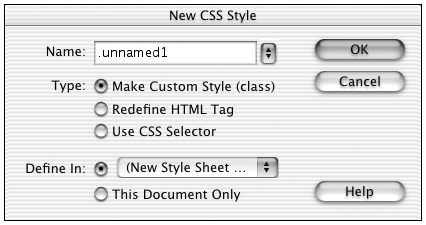
Creating New Styles
To create a new style, in the CSS Styles panel click the New CSS Style button (see Figure 13.4). This button is available in either the Style Applier or Style Editor views. The New CSS Style dialog box will appear (see Figure 13.5).
Figure 13.5. The New CSS Style dialog box.
-
Attach Style Sheet. Prompts you for an existing style sheet filename; use the browse button to locate it.
-
New CSS Style. Brings up the New CSS Style dialog box for you to create the new style.
-
Edit Style Sheet. Either brings up the External Style Sheet dialog box, opens the CSS Editor dialog box, or opens the CSS Definition Editor dialog box.
You can define a custom class or redefine a tag or redefine a selector and you can specify in the local document or have it create or update an external style sheet. If you create the external style sheet, then the program automatically adds the appropriate linking information in the <head> section of your document.
Note
| | It is important to keep an eye on the names of the dialog boxes when making style sheets. Some of the windows are similar, and you need to know where you are in each step. |
The options here are as follows:
-
Name. Name of the style. This is the name that shows up in the CSS Styles panel. It is a good idea to name them so that they reflect what they do. This will make keeping track of styles easy, especially if you are working with other developers. Complex sites can have quite a few styles and good naming helps you keep everything straight.
The Name field is context-sensitive: it will have a different name depending on the type of style selected. If Redefine HTML is chosen, the field will be called Tag and the drop-down menu will list all available tags. If Use CSS Selector is chosen, the field will be called Selector. Into this field you would select the link style from the drop-down list or enter in the tag combination for the selector.
Tip

If you want to define more than one tag with the same CSS, you would enter them as follows in the Selector field:
td, p
Another example might be:
body, td, p
-
Type. What kind of style is this going to be:
-
Make Custom Style. This will make a custom class that can be applied to any tag.
-
Redefined HTML Tag. This will create a style that will affect every instance of the selected tag.
-
Use CSS Selector. Creates a style for a specific combination of tags or allows you to set link styles.
-
-
Define In. Determines whether this will be part of an external style sheet, or whether it will be an internal style.
To define a style as part of an external style sheet, use the pop-up menu to either choose an existing CSS file the style should be added to, or create a new CSS document.
To define an internal style, which will affect the current document only, choose the second option.
After you've decided what kind of style to create, click OK. The Style Definition dialog box will open (see Figure 13.7), ready for you to specify what formatting the new style should include. (See the section on style definitions for more on this.)
Figure 13.7. The Type Category options.
Note
| | To create a custom inline style, the code must be entered directly into the tag. With the new Tag Inspector, however, you can easily code style elements within the tags of your page. |
Removing Styles
Removing a style from a page or an element is quite simple. Dreamweaver MX makes it even easier. The redesigned CSS Styles panel now shows all the styles being used. With items such as redefined HTML tags or pseudo-classes or in other words, those style elements applied to the whole page you need to delete the style definition from the page or the external style sheet. You can highlight the style in the CSS Styles panel and right-click (Ctrl-click) and from the contextual menu choose Delete, or you can press the Delete Style button in the lower-right corner of the CSS Styles panel (refer to Figure 13.4).
For custom classes, you can either remove the style from the specific element to which it is applied and/or you can remove the style from the style sheet.
To remove the style from the page, go to the Edit Styles panel and highlight the style. Click on the Remove CSS Style button in the lower-right corner of the panel. This works in two ways. If you remove a linked style sheet, it simply removes the link from the page; it does not affect the external file. If you remove an internal style, it deletes the style definition from the head tag, permanently removing that style.
To remove a custom class from the element itself, select the element and go to the Apply Styles panel. Click the No CSS Style button and the CSS code will be removed from the element tag.
Linking to Style Sheets
Although you can use the CSS Styles panel to create style sheets, you also can link to existing style sheets. If you are adding more pages to a web site that has a series of premade styles, you can easily link those pages to your new pages and apply them as you want. They will act no differently than styles created in Dreamweaver: Redefined HTML tags will automatically update and the list of custom classes should appear in the CSS Styles panel.
To link to an existing style sheet, simply click on the Attach Style Sheet button in the lower left of the CSS Styles panel (refer to Figure 13.4). You will be prompted to browse to the .css file. You also have a choice between linking and importing. Generally Link will be the best choice. The difference is slim: Link uses an href to link to the sheet, while the import uses a Style or URL link to find the file.
Tip
| | The Link generally is used for a style sheet that contains styles that work in Netscape 4. The Import link generally is used to hide styles that aren't Netscape 4 compliant but are compliant with other browsers and Netscape 6. The reason for this is because Netscape 4 ignores the @import directive. |
Click OK to complete the linking. The redefined HTML tags and selectors will be applied automatically, and the list of the Custom Classes will be available in the Apply Styles panel.
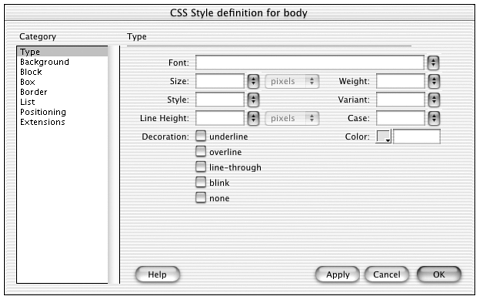
Working with Style Definitions
The interface for specifying CSS style formatting is the Style Definitions dialog box (see Figure 13.6). This dialog box will appear as soon as you create a new style, and every time you want to edit existing styles. Its eight different windows cover different aspects of CSS control. They are described in the next few sections.
Figure 13.6. The CSS Style Definition dialog box.
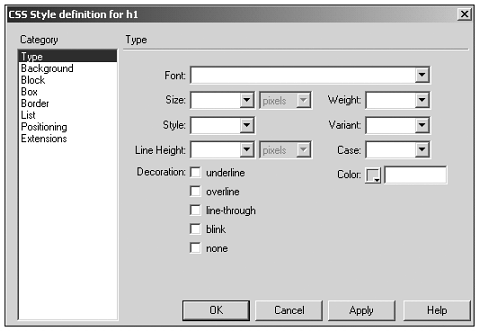
Type
Table 13.1 lists the Type options available in the Type category of the CSS Style Definition dialog box (shown in Figure 13.7).
| Option | Description |
|---|---|
| Font | Selects the fonts to be used in the style. These are the same groupings that have been set in Dreamweaver. You can edit this list by clicking the down arrow and choosing Edit Font List. (See Chapter 4, "Working with Text," for a full discussion on font lists.) |
| Size | Enables you to specify font size. Notice that you can choose a number value or absolute size values. Absolute size values set the medium value to the default settings of the user's browser or defined styles rules and then scales from there. |
| Style | Sets the font to normal, italic, or oblique. The difference between italic and oblique is this: Italic is a distinct version of the font. Most fonts have an italic version. Oblique is simply the original version of the font that has been angled by the computer. In reality, there is usually no difference between the two in the browser, but there can be variances between fonts and sizes. If this distinction is critical, test both settings in the browsers. |
| Line Height | Defines the height of a single line of text. If you are more used to working with print projects, this is comparable to line spacing or leading. Normal line height is calculated based on type size; lines will be approximately 20% larger than the type size. Absolute line height can be assigned based on any of the measurement systems covered in the following sidebar. |
| Weight | Sets the boldness of the font. The number values are absolute settings, whereas the bolder and lighter are relative to the default size. (Boldness is not always rendered the same way across browsers; always preview in several different browsers if you choose any setting here other than normal or bold.) |
| Variant | Normal or small capital letters. Determines whether lowercase letters will be substituted with small capital letters. |
| Case | Sets the font to all uppercase, all lowercase, or all capitalize. Displays text as all uppercase, all lowercase, or capitalize every word. |
| Color | Sets the color of the font. |
| Decoration | Sets options for lines on the text. Use the None option for removing the underline from hyperlinks. |
Dreamweaver MX now renders most CSS elements in the Design window. It is still a good idea to preview the page in multiple browsers to make sure that your pages will actually render correctly.
Defining Font Sizes There are many different ways to define font sizes. They are generally grouped into two groups: Absolute and relative lengths. They each have their pros and cons. The sizes are: Absolute Absolute sizes imply that they are set in size, no matter where they are used. One centimeter is the same the world around, except on the computer screen.
Relative Relative lengths are bigger or smaller than some defined length. Percentage is a relative measure: Y is 10% bigger than X. X can be any size and Y will always be 10% bigger.
|
Background
The Background category controls how the background is rendered. Note that with CSS, you can control the background of every block element. This means that every paragraph, layer, table, or other discrete element can have its own background style. Keep this in mind as you apply background styles. Make sure that you are applying it to the correct tag. For instance, if you want to apply a background to the whole page, you must apply the style to the <body> tag.
Table 13.2 lists the Background Category options you see in Figure 13.8.
Figure 13.8. The Background Category options.

| Option | Description |
|---|---|
| Background Color | Sets the background color of the selected element. |
| Background Image | This is the preferred way to set a background image because you get additional controls over it. Browse to choose the image. |
| Repeat | Controls whether the image repeats in the background. You can repeat, not repeat, and repeat horizontally or vertically. |
| Attachment | Sets whether the background image will scroll with the page or remain static in the background and allow the page to scroll over it. |
| Horizontal Position | Enables you to control whether the image is left, right, or centered. You also can specify a specific value for the position. |
| Vertical Position | Allows the same control as the horizontal position in the vertical axis. |
In the Dreamweaver window, the image set here might show up in the upper-left corner of the Design window. Preview in Browser for a correct look at the page. There are browser limitations with some background images settings, especially with Netscape 4. As always, test in multiple browsers for compatibility.
Block
Block elements are discrete pieces of HTML. For instance, a paragraph is a block level element. For CSS reasoning, it is considered a block of code and when applying a custom class to a paragraph, it will only affect the code between the opening and closing paragraph tags. This way, each paragraph is treated as a separate element. Most block elements have an opening and closing tag. This is distinct from inline elements, which can be placed anywhere within a block element. An image is a good example of an in inline element. An image does not have a closing tag.
The block category controls how the element is presented on the page. Table 13.3 lists the Block Category options you see in Figure 13.9.
Figure 13.9. The Block Category options.
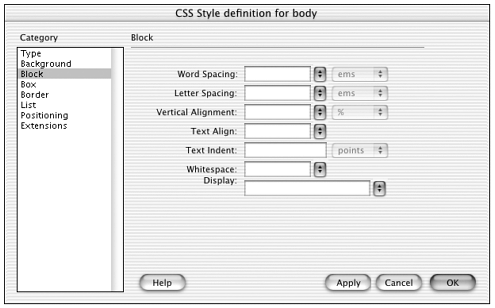
| Option | Description |
|---|---|
| Word spacing | Enables you to define the amount of space between each word. |
| Letter spacing | Enables you to define the space between each letter. |
| Vertical Alignment | Enables you to control the vertical aspect of word spacing. You can use this to specify subscripts and superscripts. |
| Text Align | Enables you to set the justification settings: Left, Right Center, or Justify. Check in the browser when using Justify as browser support is inconsistent. |
| Text Indent | Enables you to choose an indentation value from the edge of the page. |
| Whitespace | 'Normal' collapses multiple spaces into onespace. 'Pre' leaves multiple spaces. 'Nowrap' does not permit line wrapping without a break tag. |
| Display | Controls fundamental aspects of the block element. You can controls whether the element displays or not. You can also change aspects of the behavior of the tag itself. Test there settings as there is limited browser support. |
Box
Use Box options to control element placement and spacing on the page. Every block level element, such as a paragraph, is considered an element and can be arranged using the Box settings. Note that many of these settings will show up only in the browser. Preview frequently to check your page. Table 13.4 lists the Box Category options you see in Figure 13.10.
Figure 13.10. The Box Category options.
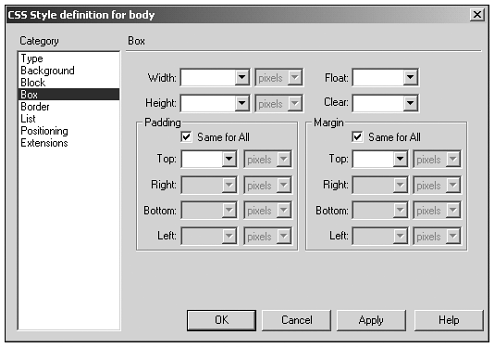
| Option | Description |
|---|---|
| Width and Height | Sets the width and height of the element. |
| Float | Float is used to separate an element from the rest of the page. Other elements will flow and wrap around this element as if it were something like an image. Only with an image will this setting show up in Design view. |
| Clear | Clear is used to define an area that does not allow elements to overlap. A layer that appears on a side set to clear will be moved below the clear area. This will keep block level elements from occupying the same horizontal space. |
| Padding | Used to set the space between the contents and the border (or the margin if a border is not set). Similar to the Cell Padding setting in a table. |
| Margin | Defines the amount of space between the element border and the other elements. |
New to Dreamweaver MX is the Same for All check box. You can now set one value and check that box for consistent values. Uncheck the box for customizing the individual values.
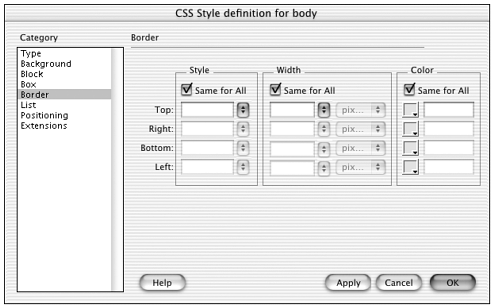
Border
Border options are used to set a border around the chosen element. It is this border from which the Box padding and margin are referenced. Although this is similar to a table border, you have a lot more control and choice in how it displays. Table 13.5 lists the Border Category options you see in Figure 13.11.
Figure 13.11. The Border Category options.
| Option | Description |
|---|---|
| Style | Enables you to set a style of border. You can choose from Dotted, Dashed, Solid, Double, Groove, Ridge, Inset, and Outset. Browser support for these differs. Use the Same for All check box for quickly setting a consistent border. Uncheck the box to set each side individually. |
| Width | Set the width value for the border. |
| Color | Set the color for the borders. |
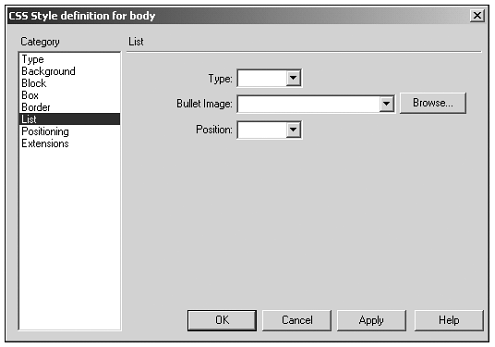
List
This List category provides more options when making a numbered or bulleted list. You can even use a custom graphic as the bullet. Table 13.6 lists the List Category options you see in Figure 13.12.
Figure 13.12. The List Category options.
| Option | Description |
|---|---|
| Type | Choose the type of bullet: Disc, Circle, Square, Decimal, Lowercase Roman Numerals, Uppercase Roman Numerals, Upper- and Lower-case Letters. |
| Bullet Image | You can create any kind of custom image and use that as your bullet. Press the Browse button to link the image. |
| Position | Use Outside to wrap an item to an indent and use Inside to wrap the item to the margin. |
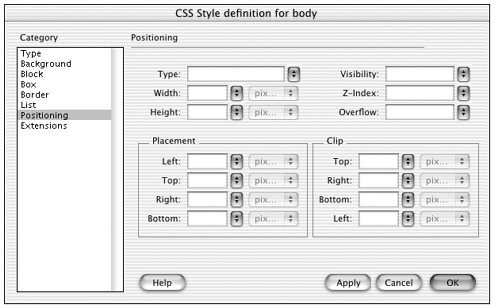
Positioning
This is the main interface for controlling where the page elements will appear on your page. While CSS positioning can be applied to most block level elements, they are generally used with Layers. Layers are actually <div> tags that contain an inline style with absolute positioning. Draw a layer on a page and check out the code created for it. Dreamweaver MX now displays positions in the Design window. For browser support issues, again, always preview in multiple browsers to confirm support.
There are a few important settings here for control over your page. Table 13.7 lists the Positioning Category options you see in Figure 13.13.
Figure 13.13. The Positioning Category options.
| Option | Description |
|---|---|
| Type | Controls what kind of positioning you are using: Absolute. Positions the block element relative to the upper-left corner of the page. Relative. Position is determined relative to the spot in the document where the positioning style appears in the document. Static. Puts the block element in the same location in which it appears in the document. |
| Visibility | Controls the initial visibility of the element. Inherit. Gives the element the same visibility setting as the parent tag. Defaults to visible. Visible. Makes the element visible when loaded. Hidden. Makes the element invisible when the page is loaded. |
| Width | Defines the width of the block element. |
| Height | Defines the height of the block element. |
| Z Index | Determines the stacking order of the elements. Lower number Z indexes will appear below higher numbered elements. Used for controlling visibility. This also can be set in the Layers panel. |
| Overflow | This is used when the content of a layer is larger than the layer size. Setting the Overflow parameter determines what happens to that extra material Visible. Allows all the content of the layer to be shown simultaneously, no matter what the size setting. Hidden. Strictly enforces the layer's size and cuts off any content that overflows this layer size. Scrollbars. Adds scrollbars to the layer whether it needs them or not. Watch for browser support on this if you are displaying important content. Auto. Will create scrollbars only when needed. |
| Placement | Enables you to specify where the layer will display. The Top and Left settings will be dependent on the Type setting you have chosen. Right and Bottom can give you a greater level of control for layout. |
| Clip | Used to specify the part of the layer that is visible. This is not a required setting. It is used only if you want to hide a part of the layer without Overflow controls. Used in combination with JavaScript to create interesting effects. |
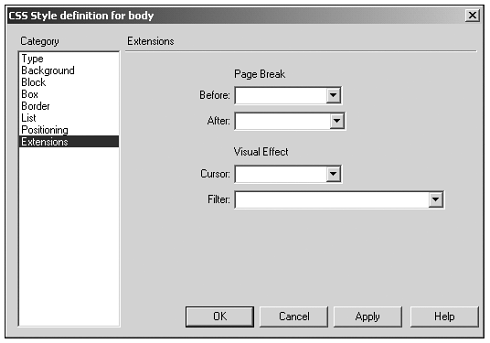
Extensions
Extensions options are used for special considerations and customization. Extensions are CSS Level 2 options. CSS Level 2 is the next specification of CSS. It has advanced features that go well beyond CSS Level 1, the specification of which we have been mostly speaking. Be careful, however, because this does not yet have full browser support. Table 13.8 lists the Extensions Category options you see in Figure 13.14.
Figure 13.14. The Extensions Category options.
| Option | Description |
|---|---|
| Page Breaks | Used for setting page breaks when setting up the page for printing. Use this setting for determining whether the page break comes before or after this element. |
| Visual Effect | Enables you to change the look of the cursor when it is over the element with this setting. Test this setting because there is limited browser support. Filter can enable you to set special effects to images on the page. As of this writing, they only work in IE 4.0 and above. Check out filter.htm in the chapter_13 folder for some examples of this feature. |
You can use these style settings in combination to exactly lay out your page and have complete control over the look and feel of your page. A consistent use of CSS will help you separate content from style.
Interview: Nick Bradbury
Business Name: Bradbury Software, LLC.
URL: http://www.bradsoft.com
How has working in Dreamweaver MX made your life easier?
I tend to work almost entirely in code view and keep everything else hidden, so the code editing improvements in DW MX have been a big hit with me. I can stay in Dreamweaver for both Code and Design views now, which makes my job simpler.
Code editing in previous versions was almost primitive, but the changes in DW MX put it on par with dedicated HTML text editors.
You do a lot of CSS work. Talk about some of the improvements for CSS in DW MX.
Well, I'm obviously thrilled to see the integration with TopStyle. Being able to use TopStyle to edit style rules and style sheets from within Dreamweaver makes it so easy to get the best of both worlds. I can rely on Dreamweaver's design tools and then quickly switch to TopStyle for more powerful CSS editing and validation.
What's your favorite new feature(s) in DW MX?
I'd have to say it's a tie between the code editing improvements and the new dockable user interface. I was never comfortable with the floating palettes found in previous releases, but the UI in DW MX feels right to me.
Do you have any recommendations for new DW MX users/Web site builders?
I always recommend designing with an eye for maintenance, which goes hand-in-hand with using CSS. Style sheets offer tremendous maintenance benefits in that they enable you to store formatting in a centralized location. If you decide to change the look of your site, you can simply change a single style sheet instead of hundreds of HTML documents.
For a nice illustration of this, stop by the TopStyle home page at http://www. bradsoft.com/topstyle/. We enable you to change the style sheet used by our entire site, which really shows off how separating your site's style from its content makes it easy to change your site's appearance.
But make sure to stick to the basics when it comes to CSS. It might be fun to experiment with everything CSS has to offer, but spotty browser support means that a site which looks wonderful if one browser might look like a ransom note in another.
Used correctly, CSS can save you a lot of work; used incorrectly, and you'll have a lot of maintenance problems down the road. So, if using CSS doesn't make your job simpler, then you need to simplify how you're using CSS.
Working with Redefined HTML Tags
Redefined HTML tags are used when you want every instance of a certain element to have identical properties. For instance, you can set every paragraph to automatically have blue text.
Redefined HTML tags can be internal or external, just as any other style. Linking the style sheet with a page will automatically convert the redefined tags.
Also because the style is written in the head or externally, and no class tag appears in the page, you can easily overwrite a particular instance of the tag by applying a custom class.
Keep in mind that according to the cascading principle, an internally redefined tag (one defined on the page) will take precedence over a redefinition on an external style.
Note
| | Because the style is written on the page itself, and because it is applied to every instance of the tag, these redefined styles do not show up in the Style Applier view of the CSS Styles panel. If you have a redefined tag on the page, double-click on the tag in the Style Editor view of the CSS Styles panel and the Style Definition dialog box will open. |
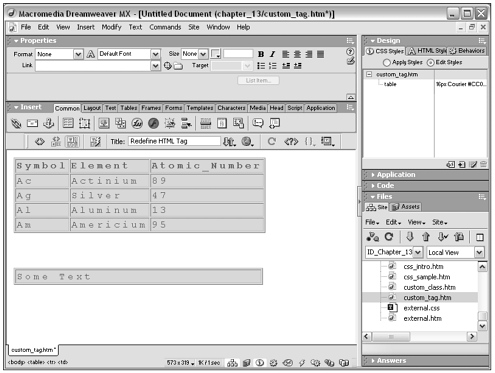
Exercise 13.1 Redefining an HTML Tag in an Internal Style Sheet
This exercise demonstrates how a redefined HTML tag will be applied to every instance of that tag.
Before you start, copy the chapter_13 folder on the CD to your hard drive. Define a site called Chapter 13, with this folder as the local root folder.
-
Open custom_tag.htm in the chapter_13 folder. This page contains a section of the table that you imported in Chapter 3, "Creating and Working with Documents."
-
Open the CSS Styles panel (Window > CSS Styles).
-
Click the New Style button.
-
In the New Style dialog box, choose the following:
-
Redefine HTML Tag
-
For Tag, choose Table
-
Define In: This Document Only
-
-
Click OK.
-
In the Style Definition for Table, for Type, choose the following settings:
-
Font, Courier or any other font if you don't have that one
-
Size, 16 pixels
-
Color, Red
For Background, choose the following:
-
Background Color, type in #FFCC99
For Block, choose 5 pixels for Letter Spacing.
-
-
Click OK to close the Settings dialog box and then Done to close the Edit Style Sheet dialog box.
Your table should now reflect the settings that you just made. It should have red letters on a gold/yellow background and the letter spacing should be set.
-
Preview in Browser (F12) to make sure that the design view and the browser match.
-
Now insert another table (Ctrl+Alt+T). Choose the default settings and click OK. Notice that the table already has the background color.
-
Type in a few letters and notice that they are set to Red.
This goes to show how redefining an HTML tag will automatically apply it to all instances of that tag on the page. Use custom classes to further customize individual instances of a redefined tag; see Figure 13.15 for a representation of the finished exercise.
Figure 13.15. Representation of the finished exercise.
Working with Custom Classes
Custom classes are the most common way of applying a style to a page. With a custom class, you define the characteristics of the block element (the paragraph or the table) and then apply the style to that block element.
Using custom classes, you can be selective with the elements that you want to be styled, as opposed to redefining an HTML tag, which will change all instances.
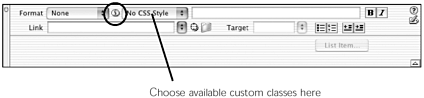
To create a custom class, click the New Style button in the CSS Styles panel. For settings, choose Make Custom Style (class). Choose This Document Only for the Define In field. For Name, give it a descriptive name. Click OK to go to the Style Definition box. Set the definition parameters you wish. You can set the color and style of the font, give it a background color in the Background tag and set the letter spacing in the Block tab. Click OK when done. The custom class will now show in the Apply Styles panel.
There are five ways to apply this custom class:
-
Highlight some text on your page and click on the Property inspector's, Toggle CSS/HTML Mode button (see Figures 13.16 and 13.17). Select the class name from the dropdown to the right of the button. The style will automatically be applied to that text wrapped by a <span> tag.
Figure 13.16. The Property inspector (HTML mode).

Figure 13.17. The Property inspector (CSS mode).
-
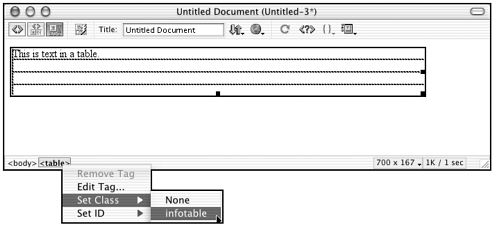
Highlight some text on your page, and using the tag selector, select the rightmost tag. Right-click (Cmd-click) the tag, navigate to Set Class from the menu that appears, and click the class name (see Figure 13.18). The style will automatically be applied to that text parent tag. Note that this does not apply a <span> tag and affects whatever is in the selected tag.
Figure 13.18. The tag selector.
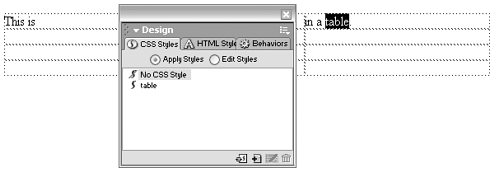
-
Highlight some text on your page and click the class name in the Apply Styles window (see Figure 13.19). The style will automatically be applied to that text wrapped by a <span> tag.
Figure 13.19. The CSS Styles Panel > Apply Style interface.
-
Highlight some text on your page, right-click (Cmd-click) and choose CSS Styles, then select your desired style to apply (see Figure 13.20). The style will automatically be applied to that text wrapped by a <span> tag.
Figure 13.20. Contextual CSS Styles menu.
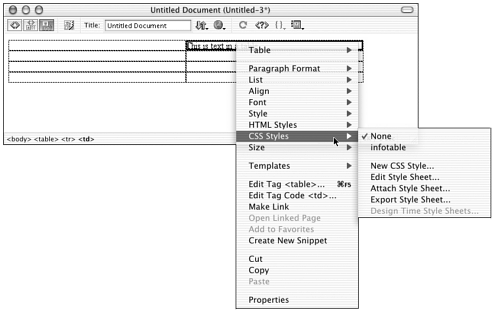
-
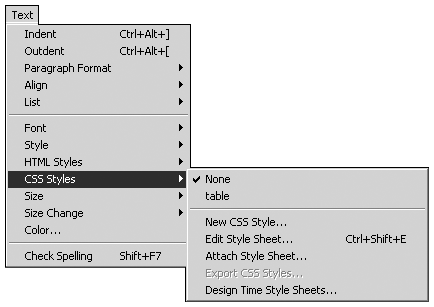
Highlight some text on your page and choose Text > CSS Styles, then select your desired class to apply (see Figure 13.21). The style will automatically be applied to that text wrapped by a <span> tag.
Figure 13.21. The Text > CSS Styles menu item.
Applying Custom Classes to Page Elements
After you have defined the custom styles in the Edit Styles panel, switch to the Apply Styles view. You will see a list of available custom classes that you have created.
To apply the class style to an element, select the element or text. Then click on the name of the style in the CSS Styles Panel > Apply Styles (see Figure 13.4). It will be applied automatically. Another way of applying a class is from the Property inspector. Next to the Font field in the Property inspector, is the letter 'A'. Click on that 'A' and it will switch to the CSS Styles icon. You will now have a drop-down list of available styles and a description of the selected style. (See Figures 13.16 and 13.17.)
Highlight the element and choose the class from the dropdown. It will be applied instantly. Yet another way to access the classes if from the right-click menu (see Figure 13.20). Highlight the element and right-click (Ctrl-click). From the contextual menu, choose CSS Styles, and the custom classes list will appear. Choose the style and click to apply.
Removing Styles from Page Elements
To remove a custom class from a page element, highlight the element and then in the Apply Class drop-down list, choose None. This will remove the Class attribute from the tag.
Exercise 13.2 Creating a Custom Class in an External Style Sheet
In this exercise, you develop a custom class and then apply to it elements of the page. This will demonstrate the difference between that and a redefined HTML tag.
If you haven't done so yet, copy the chapter_13 folder on the CD to your hard drive. Define a site called Chapter 13, with this folder as the local root folder.
-
Open custom_class.htm.
-
Open the CSS Styles panel and click the New CSS Style button.
-
For Type, choose Make Custom Style. For Name, enter tablestyle.
-
For Define In, choose New Style Sheet File. Click OK. Because you chose to make a new style sheet file, you will be asked to save the style in a new CSS file (sheet).
This will create an external CSS style file and on it will be the table style. Remember that a CSS file can have many styles defined within it.
-
In the Save Style Sheet File As dialog box, call it tablestyle.css and save it in the same folder as the custom_class.htm file.
-
The Style Definition dialog will display. In this box, make the following settings:
Type:
-
Font, Courier or anything else if you don't have that font
-
Size, 18 pixels
-
Weight, Bolder
-
Color, #6633cc
-
Decoration, None
Background:
-
Background Color, #CC9933 (you can just type it in the field)
Block:
-
Word Spacing, 5 pixels
-
Text Align, Center
Border:
-
Width, Top, 4 (all in pixels)
-
Width, Right, 3
-
Width, Bottom, 3
-
Width, Left, 3
-
Style, Groove, same for all
-
Colors, Top and Bottom, #CC0000; Right and Left, #CCCC66
Positioning:
-
Type, Absolute
-
Placement, Left, 300; Top, 300
Extensions:
-
Cursor, Crosshair
-
-
Click OK to set the style. Granted, this will not be pretty, but it will give you an idea of how to use CSS to lay out your page.
-
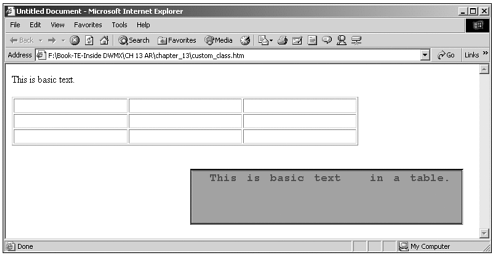
. Highlight the table in the page. You can use the tag selector in the lower-left corner of the program to select the table tag. This will highlight the entire table.
-
With the table selected, click the table style in the Style Applier view of the CSS Styles panel. The table should change color and position in the Design window. Preview in Browser to see the page in the browser.
-
Insert another table onto the page (Insert > Table). Use the default settings.
It should appear as a normal table. This is because there is no style attached to it. If you are not in Code or Code and Design view, switch to it. Notice that in the code for the first table, there is a class="table" attribute in the table tag. This is the code that calls the style from the external style referenced in the <link> tag in the head of the page. Until that attribute is there, no style is applied. Once again, this highlights the difference between a custom class and a redefined HTML tag. In the example for redefined tags, the style was instantly applied to the table when inserted on the page. See Figure 13.22.
Figure 13.22. Representation of Exercise 2 completed.
Because custom classes can be used for positioning, you might end up with many custom classes. It is vital that you name them with clarity for you and other developers. You also can start to see the benefits of different types of styles and different ways of applying them. Having an understanding of how each works will enable you to use them with maximum efficiency and flexibility.
There is also a way to add a custom class to a small piece of text rather than to the entire element. If you highlight a piece of text and then apply a custom class, you will see a <span> tag that wraps the selected text. A <span> tag is used for just this reason: applying a custom class to a subset of the element. Although span tags can be good for making small tweaks to your page, you should be careful to not use too many of them. The whole idea of CSS is to have the styles globally applied. Having a large set of <span> tags to define your styles will defeat the idea of CSS. All those <span> tags will add to your file size. Use spans only when needed. Also, there is better browser support if you apply your classes to block level elements. Take advantage of the rules you have available to you.
CSS Selectors
There is one more way to make and use styles in Dreamweaver: the CSS selector.
In Dreamweaver, CSS selectors refer to two things: pseudo-classes or pseudo-elements and contextual selectors.
Pseudo-Classes
Pseudo-classes are CSS elements dependent on a certain condition to be active. Certain conditions are not dependent on the HTML code. The most popular pseudo-class has to do with links.
A link is always in an anchor tag (<a>). Although this never changes in the actual code, in reality, there are different states of linked: links that have been visited and links that have not been visited, links that the mouse is over (Hover) and links that are active.
Although the code for these is the same, you know that they have different display properties depending on whether the link in question has already been visited. Blue links have not been visited and purple links have already been visited. Therefore, this means that hyperlinks have at least two different states that are independent of the actual code. So, a pseudo-class refers to a style dependent on an external condition. CSS recognizes this and gives you a way to customize these states.
For links, four pseudo-classes apply (order is very important!):
-
Link. The Link pseudo-class is the default color/settings of the link.
-
Visited. The Visited pseudo-class replaces the default purple color/settings for links that have been visited already.
-
Hover. The Hover pseudo-class is activated when you are mousing over the link. This is a very common way to indicate an active link, especially when the link is not underlined. You also can set the font size to be bigger or smaller for a better indicator.
-
Active. The Active pseudo-class is activated when you are actually clicking the link (onMouseDown).
Using these pseudo-classes, you can set your links to have a custom style, including color and size. In any of these pseudo-classes, you can set the link to not be underlined, set font type, sizes, or any other CSS parameter.
Contextual Selectors
Contextual selectors are styles applied only when a defined set of conditions are met, usually a specific combination of tags. Using these rules, you can, for instance, apply a specific style to text but only if that text is bold and within a table. Text outside of the table will not be affected by the style.
The rule for the preceding example would look like this:
TD B {color: #6600CC} This says that any text within a TD tag that is also coded within a B (bold) tag will display as #6600CC (a purple).
To create a contextual selector, click the New Style button. Choose Use CSS Selector and This Document Only. For the Selector field, type in the set of tags that will define the selector. To use the above example, type TD B and then click the OK button. Set a style for the selector. In this case, it will be applied to any bold text within a table cell. Click OK when done.
To use the selector, add a table to a the page and then add some text to a cell. Select the text and make it boldface (you can apply Bold in the Property inspector). The style will instantly be applied to the text accordingly.
Exercise 13.3 Adding Contextual Styles to a Linked External Style Sheet
In this exercise, you link an existing style sheet to a page. To this linked sheet, we will add a CSS Selector for use on the page.
If you haven't done so yet, copy the chapter_13 folder on the CD to your hard drive. Define a site called Chapter 13, with this folder as the local root folder.
-
Open the external.htm file from the chapter_13 folder on the companion CD.
-
Open the CSS Styles panel (Window > CSS Styles).
-
Click the Attach Style Sheet button.
-
Choose the external.css file from the chapter_13 folder and click OK.
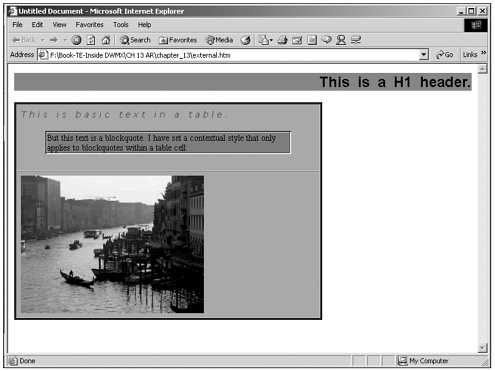
You should now see the initial changes that the style sheet makes. It has a selector for the <h2> tag. It should now have a gray background and be aligned to the right side of the page.
The block quote text in the table should have an olive background and a different font and size.
The block quote text has a contextual style that applies to block quotes that are within a table cell.
-
Highlight the table. You can click the border or click inside the table and then choose table from the tag selector in the Design window's lower-left corner.
-
Within the CSS Style panel's Style Editor view, use the Apply Style drop-down menu, choose tablestyle. This should now make the background gray. Preview in Browser to see changes made to the border.
-
Select the table again.
-
In the CSS Styles panel, double-click the table.positioning class. This will apply the style to the highlighted table. The table should move so that it is halfway across the page. (I have set this style to put the table at 50 percent of the screen from the left side of the page. I also have used the CSS to change the table width from pixels to 50 percent of the page. This setting will keep the right border at a constant distance from the right side of the page.)
-
Preview in Browser. Resize the window and notice how the table size reacts. Notice that it will change size and horizontal position as you resize the Browser window. The table, on the other hand, will not change its vertical position. The distance from the top of the window has been set as a pixel value, so it will remain constant.
-
In order to add another CSS Selector, click the New CSS Style button in the CSS Styles panel.
-
Choose Use CSS Selector and for Define In:, choose external.css.
-
We are going to apply a selector to the paragraph that is within a table tag. In the Selector field, type TD P and then click OK. Selectors are defined as the tag in the order in which they appear in the code, separated by a space.
-
Under Type, for Font choose Verdana, Size 14. Set the Style to italic and the color to blue. (the vertical strip of color on the left of the color panel is the pure colors). Click the Apply button. The text in the table should change.
In the Block tab, set the Letter spacing to 5 pixels. Click the Apply button again and the letters should space out. Click OK to close the style.
-
Go to the table and type in more text. The style will automatically be applied to the text as you type. Type in some text outside of the table and it will not be affected by the style. (If you change the text outside of the table to a H2 tag, what happens and why?)
One other thing to notice when you apply the positioning style is that the gray background goes away. This is because tablestyle and positioning are both custom classes applied to the table tag. When you apply one to the table, the other is taken off. If you want to have all the properties on the table, add all the parameters to one custom class. See Figure 13.23.
Figure 13.23. Representation of Exercise 3 completed.
Combining Style Sheets
Thanks to the properties of inheritance and cascading, you can have external sheets on one page or have an external page and an internal style on the same page. Remember that the "cascading" in CSS means that styles can be additive and the code closest to the actual element trumps higher-level style rules. Understanding the benefits and drawbacks of combining sheets will enable you to take full advantage of CSS.
External style sheets are very useful because they enable you to specify many parameters for your site in a central location, and therefore these style parameters are easily updateable. You can change the look of thousands of pages by changing one line in the style sheet. This kind of power goes both ways. You can easily change every <h2> tag in your site by updating the selector on the external style sheet. If you have a certain section where you need the <h2> tags to be different from all the rest, however, this external style will not help you. You can use the cascading principle to your advantage by combining your external style with an internal style for those specific pages. Because the internal style is closer to the actual H2 element, the external style sheet, the internal rules will be used and your section will look correct.
Of course, the drawback to this is that if your special section needs to be updated, you need to change the internal style on every page. Although Find and Replace is an option in such a case, this shows one of the difficulties of internal styles.
If you already have an externally linked style sheet, to combine these with an internal style, merely create a new style in the New CSS Style dialog box. Then choose This Document Only. Dreamweaver will place the style in the head.
You also can use multiple external style sheets on one page. When doing this, it is vital that sheets and styles have good names so that it is clear to everyone which style does what.
You might have one sheet that handles the look of the page: text colors, background images, border styles, and so on.
Your other style sheet can handle positioning elements: right- and left-justifying, placement and float of page elements, and other nonstyle considerations. In this way, not only is content separate from form, but now style is separate from placement. If you are dealing with large sites, this might be a good routine for compartmentalizing your development and making your development scheme more accessible to other developers.
What happens, however, when you have two styles that affect the same element? It depends.
It has to do with specificity and inheritance. If you have two external style sheets and both specify only the background color of an <h2> tag, which one wins? In this case, two <link> tags in the head specify the external style sheet. The style sheet listed lower in the code will win. This is because HTML pages are rendered from the top down. The browser will hit the first style sheet link and see that it needs to color it red. It does so and then continues. In the next line, it reads the CSS link and notices it needs to color the <h2> tag blue and it does so. Because cascading says that the style closest to the element wins, two styles that are equal are decided upon merely by ordering in the code.
Inheritance makes this a little more complicated. Suppose in the preceding example that the style that colors the <h2> tag red is above the blue rule. This means that the H2 will be blue. If the red H2 style specifies a font face for the <h2> tag, however, this will be incorporated on the page because it is more specific than the blue rule. In this case, therefore, you will have an <h2> tag with the chosen font and a blue background.
This exact scenario is demonstrated in cascade_test.htm in the chapter_13 folder.
Exercise 13.4 Demonstrating Cascading and Inheritance
This exercise demonstrates the idea of cascading and inheritance and uses multiple external style sheets to do so.
If you haven't done so yet, copy the chapter_13 folder on the CD to your hard drive. Define a site called Chapter 13, with this folder as the local root folder.
-
Open the cascade_test.htm file.
-
Go to Code and Design view (View > Code and Design).
-
Open the CSS Styles panel (Window > CSS Styles).
-
Notice in the CSS Styles panel that two external style sheets are listed: blue.css and red.css. Notice that they both have H2 selectors. blue.css defines only the background as blue. red.css defines the background as red and defines the font as Comic San Serif.
In the code, red.css is listed after blue.css. As described earlier, this means that the red style will trump the blue style. In the Design window, you will see the Comic font on a red background.
-
In Code view, highlight the <link> line that contains the blue style.
-
Click and drag that line so that it is placed below the red <link> line.
-
Click back in the Design window to refresh the window.
You should now see the blue background, but the Comic font stays the same.
-
In the Style Editor view of the CSS Styles panel, right-click (Ctrl-click) the H2 selector in the blue.css file and from the contextual menu choose Edit.
-
Go to the Block section and for Text Align choose Right. Click OK to save the new setting.
The H2 text should jump to the right.
You can deduce from inheritance that if you were to move the blue style link so that it was again above the red link, the H2 would be red with the Comic font; but because the alignment specified in the blue style is more specific, the text will be on the right side.
-
In the Code window, highlight the blue line and click and drag it so that it is above the red style link. You should now see right-aligned text with a red background.
Removing Style Sheets
Removing a style sheet from a page or an element is quite simple. Dreamweaver MX makes it even easier. The redesigned CSS Styles panel now shows all the styles being used. With items such as redefined HTML tags or pseudo-classes or in other words, those style elements applied to the whole page you need to delete the style definition from the page or the external style sheet. You can highlight the style in the CSS Styles panel and right-click (Ctrl-click) and from the contextual menu choose Delete or you can press the Delete Style button in the lower-right corner of the CSS Styles panel.
To remove a custom class from a page element, highlight the element and then in the Apply Class drop-down list, choose None. This will remove the class attribute from the tag.
Summary
CSS is an important aspect of web design and it will become only more important in the future. This chapter acquainted you with CSS and the basics of its structure, use, and possibilities. This chapter discussed the theory of separating content from style, cascading and inheritance, and ways to link to styles. Experiment with CSS, using the styles provided or creating styles of your own. Try using all the different parameters available to you, and then check them in both browsers to get an idea how they react.
Knowing CSS will go a long way to increasing your web design ability and creativity.
| CONTENTS |
EAN: 2147483647
Pages: 49