Workshop #2: Creating a Full-Featured Behavior  Okay, it's time to pull out all the stops and create the world's most incredible do-it-all-for-you behaviorokay, not quite yet. But you're on your way. Sample Behavior: Set Page Properties Have you ever wanted to click a button to change the color scheme of a Web page? Maybe you just don't like neon pink backgrounds, or maybe you like bright yellow text on black just fine, but want to print the page in regular old black-on-white? In this workshop, we'll write a JavaScript function that changes the default colors on the page (background, text, and links) when the visitor clicks a button; and we'll turn that function into a behavior so that Dreamweaver users can easily insert the function into their documents. Creating the Set Page Properties Behavior To create this behavior, you'll again start by creating and testing the JavaScript code the behavior should insert. Then you'll build the behavior file, design and implement a form to collect user input, and add various other bells and whistles. Task 1: Write the JavaScript function and function call to be inserted As usual, start by creating the JavaScript code (function and function call) that the behavior should insert. Do this in a test file, with your aim being to create a working script that meets the Dreamweaver requirements for behavior structuring. It must be in the form of a function and function call, and the function ideally should be as generic as possible so that changes in the function call can create a variety of different effects from the same function. (This is because, in Dreamweaver behaviors, only the function call can be customized by the user. The user will have no opportunity to alter the function call.) -
In your text editor or in Dreamweaver, create a new HTML file, containing the basic HTML framework code. Because this is a test file (not an extension file), save it in your Working folder. Call it property_test.htm . -
Change the <title> to Set Page Properties Test . -
In the new document's <body> section, enter the text Click here to change properties . Link the words Click here to the pound sign ( # ). Figure 3.15 shows what the document should look like at this point. Figure 3.15. The property_test.htm file, with text link in place.  -
Add a <script> tag to the document <head> . Inside this tag, enter a JavaScript function that will change several page properties to predetermined values: <script language ="JavaScript"> function setProperties() { document.bgColor="black"; document.fgColor="white"; document.linkColor="red"; document.vlinkColor="green"; document.alinkColor="blue"; } </script> When this function is executed, it will change the page background to black, the page text to white, links to red, visited links to green, and active links to blue. Because these specific colors are being built into the function, black/white/red/green/blue is the only color scheme this function will ever be able to perform. It's not yet a flexible function. note In the interests of easy typing, color names have been used here. The function works equally well when hexadecimal values are specified for the colors, for example, document.bgColor= "#000000" . -
Now add a function call to the text link, triggering the setProperties() function. Your code for the text link should look like this (new code is in bold): <a href="#" onClick="setProperties()" >Click here</a> to change properties. -
After both the function and its function call are in place, try the page out in a browser. Clicking the link should turn the page background black, the non-linked text white, and the linked text bright red. If necessary, troubleshoot until the code works properly before proceeding. -
So, there you go! You got the code to work. But it's not yet suitable to become a Dreamweaver behavior, because it's not yet generic. Remember, a function in a behavior must be generic; the user won't be able to change anything about it. To fix this, revise the setProperties() function so that it uses a set of parameters to determine what colors it will create in the document. Like this (new code is in bold): function setProperties( bg,fg,links,vlinks,alinks ) { document.bgColor= bg ; document.fgColor= fg ; document.linkColor= links ; document.vlinkColor= vlinks ; document.alinkColor= alinks ; } Each color to be set is now being passed into the function. The statements in the function now set the page properties based on externally specified colors. -
Now revise the function call so that it passes a series of color choices to the function (new code is in bold): <a href="#" onClick="setProperties( 'black','white','red','green','blue' )">Click here</a> to change properties. Now the code is getting flexible. After this function and function call are turned into a Dreamweaver behavior, a dialog box can be used to collect color choices from the user, and those colors can be passed to the function. Before proceeding any further, try the page in your browser to make sure your revised code works. If it doesn't, troubleshoot until it does. (Tip: Make sure the parameter names specified in line 1 of the function exactly match the names that appear in subsequent lines. And watch the quotes and commas in the function call!) -
How about adding one more bit of flexibility? The way the function is currently written, it must set all five default page colors every time it is executed. A truly flexible function would be ready to set one, two, or all five colors when executed, depending on how many parameters are passed from the function call. The trick to adding this flexibility is to make each statement within the function a conditional (if-statement) that will execute only if the relevant parameter has been specified. Add the following code to the setProperties() function (new code is in bold): function setProperties(bg,fg,links,vlinks,alinks) { if (bg) { document.bgColor=bg; } if (fg) { document.fgColor=fg; } if (links) { document.linkColor=links; } if (vlinks) { document.vlinkColor=vlinks; } if (alinks) { document.alinkColor=alinks; } } If any particular parameter has been left out of the function call, that property won't be set. Now, that's a flexible function! -
To take the function through its paces, try it with a variety of function calls. First, try the page out in a browser using the function call that's already in place. If you entered the revised function code correctly, clicking the text link should have the same effect it had before you changed the function. Because your function call currently specifies all five parameters, all five conditional statements should execute, and all of the page's colors should change. -
After you know the function is working properly, experiment a bit with the function call. Change the text link by removing all values from the function call, leaving only empty quote marks in their place. <a href="#" onClick="setProperties( '' , '' , '' , '' , '' )">Click here</a> to change properties. Be careful, as you're deleting, to leave the quotes and commas in place, and not to add any extra spaces. After you've done that, try the page in a browser again. If you deleted correctly, you shouldn't get any JavaScript error messagesbut of course, the page properties won't change because none of the function's conditional statements execute. -
Finally, try adding just a few parametersmaybe text and link color only, like this (new code is in bold): <a href="#" onClick="setProperties('',' orange ',' green ','','')">Click here</a> to change properties. This function call changes the text and link colors by including the second and third parameters. (Check the function definition to remind yourself what order the parameters must be specified in.) Try it out in a browser. Assuming you typed your new color names between the correct quotes, clicking the link will change the non-linked text orange and the linked text aqua. Can you see how rewriting the function to include conditionals has made it more flexible? Depending on the parameters included in the function call, some or all of the page properties can be changed. Now this function is ready to be turned into a decently flexible behavior. Listing 3.3 shows what the final property_test.htm file should look like. Listing 3.3 The Finished Code for the setProperties() Function and its Function Call, Ready to Be Made into a Behavior <html> <head> <title>Set Page Properties Test</title> <script language="JavaScript"> function setProperties(bg,fg,links,vlinks,alinks) { if (bg) { document.bgColor=bg; } if (fg) { document.fgColor=fg; } if (links) { document.linkColor=links; } if (vlinks) { document.vlinkColor=vlinks; } if (alinks) { document.alinkColor=alinks; } } </script> <body> <a href="#" onClick="setProperties('','orange','green','','')">Click here</a> to change  properties. </body> </html> properties. </body> </html> Task 2: Put the code into a basic behavior file framework When you know what JavaScript code you want your behavior to insert, turning that code into a behavior is your next task. Keep the property_test.htm file handy as you work so that you can just copy and paste the relevant code into your behavior file. -
In your text editor, open the My Behavior.htm framework file. Save it in your Actions/Development folder as Set Page Properties.htm . -
Change the <title> to Set Page Properties . -
Open property_test.htm (if it's not already open) and copy the setProperties() function. In the new behavior file, delete the myBehavior() function and paste the setProperties() function into its place. -
Revise the behaviorFunction() function so that it returns the name of the new function: function behaviorFunction() { return " setProperties "; } -
Revise the applyBehavior() function so that it returns a function call that specifies all parameters the function can set. Eventually, of course, you'll want to rewrite this function so that it processes user input; but for now, just enter a set function call. The revised applyBehavior() function should look like this (new code is in bold): function applyBehavior() { return " setProperties('black','white','red','green','blue') "; } At this point, the <head> section of your new behavior file should look like this: note If you want the user's document to include comments as part of the function, just add them as part of the defined function; Dreamweaver inserts your function exactly as you specify itcomments and all. <head> <! title becomes actions menu item name > <title>Set Page Properties</title> <script language="JavaScript"> //this is the function the behavior will insert into the user's document function setProperties(bg,fg,links,vlinks,alinks) { if (bg) { document.bgColor=bg; } if (fg) { document.fgColor=fg; } if (links) { document.linkColor=links; } if (vlinks) { document.vlinkColor=vlinks; } if (alinks) { document.alinkColor=alinks; } } -
Try the behavior out before proceeding any further to make sure the basic structure works. Save and close the behavior file. Quit and relaunch Dreamweaver to make it recognize the new behavior. Create a new test file with a text link in it (something similar to the link in property_test.htm). Save the new file in your Working folder as property_test2.htm . Apply the Set Page Properties behavior to the text link. As Figure 3.16 shows, the code that the behavior inserts should be identical to the code you entered by hand in property_test.htm. It should behave identically in the browser. Figure 3.16. The Set Page Properties behavior, being used in a Dreamweaver document. 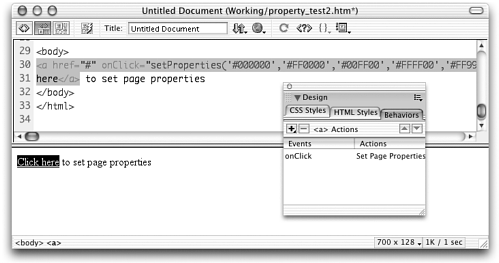 note Caution: What if it doesn't work? The most common error at this point is a problem copying and pasting (or retyping) the wrong codeeven missing a quote or curly brace at the end of something will cause problems. These mistakes will all cause Dreamweaver to report syntax errors. Read the error message carefully . It will point you right to the problematic line of code.
Task 3: Design and create the form to collect user input We need to give the user opportunities to change five different properties ( bgcolor , fgcolor , link , vlink , alink ), using a color button and text field for each. Figure 3.17 shows what your completed form should look like. The code for the form looks like this: Figure 3.17. The desired layout for the Page Properties behavior's dialog box. 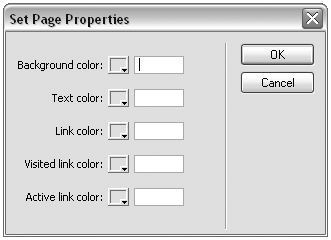 <form name="myForm"> <table> <tr valign="baseline"> <td align="right" nowrap>Background color:</td> <td align="left" nowrap> <input type="mmcolorbutton" name="bg_button"> <input type="text" name="bg_label" size="10"></td></tr> <tr valign="baseline"> <td align="right" nowrap>Text color:</td> <td align="left" nowrap> <input type="mmcolorbutton" name="fg_button"> <input type="text" name="fg_label" size="10"></td></tr> <tr valign="baseline"> <td align="right" nowrap>Link color:</td> <td align="left" nowrap> <input type="mmcolorbutton" name="link_button"> <input type="text" name="link_label" size="10"></td></tr> <tr> <td align="right" nowrap>Visited link color:</td> <td align="left" nowrap> <input type="mmcolorbutton" name="vlink_button"> <input type="text" name="vlink_label" size="10"></td></tr> <tr> <td align="right" nowrap>Active link color:</td> <td align="left" nowrap> <input type="mmcolorbutton" name="alink_button"> <input type="text" name="alink_label" size="10"></td></tr> </table> </form> Task 4: Rewrite the applyBehavior() function to construct the function call from user input As in previous exercises, creating the function call is a simple matter of collecting the form information and concatenating it into variables and concatenating those variables into a return statement. -
To collect the form information, add the following code to your applyBehavior() function (new code is in bold): function applyBehavior() { var bg=document.myForm.bg_button.value; var fg=document.myForm.fg_button.value; var links=document.myForm.link_button.value; var vlinks=document.myForm.vlink_button.value; var alinks=document.myForm.alink_button.value; return "setProperties('black','white','red','green','blue')"; } -
Now the hard partrewriting the return statement to account for all those variables. Figure 3.18 shows a diagram of how the concatenation will work. Using that diagram as a guide, revise your return statement to leave holes for the variables (new code is in bold): return "setProperties(' "+ +" ',' "+ +" ',' "+ +" ',' "+ +" ',' "+ +" ')"; Figure 3.18. Diagram showing concatenation of the setProperties() function call for the applyBehavior() function. 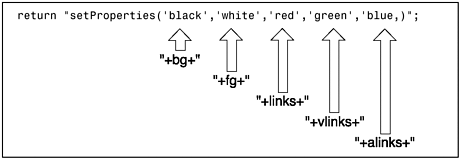 Then fill in the variable names, like this: return "setProperties('"+ bg +"','"+ fg +"','"+ links +"','"+ vlinks +"','"+ alinks +" ')"; Your completed applyBehavior() function should look like this: function applyBehavior() { var bg=document.myForm.bg_button.value; var fg=document.myForm.fg_button.value; var links=document.myForm.link_button.value; var vlinks=document.myForm.vlink_button.value; var alinks=document.myForm.alink_button.value; return "setProperties('"+bg+"','"+fg+"','"+links+"','"+vlinks+"','"+alinks+"')"; } -
At this point, the behavior should be basically functional. The behaviorFunction() function tells Dreamweaver to insert the setProperties() function in the user's document; the form collects information for the function call; and the applyBehavior() function processes that information to construct and insert the function call. Try it out. In Dreamweaver, open property_test2.htm. Remove the Set Page Properties behavior from the text link and re-apply it to see the behavior in action. The dialog box will appear and should allow you to set the parameters for the behavior. It won't yet recognize color information entered into the text fields of the form yet, but colors chosen from the color buttons should work fine. Task 5: Add local functions to make the color buttons and color text fields reciprocal You did this in the Custom Horizontal Rule workshop (Workshop #3) in Chapter 2. You need to define a function that puts the chosen color value in a text field when the user chooses a color using the related color buttonand a function that does the opposite , updating the color button if the user enters information into the related text field. Then you call each function using the onChange and onBlur event handlers attached to each form element. The only aspect of this procedure that's trickier here is that there are so many fields and buttons; you either have to write separate functions for each pair of color controls, or use parameters to specify which fields should change each other. -
Start by adding the following two functions to the <script> tag in the behavior file, immediately following the closing curly brace of the applyBehavior() function: //update the swatch field if color is chosen using the text field function setColorButton(myNumber) { document.myForm.elements[myNumber-1].value = document.myForm.elements[myNumber].value; } //update the color text field if the color is chosen using the swatch function setColorField(myNumber) { document.myForm.elements[myNumber+1].value = document.myForm.elements[myNumber].value; } How does this system of parameters work? All input elements within a form are considered to be members in an array of form elements and are assigned an array number based on the order in which they appear in the form. The first element in a form named myForm can be addressed as document.myForm.elements[0] ; the second element can be addressed as document.myForm.elements[1] ; and so on. note For a refresher on using JavaScript with forms and form elements, see Appendix A, "JavaScript Primer." Because each color button in the form is followed immediately by its paired text field, if a color button's array number is 1, the array number of its text field must be 2 (1 + 1); if a text field's number is 2, the number of its related color button must be 1 (2 1). Therefore, if a color button passes its own array number to the setColorField() function as a parameter, the function just needs to add 1 to that number to access the button's paired text field because the text field always immediately follows the button in the form. And conversely, if a text field passes its own array number to the setColorButton() function as a parameter, subtracting 1 from that parameter will access the field's paired color button because the related button always immediately precedes the text field in the form. -
To see how this parameter passing works in practice, locate the first pair of color controls in the document's form (the bg_button and bg_label form input elements). Because these two elements are the first two input elements in the form, their array numbers are 0 and 1 respectively. Add the following function calls to these controls (new code is in bold): <input type="mmcolorbutton" name="bg_button" onChange="setColorField(0)" > <input type="text" name="bg_label" size="10" onBlur="setColorButton(1)" > With this code in place, try the behavior in Dreamweaver again. The first color button/text field in the dialog box should now work. Choosing a color from the color button should update the text field, and vice versa. After you have chosen a color, clicking OK should successfully insert the setProperties() behavior with the first color parameter correctly set. -
After you have the first set of color controls working correctly, you only need to add similar onChange and onBlur event handlers to the other elements in the form. Repeat the process you went through in the previous step for each of the other color buttons and text fields. You can even copy and paste the code you added in the previous step; just increment the numbers that get passed as parameters each time (new code is in bold): <input type="mmcolorbutton" name="bg_button" onChange="setColorField(0)"> <input type="text" name="bg_label" size="10" onBlur="setColorButton(1)"> ... <input type="mmcolorbutton" name="fg_button" onChange="setColorField(2)" > <input type="text" name="fg_label" size="10" onBlur="setColorButton(3)" > ... <input type="mmcolorbutton" name="link_button" onChange="setColorField(4)" > <input type="text" name="link_label" size="10" onBlur="setColorButton(5)" > ... <input type="mmcolorbutton" name="vlink_button" onChange="setColorLabel(6)" > <input type="text" name="vlink_label" size="10" onBlur="setColorButton(7)" > ... <input type="mmcolorbutton" name="alink_button" onChange="setColorLabel(8)" > <input type="text" name="alink_label" size="10" onBlur="setColorButton(9)" > note I have not included the entire code for the form here, but I do want to show all the added code throughout the form. What I have here instead is just the selected lines, with changes shown in bold. As you can see from the code shown here, the numbers in parentheses in the function calls (the parameters) simply increase by one for each new form element. -
When you're done, be sure to test the revised behavior in Dreamweaver. (You can use property_test2.htm for this, like you did in the previous taskjust remove the existing Set Page Properties behavior from the text link and re-apply it to see the behavior in action.) Make sure that, for every pair of color controls, you can select a color in the button or enter its name in the text field and have both color controls properly respond to your change. Figure 3.19 shows the Set Page Properties dialog box with reciprocal values showing in the color controls. Figure 3.19. The Set Page Properties dialog box, showing color fields and color buttons updated to show reciprocal values. 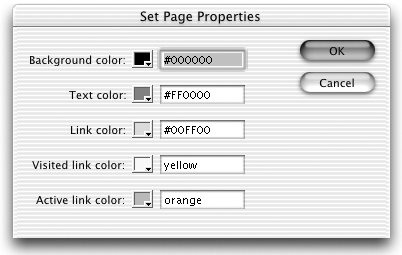 Task 6: Split the code into HTML and JS files Your code will only get more complex from here on, so now is a good time to put the JavaScript functions in their own file. Do it this way: -
Open the behavior file in your text editor. Select all the JavaScript code between the <script> tags in the document head, and then Edit > Cut. -
Create a new text file and Edit > Paste. Save the file in the Actions/Development folder. Call it Set Page Properties.js . -
In the original Set Page Properties.htm file, change the <script> tags to link to the new JS file. Like this (new code in bold): <script src="Set Page Properties.js" ></script> -
Save both files. Reload extensions in Dreamweaver, and try the behavior again to make sure it still works. Listing 3.4 shows what the code for the HTML file should look like at this point. Listing 3.5 shows the code for the linked JS file. Listing 3.4 Complete Code for Set Properties.htm, Commented for Reference <html> <head> <! title becomes actions menu item name > <title>Set Page Properties</title> <script src="Set Properties.js"></script> </head> <body> <form name="myForm"> <table> <tr valign="baseline"> <td align="right" nowrap>Background color:</td> <td align="left" nowrap> <input type="mmcolorbutton" name="bg_button" onChange="setColorField(0)"> <input type="text" name="bg_label" size="10" onBlur="setColorButton(1)"> </td></tr> <tr valign="baseline"> <td align="right" nowrap>Text color:</td> <td align="left" nowrap> <input type="mmcolorbutton" name="fg_button" onChange="setColorField(2)"> <input type="text" name="fg_label" size="10" onBlur="setColorButton(3)"> </td> </tr> <tr valign="baseline"> <td align="right" nowrap>Link color:</td> <td align="left" nowrap> <input type="mmcolorbutton" name="link_button" onChange="setColorField(4)"> <input type="text" name="link_label" size="10" onBlur="setColorButton(5)"> </td> </tr> <tr> <td align="right" nowrap>Visited link color:</td> <td align="left" nowrap> <input type="mmcolorbutton" name="vlink_button" onChange="setColorLabel(6)"> <input type="text" name="vlink_label" size="10" onBlur="setColorButton(7)"> </td> </tr> <tr> <td align="right" nowrap>Active link color:</td> <td align="left" nowrap> <input type="mmcolorbutton" name="alink_button" onChange="setColorLabel(8)"> <input type="text" name="alink_label" size="10" onBlur="setColorButton(9)"> </td> </tr> </table> </form> </body> </html> Listing 3.5 Complete Code for Set Properties.js, Commented for Reference //this is the function the behavior will insert into the user's document function setProperties(bg,fg,links,vlinks,alinks) { if (bg) {//if this parameter is specified document.bgColor=bg;//change this property } if (fg) { document.fgColor=fg; } if (links) { document.linkColor=links; } if (vlinks) { document.vlinkColor=vlinks; } if (alinks) { document.alinkColor=alinks; } } //this returns the name of the function to be inserted, minus its parentheses function behaviorFunction() { return "setProperties"; } //this returns the function call, which will be inserted as part of the user's selected object function applyBehavior() { //collect user input from the form var bg=document.myForm.bg_button.value; var fg=document.myForm.fg_button.value; var links=document.myForm.link_button.value; var vlinks=document.myForm.vlink_button.value; var alinks=document.myForm.alink_button.value; //concatenate into a text string containing a function call return "setProperties('"+bg+"','"+fg+"','"+links+"','"+vlinks+"','"+alinks+"')"; } //update the swatch field if color is chosen using the text field //each field passes the function its own number in the form elements array function setColorButton(myNumber) { //the preceding form element (the color button) gets this element's value document.myForm.elements[myNumber-1].value = document.myForm.elements[myNumber].value; } //update the color text field if the color is chosen using the swatch //each button passes the function its own number in the form elements array function setColorLabel(myNumber) { //the next form element (the text field) gets this element's value document.myForm.elements[myNumber+1].value = document.myForm.elements[myNumber].value; }  |