8.1. General Security Windows Vista includes many new general security tools, as well as holdovers from Windows XP. It also includes an entirely new way to access security settings, via Security in the Control Panel. This section of the chapter covers general security settings and tools. Note that there is some overlap between this section and the "Internet Security" section later on; for example, Parental Controls are covered in this section because they control access to applications and time spent on the computer, even though a major purpose of Parental Controls is to control how children can use the Internet. Local Security Policy: \windows\system32\secpol.msc Sets local policies for security. See "Microsoft Management Console," in Chapter 10. |
Parental Controls Controls the way children can use the computer and the Internet. To open Control Panel  [User Accounts and Family Safety] Parental Controls [User Accounts and Family Safety] Parental Controls Control Panel [User Accounts and Family Safety] Set up parental controls for any user Control Panel Set up parental controls for any user Control Panel [Security] Parental Controls Control Panel [Security] Set up parental controls for any user Description Many parents are justifiably worried about how their children use computers and the Internet. The Internet can be a dangerous place for childrenparticularly young children, preteens, and even teens. They may inadvertently come across pornography, violent images, or other unsuitable content, and they could even be targeted by predators. But it's not just the Internet and its dangers that parents worry about. Computers themselves may be a problem as well. Some children may spend inordinate amounts of time using a computerby playing games, for exampleand parents may want to ensure that their children do not spend too much time using a PC. An increasing number of games are violent, portray drug use, and include sexual situations, and parents may want to block access to those games. In addition, parents may want to block access to certain programs on a shared PCgiving children access to your personal finance software, for example, could prove to be disastrous. To help parents, Windows Vista offers a new feature, Parental Controls, which lets parents limit the web sites their children visit, set time limits on using the computer, control the games they play, and block access to specific programs. It also logs children's activity so that parents can see what their children are doing on the computer and online. Before setting up Parental Controls, you first need to set up a new user account. (For details, see Chapter 10.) Once you do that, you can turn on Parental Controls in a variety of ways; the most direct way is by selecting Control Panel  Set up Parental Controls. Youll come to a screen with all the user accounts on the PC listed. Click the one for which you want to set up Parental Controls. Select "On, enforce current settings," and you'll see the screen pictured in Figure 8-1. Set up Parental Controls. Youll come to a screen with all the user accounts on the PC listed. Click the one for which you want to set up Parental Controls. Select "On, enforce current settings," and you'll see the screen pictured in Figure 8-1. Figure 8-1. Turning on Parental Controls 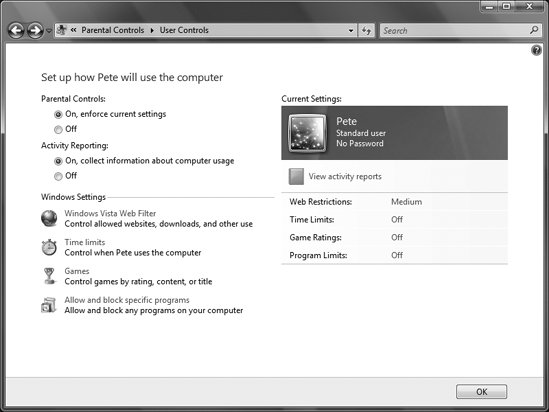
When you first turn on Parental Controls for an account, there are no limits in place. The screen in Figure 8-1 lets you control the user of the PC for the account in the following ways:
Activity Reporting This tracks how the child uses the computer, including web sites visited, games played, instant messenger programs used, and so on. It creates a report, which is viewable using the Activity Report setting, described later on in this section.
Windows Vista Web Filter This allows parents to control what types of web sites their children can visit, and it can even limit visits to specific sites only. Click it, and on the screen that appears (Figure 8-2) select "Block some websites or content." In the "Block web content automatically" area, choose the restriction level you want to apply. Each level has a different set of categories it blocks, which are listed below the selection. To create your own custom level, select Custom, and then select the categories you want to block. Parental Controls cannot rate every single site on the Web, particularly new ones, so you can also tell it to block access to sites that have not been rated. Figure 8-2. Controlling the kinds of content children can view and use on the Web 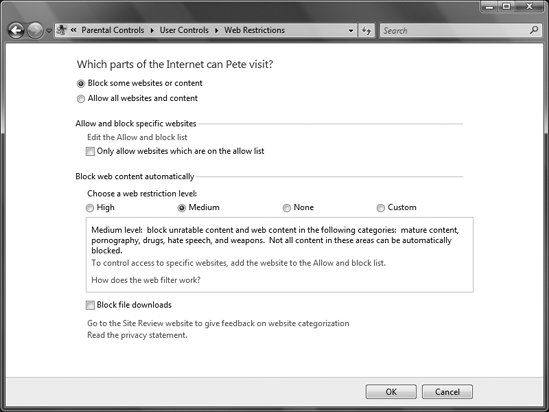 When a child tries to access a web site that has been filtered, he will get the message shown in Figure 8-3. Figure 8-3. The message a child receives when he tries to visit a blocked site 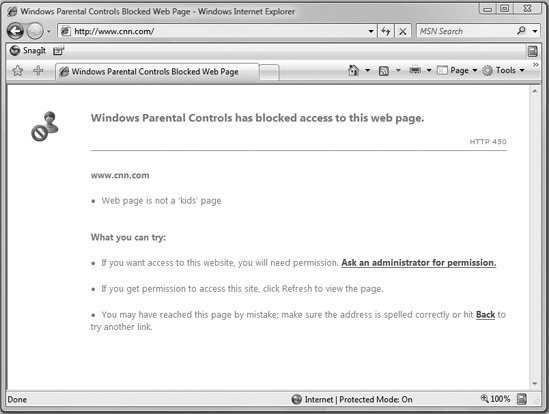 You also allow or block access to specific web sites by clicking "Allow and block specific web sites" and filling out the form. Doing this overrides the categories you've chosen. So, for example, if you've found a site that the filtering blocks but that you want your children to be able to access, include that site. Alternatively, if there's a site that you want blocked but Parental Controls doesn't block it, you can add it. The screen also lets you block file downloads from the Internet.
Time limits This lets you specify what hours of each day and week you want to block children from using the computer. Click the link, and you'll come to a page that lets you easily block out the time, as shown in Figure 8-4. Figure 8-4. Setting up a schedule of when a child can use the computer 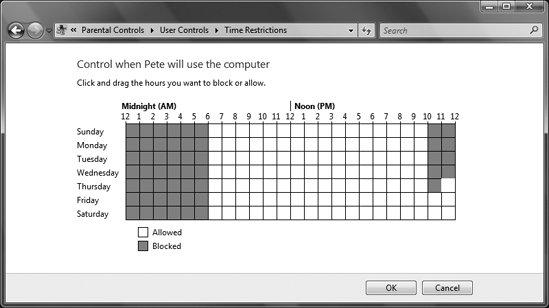
Games This lets you entirely block a child from using games, block or allow specific games, and choose a level of game a child can play, ranging from Early Childhood all the way up to Adults Only. You can also block games with specific kinds of content in themfor example, games with references to drugs, that contain intense violence, and even that depict blood.
Allow and block specific programs This lets you select specific programs that the child can or cannot use.
View Activity reports This shows you information about how your child has used the computer, including a list of web sites blocked, the most popular web sites visited, games played, applications run, instant messenger conversations held, emails sent and received, and more. (See Figure 8-5.) In addition, there's a useful feature that has nothing to do with Parental Controls. You can view information about the entire system, including any changes made to system settings and user accounts, any failed logon attempts, and any changes to the system clock. Figure 8-5. The Parental Controls activity report 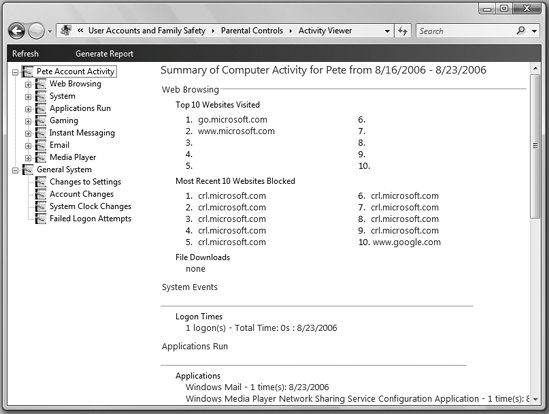 Notes When you set up a new user account, you'll come to a screen that lets you set up Parental Controls. When creating user accounts for children, it's a good idea to immediately turn on and configure Parental Controls at that point. The Entertainment Software Rating Board (ESRB) provides the game categories. The actual ratings of each game are provided by a number of systems, including the ESRB. Parental Controls is no substitute for teaching your children the right way to use computers and the Internet. Many sites offer advice on how to do this, including http://www.safekids.com and http://www.staysafe.org. If you set up or change Parental Controls when the child is logged on to the computer, the changes may not be applied until he logs off and then on again.
|
Security Center: wscui.cpl Provides easy access to the Windows Firewall, antivirus and antimalware settings, Windows Update, and other security settings. To open Control Panel Security Security Center Command Prompt wscui.cpl Description The Security Center (Figure 8-6) doesn't actually provide any additional security, but it does act as a control center for your existing softwarekeeping tabs on what's on or off and what needs updating or replacing, and providing impossible-to-miss warnings that erupt from the Windows notification area. You'll get a warning from the System Tray if the Security Center detects that something is amiss with your security; otherwise, the Security Center won't appear there. Figure 8-6. A computer with solid security protection, according to the Security Center 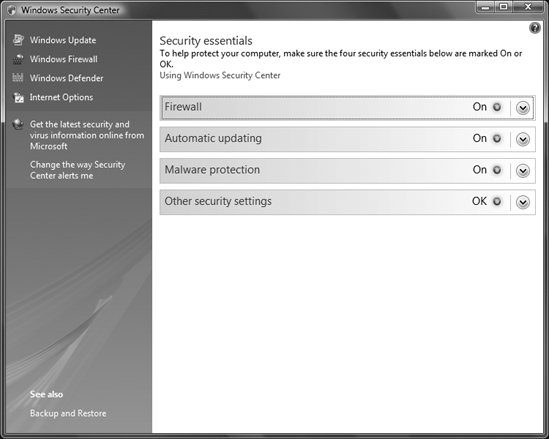
 | Don't confuse the Security Center with the Security Control Panel category. The Security Control Panel category includes links to a wider variety of security settings and controls than does the Security Center. The Security Center's main purpose is to issue alerts and warnings about your security settings, not to provide a front door to every security feature in Windows Vistafor example, it doesn't link to BitLocker Encryption and Parental Controls like the Security Control Panel category does. |
|
The Security Center keeps an eye on firewalls (Windows Vista's own or any Windows Vista-compliant third-party program), your antivirus software, your antispyware software, your Internet security settings, UAC, and the Automatic Updates feature in Windows. The Center will pop up an alert if it thinks there's a problem in any of these areas. You can turn off monitoring by clicking the "Change the way Security Center alerts me" link in the main Security Center window. Note that the Security Center monitors your software only for activation and updatesit doesn't actually provide any security itself. The main part of the screen, the righthand side with the green or red buttons, serves only to alert you to whether security features are turned on or off (green for on; red for off). You can't actually turn on or customize security features by clicking the red or green buttons. Click the button, and a message drops down, telling you the state of that particular security option. For example, if the Firewall button is green, click it and you'll get a message telling you that the Windows Firewall is on and working. Clicking the button again makes the message go away. You can perform the same function via the up and down arrows to the right of each button. The Security Center monitors the status not only of built-in Windows Vista security software and features, but also of third-party software. The Security Center monitors these security features:
Windows Firewall It checks whether the Windows Firewall is running. If you use a different firewall, though, it will monitor that as well.
Automatic updating It checks to make sure that Windows Update is turned on for automatic updates.
Malware protection It checks to see whether the antispyware program, Windows Defender, is running. If you use a different piece of antispyware, it will monitor that as well. It also checks to make sure that you're running antivirus software. Windows Vista doesn't ship with antivirus software, but it checks to make sure you're running a third-party antivirus program.  | Before installing antivirus software, make sure that it's designed to work with Windows Vista. Older antivirus software written for Windows XP usually will not work with Windows Vista, so make sure to get the latest version of your antivirus software before installing it on Windows Vista. |
|
Other security settings This checks to make sure that your Internet security options are set to a safe, recommended level, and that UAC is turned on. (For more details about Internet security options see Chapter 5, and for information about UAC, see the "User Account Control" section, later in this chapter.) That main part of the screen monitors your security, but it won't let you actually do anything about your settings. If you want to make changes to your security settings, you need to use the links on the left side of the screen. Here's what each setting does:
Windows Update By default, Windows Vista automatically downloads and installs all high-priority (aka critical) updates to the operating system at a set time each day. This happens in the background, without any intervention by (or notification to) you. (The exception is when an update requires a reboot.) This is the easiest way to keep your system up-to-date, but it's not compulsory. Clicking this button lets you customize how Windows Update works. (For details, see "Windows Update," later in this chapter.)
Windows Firewall This link leads to a tabbed dialog box that lets you configure Windows Vista's firewall. It will also monitor most third-party programs.
Windows Defender This leads to the main screen for the Windows Defender antispyware software.
Internet Options This leads to the Security tab of the Internet Properties dialog box. See also "Windows Firewall," "Windows Defender," and "Windows Update" |
Security Control Panel Category Provides easy access to all the major security features and settings of Windows Vista, including Windows Firewall, Windows Update, Windows Defender, Internet Options, Parental Controls, and BitLocker Drive Encryption. To open Control Panel Security Description The single best place to get access to all of Windows Vista's security features is the Security Control Panel category, shown in Figure 8-7. This is a new Control Panel category. In previous versions of Windows, no such category existed; there was only the Security Center. Figure 8-7. The Security Control Panel category, command central for all of your security settings 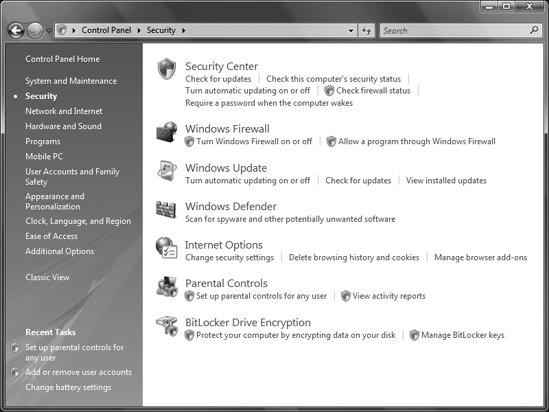
| Don't confuse the Security Control Panel category with the Security Center. The Security Control Panel category includes links to a wider variety of security settings and controls than does the Security Center (although it doesn't issue security alerts like the Security Center does). |
|
Particularly useful is that the Security Control Panel includes more than just links to Windows Vista's major security features; it also lets you directly perform actions. For example, there are links on the panel to turn the Windows Firewall on or off, to initiate spyware scans, to check for automatic updates, and so on. Notes See also "Security Center," "Windows Firewall," "Windows Defender," "Windows Update," "Parental Controls," and "BitLocker Drive Encryption" |
Security File and Folder Properties Set permissions on a file or folder. To open Right-click a file or folder and select Properties Security. Description See "File Properties," in Chapter 4, for details. |
User Account Control Protects users against threats by controlling access to important settings. To open User Account Control is turned on by default. Description User Account Control (UAC), new to Vista, is designed to protect users against a variety of threats, but it is by far the most controversial change to the operating system. The feature caused enough outcry during the beta (testing) phase of Windows Vista that Microsoft changed how it works several times. Like it or not, though, UAC is here to stay, and it offers substantially increased security over previous versions of Windows. It is designed to prevent unauthorized changes to your computer so that the system and its files cannot be damaged or tampered with. This protection is designed not only against external threats and malware, but also against users of the computer who accidentally make dangerous changes. UAC relies on there being two types of accounts on a system: an administrator account and a standard user account. The administrator can perform many tasks and make many changes that the standard user cannot. For maximum security, you should run as a standard user rather than as an administrator, because unauthorized changes can be more easily made when you run as an administratorfor example, a piece of malware set loose on a PC running with an administrator account can wreak far more havoc than a piece of malware loose on a PC running with a standard user account. | There is a great deal of confusion about administrator accounts in Windows Vista, and justifiably so. There are, in fact, two different types of administrator accounts: the single, all-powerful Administrator account (which is disabled by default), and the accounts that are part of the Administrators group. The Administrator account can do anything on the computer, and members of the Administrators group run much as standard users, except that they can elevate their privileges by clicking a Continue button in a dialog box when prompted. The single, overall Administrator, on the other hand, will not be prompted by dialog boxes. |
|
Under UAC, standard users can perform most common tasks, such as using applications and email, surfing the Internet, and so on. But when they try to change a setting that requires administrator privilegesfor example, a setting that affects other users or is dangerous, or that wants to install new softwarethey'll get a prompt, asking them to type in the password of an administrator's account. If multiple administrators are set up on the computer, the prompt will include a list of all the administrators. The user will have to type the password underneath the right administrator account. In most instances, a standard user will know ahead of time that the prompt will appear, because the setting will have an icon of a shield next to it, as shown in Figure 8-8. Figure 8-8. Shield icon signifying that the setting is protected by UAC 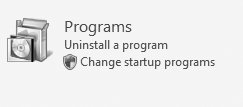
Once the user types in the administrator password, he can continue making the change. Administrators will also receive prompts when they want to make a change, but because they're already logged in, they won't have to retype their passwords. So the prompt doesn't ask for a password; instead, the administrator only has to click the Continue button in order to proceed. | When the prompt appears for either an administrator or a user, Windows Vista will switch to secure desktop mode, in which everything on the screen darkens except for the prompt. While in secure desktop mode, all you can do in Windows Vista is type in the password, click Continue, or cancel the operation. |
|
Understanding and elevating privileges UAC can be somewhat confusing, so to help you get a better handle on its use, you should know a little bit about the guiding principle behind itthe least-privileged user. In this principle, an account is set up that has only the minimum amount of privileges (the ability to make changes) needed in order to run the computer for most tasks. A standard user, in Windows Vista, is this least-privileged user. When a change needs to be made that can affect the overall operation or security of the operating system, the privilege needs to be elevatedthat is, someone with greater privileges than the least-privileged user must make the change. That's why a standard user will need to type in an administrator password to make a change, and it's why an administrator will have to confirm that she wants to make a change. An administrator can allow standard users to run certain applications without having to type in administrator credentials. To do this, the administrator can "elevate" the privileges of the applicationin other words, have it always run with elevated privileges so that no password need be typed in to run it. To do this, an administrator right-clicks the application, selects the Compatibility tab, and under Privilege Level selects "Run this program as an administrator." Then she clicks OK. Customizing UAC You can use the Local Security Policy Microsoft Management Console to change how UAC behaves on your PC. (See "Local Security Policy," earlier in this chapter, and "Microsoft Management Console," in Chapter 10, for details.) Run Local Security Policy (\windows\system32\secpol.msc) and go to Security Settings/Local Policies/Security Options. (This utility is not available in the Home versions of Vista.) You'll find these policies that you can edit:
User Account Control: Admin Approval Mode for the Built-In Administrator Account This determines whether the Administrator account (the single account, not part of the Administrators Group) is subject to UAC. Enabling it means that UAC will treat the account like any other administrator, and the user must click Continue in dialog boxes when prompted. If it is not enabled, no prompt will appear for the account.
User Account Control: Behavior of the elevation prompt for administrators in Admin Approval Mode This determines what prompt appears for administrators (members of the Administrators Group, not the built-in Administrator account). The default is Prompt for Consent, in which the administrator needs to click Continue or Cancel. You can also choose Prompt for Credentials, in which case the administrator password will have to be typed in. Choosing No Prompt will not allow administrators to elevate their privilegesin other words, they won't be able to make the change.
User Account Control: Behavior of the elevation prompt for standard users This determines what prompt appears for standard users. The choices are Prompt for Consent, Prompt for Credentials, and No Prompt. The default is Prompt for Credentials in the Home editions, but No Prompt for the Enterprise edition, as a way to reduce calls to the Help Desk.
User Account Control: Detect application installations and prompt for elevation By default, this is enabled in Home editions, so before software can be installed, UAC will ask for a prompt or a password. Disabling it allows software to be installed without that prompt. In Enterprise editions, it is disabled because enterprise-level installation technologies handle security on their own.
User Account Control: Only elevate executables that are signed and validated When enabled, this will only allow users to install programs that have been properly signed and validated by their creators. If you try to install an unsigned application, you will get an error message instead of a UAC prompt.
User Account Control: Only elevate UIAccess applications that are installed in secure locations UIAccess applications are those that require a higher degree of security than normal because of their capability to change system settings. This setting controls whether UIAccess applications must be run from a secure area of the operating system, or whether they can instead be run from any area. Secure areas are C:\Program Files and C:\Windows. Enabled means that UIAccess applications will launch only if they are in secure areas; disabled means that the applications will launch wherever they are located. The default is enabled. | For more information about these settings, see the article "Understanding and Configuring User Account Control in Windows Vista," at http://www.microsoft.com/technet/windowsvista/library/00d04415-2b2f-422c-b70e-b18ff918c281.mspx. |
|
User Account Control: Run all administrators in Admin Approval Mode This rather murky-sounding setting can essentially turn UAC on or off. By default, it is enabled, which means that UAC is turned on. If you disable it to turn off UAC, you will have to perform a system reboot before it takes effect.
User Account Control: Switch to the secure desktop when prompting for elevation This determines whether Windows Vista will switch to the secure desktop when the prompt appears. By default, it is enabled.
User Account Control: Virtualize file and Registry write failures to per-user locations This controls whether changes to the Registry made by standard users should be written to a special, virtual area, rather than directly to the Registry. This protects the Registry. By default, it is enabled. Turning off UAC There are several ways to turn off UAC, although it's not recommended. One way is to use the MSCONFIG tool. (For details about MSCONFIG, see "System Configuration Utility," in Chapter 11.) First, run MSCONFIG by typing MSCONFIG at the command line or in the Search box. When the tool runs, click the Tools tab and scroll down until you see Disable UAC. Highlight it and click the Launch button, then reboot. To turn it back on again, follow the same steps, except choose Enable UAC instead. You can also disable UAC using the Registry Editor. Launch the Registry Editor (see Chapter 13 for details). Go to HKEY_LOCAL_MACHINE\SOFTWARE\Microsoft\Windows\CurrentVersion\Policies\System\EnableLUA and give it a value of 0. You may need to reboot in order for the change to take effect. You can also go to Control Panel [User Accounts and Family Safety] User Accounts Turn User Account Control on or off. And as outlined in the preceding section, you can disable the "User Account Control: Run all administrators in Admin Approval Mode option. Notes See also "Microsoft Management Console," in Chapter 10 |
Windows Update Standalone Installer: \windows\system32\wusa.exe Install Windows Updates from the command line. To open Command Prompt wusa Usage Wusa update [/quiet] [/norestart] [filename]
Description If you prefer to install updates manually rather than having Windows Vista download and install them, you can use the Windows Update Standalone Installer. It also comes in handy if for some reason, Windows Update refuses to automatically update or work properly. To use it, first download the update, which will end in the extension .msu. Then run the Windows Update Standalone Installer from the command line. It takes the following options:
filename Specifies an update file with the extension .msu.
/quiet Quiet mode; requires no interaction on the part of the user, will reboot automatically if needed, and won't reboot if not needed.
/norestart When combined with /quiet, no reboot will be done. If you use it alone, without /quiet, it will be ignored. See also "Windows Update" |
Windows Update Automatically downloads and installs updates to Windows Vista over the Internet. To open Control Panel [Security] Windows Update Control Panel Check for Updates Start All Programs Windows Update Description Windows Update (Figure 8-9) downloads and installs updates to Windows Vista quickly and easily. These updates are important because they often contain security patches that plug holes found in the operating system. Figure 8-9. The Windows Update tool, which you can use to make sure you have the latest bug fixes and security patches 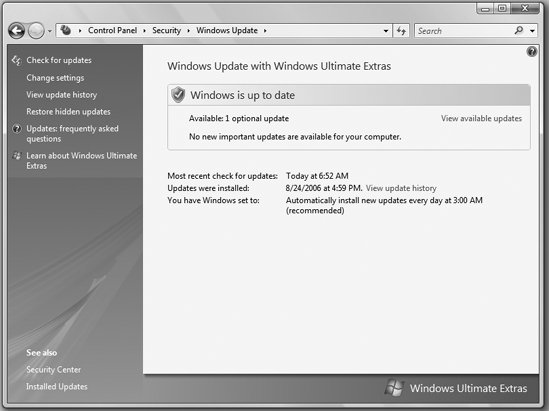
By default, Windows Update is turned on in Windows Vista. Windows Vista checks for new updates daily. It categorizes three types of updates: important updates, recommended updates, and optional updates. Important updates include security and critical performance updates. Recommended updates are those that help fix or prevent problems. Optional updates are less important updates, such as new or updated drivers. Optional updates are not automatically installed, but Windows Update will list any available and let you download and install them if you want. Windows Update includes links to these features:
Check for updates This checks whether any updates are available, reports which are ready, and downloads and installs them if you want.
Change settings This screen, shown in Figure 8-10, lets you customize how updates are downloaded and installed. You can have Windows Update check for updates one day a week (and specify that day and time) instead of daily, you can turn off automatic updating (not recommended), you can have updates automatically downloaded but not installed (you'd then pick which ones to install), or you can have Windows Update check for updates but then let you choose which to download and install. In addition, you can turn off the download of recommended updates and have only important updates downloaded and installed. Figure 8-10. Changing the way Windows handles automatic updates 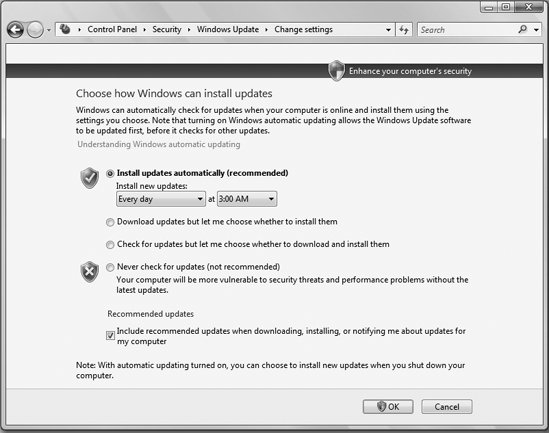
View update history As the name says, this displays a list of all updates that have been downloaded and installed. You'll be shown the date of each update, whether it was successful, the type of update, and its purpose. Double-click any to get more details about the update.
Restore hidden updates This lets you install updates that you have previously decided you don't want installed on your PC and so have "hidden." For details, see the next section, "Removing updates."
Get updates for more products This link, at the bottom of the screen, sends you to the Microsoft Update site, which downloads an installer onto your system that will allow you to download updates to Microsoft Office products, including patches, service packs, and add-ons. The installer integrates directly into Windows Update on Windows Vista, so it will always be available from there, rather than you having to visit Microsoft Update. Note that after the installer integrates into Windows Vista, the link will no longer appear on the bottom of the screen. Removing updates If an update is causing a problem, you can remove it by going to Control Panel Programs View Installed Updates, right-clicking on an update, and then selecting Remove. You wont be able to remove all updates; many security-related ones cannot be removed. If you have set your system to automatically install updates, however, the update you removed will be automatically installed the next time Windows Update does its job. One way around the problem is to change Windows Update settings so that you must first review all downloaded updates or which updates to download. There's another way around the problem, though. You can "hide" the update so that it isn't downloaded and installed, even if Windows Update is set to automatically download and install all updates. Open Windows Update, click "Check for updates," and after Windows finds updates, click "View available updates." Right-click the update you don't want downloaded and installed, and select "Hide update." Windows Update will ignore the update from now on. If at some point later, you decide you want to install the update, go to Windows Update, click "Restore hidden updates," select the update you want installed, and click Restore. Notes Your update history also includes spyware definition updates for Windows Defender. It doesn't, however, include antivirus definition updates, because those are done via a third-party program rather than directly through Windows Vista. You can also visit the Microsoft Automatic Updates site at http://corporate.windowsupdate.microsoft.com to update Windows. It requires the use of Windows Explorer and will not work with other browsers. If you use the old-style menus in Internet Explorer (see Chapter 5 for details), you can open Windows Update by selecting Tools Windows Update. See also "Internet Explorer Protected Mode"
|
|