| The Simple Query Wizard is adequate for building some queries, but it barely taps the power of Access queries. To go further with queries, you need to become familiar with query design view. Recall that you saw two views of tables in Chapter 5: datasheet view, which shows the data in a table, and design view, which shows the structure of a table. Similarly, queries have both datasheet and design views. When you look at a query in design view, you can make changes to its structure that will be represented in the datasheet view. You can use design view to alter existing queries or to build entirely new queries. In this section, you'll learn how to use design view to build new queries from scratch. Adding Tables and Queries The first task in building a new query in design view is to specify the table or query that contains the data you want to start with. Here's how to get started: -
Select the Queries shortcut in the Database window. -
Double-click the Create Query in Design View shortcut. This opens a new query in design view, along with the Show Table dialog box, as shown in Figure 7.9. Figure 7.9. Creating a new query in design view.  -
Select Plants on the Tables tab of the Show Table dialog box and click the Add button. This adds the table to the query. -
Click the Close button to view the query in design view, as shown in Figure 7.10. The upper pane of this view shows the tables that supply data to the query, and the lower pane shows the fields that will appear in the query. Figure 7.10. The query design grid.  Adding tables is the first step in creating a query, but it's not sufficient. Select View, Datasheet View from the Access menus at this point, and you'll get the following error message: Query must have at least one destination field . Access displays this message because you haven't yet told the query which fields to display. You'll see how to do this next . Tip  | If you like, you can change the font that Access uses in query design view. Select Tools, Options, and then select the Tables/Queries tab. You'll find a section labeled Query Design Font. |
Adding Fields To retrieve data via a query, you need to tell the query where that data is. So far, you've specified a table. Now you need to specify the individual fields, by following these steps: -
Double-click the CommonName field in the Plants table in the upper pane of the query design window. This adds CommonName as the first field for the query, as shown in the first column of the lower pane of the query design window. -
Click the LatinName field in the Plants table in the upper pane of the query. Now drag the field down and drop it in the second column of the lower pane of the query design window. -
Click in the first row of the third column of the lower pane of the query design window to reveal a drop-down arrow. Click the drop-down arrow to see a list of all the available fields. Select the CatalogName field. Figure 7.11 shows the query in design view with three fields selected. Figure 7.11. Specifying fields in query design view.  -
Select View, Datasheet View to see the data retrieved by the query. As you can see, there are several ways to specify the fields for a query. In addition to the three methods mentioned previously, you can also simply type the field name into the lower pane of the query design view. As you add fields, the grid shows the name of the field and the name of the table that contains the field. Sorting the Results So far, everything you've done in design view can also be done in the Simple Query Wizard. But design view has many additional capabilities. For example, you might have noticed that the results of the query you just built are sorted in alphabetical order by common name. What if you'd like to sort them in alphabetical order by Latin name instead? Query design view lets you sort the results by any field or combination of fields in the query. To do so, follow these steps: -
Select View, Design View to return to query design view. -
Click in the third row of the second column in the lower pane of the query design grid. This is the row labeled Sort under the LatinName column. When you click in the cell , a drop-down arrow appears. -
Click the drop-down arrow and select Ascending from the list. -
Click the View button at the left end of the Access toolbar and select Datasheet View , as shown in Figure 7.12. Figure 7.12. Specifying the sort for a query.  -
The query retrieves the same data that it did before, but now that data is sorted by Latin name. Use the drop-down view button to switch back to design view. -
Remove the sort from the LatinName column by clicking in the cell and selecting (not sorted) from the drop-down list. -
Move your cursor to the top of the CatalogName column and move it up slightly until it becomes a downward-pointing arrow. Click the cursor to select the entire column. -
Click and drag the CatalogName column to the left until it becomes the first column in the query. -
Set the sort for the CatalogName column to Descending. -
Set the sort for the CommonName column to Ascending. -
Switch the query to datasheet view. You'll see that the results are sorted in reverse alphabetical order by catalog name. Within each catalog, the results are sorted in alphabetical order by common name, as shown in Figure 7.13. Figure 7.13. Sorting a query by two columns .  Sorting in queries is very flexible. You can sort by any field, or by any combination of fields, in either ascending or descending order. When you save a query, the sort is saved as part of the query design, so you don't need to reapply it when you open the query again. Sorts are applied in the order in which columns are displayed in the design view. As you saw previously, you can use drag and drop to change the order of columns. Note  | If you don't specify a sort in a query, Access decides how to sort the results for you. Usually this is according to the first field of the first table in the query. |
Filtering the Results Query design view also enables you to specify a filter for query results. Filters are a very powerful concept for sorting through large masses of data. When you apply a filter, you specify some characteristics of the data that you actually want to see, and Access shows you only the matching rows. Here's how to do this: -
Switch back to query design view. -
Type Wildseed Farms in the criteria row of the first column of the query, as shown in Figure 7.14. Figure 7.14. Adding a filter to a query.  -
Switch to the datasheet view of the query. You'll see that it now displays only rows in which the CatalogName field contains Wildseed Farms , as shown in Figure 7.15. Figure 7.15. Results of filtering a query.  -
Switch back to design view. Type Richters on the next row of the design grid in the first column, directly beneath the existing filter. -
Switch to datasheet view. You'll see that the datasheet now displays rows for both Wildseed Farms and Richters. When you enter multiple criteria on different rows in the query grid, a row is shown if it matches any of the criteria. -
Switch to design view and remove the Richters value by highlighting it and pressing Delete. -
Enter Yarrow as a criteria value in the first criteria row under CommonName, directly to the right of the Wildseed Farms entry. -
Switch to datasheet view, and the query displays a single row, showing Yarrow plants from Wildseed Farms. When you enter multiple filters on the same row in the design grid, a row is shown only if it matches all the filters. -
Click the Save button on the Access toolbar. Enter FilteredPlants as the query name and click OK. -
Close the query datasheet. Access supports a wide range of expressions in query filters. Table 7.1 shows some of the expressions you can use when designing a query. For more examples, search the Access help for the topic "Examples of Expressions." Table 7.1. Query Filter Expressions | Expression | Meaning | | "Blue" | Exactly the value "Blue" . | | "Blue" or "Red" | Either "Blue" or "Red" . | | Like "B*" | Anything starting with "B" . The * is a wildcard that matches any number of characters . | | Like "B??" | "Boo" , "Boy" , "Bay" , or any other three-letter word starting with B. The ? is a wildcard matching precisely one character. | | < "N" | Before N in the alphabet. | | 333 | Exactly 333 . | | >= 333 | 333 or more. | | Between 5 and 100 | At least 5 , but no more than 100 . | | #3/5/2000# | The date March 5, 2000 (applies to DateTime fields only). | | Not "Green" | Anything other than "Green" . | | In ("Red", "Blue", "Green") | Matches red, blue, or green . | | Is Null | Field does not contain a value. | | Is Not Null | Field contains any value (isn't blank). | Note | | Access sometimes alters what you enter as a filter. For example, if you type Yarrow (without quotes), you'll see it as "Yarrow" (with quotes) when you return to design view. This is nothing to be alarmed about. In fact, it's just Access's way of helping you. |
Adding a Second Table You can also develop queries that retrieve data from more than one table in design view. In this example, you'll build a query to retrieve all medicinal plants that come from catalogs in the U.S.: -
Select the Queries shortcut in the Database window. -
Click the New button on the Database Window toolbar. -
In the New Query dialog box, select Design View and click OK. -
In the Show Table dialog box, select the Catalogs table and click Add. -
In the Show Table dialog box, select the Plants table and click Add. -
Click Close to dismiss the Show Table dialog box. -
Arrange the windows within Access so you can see both the query design window and the Database window. -
Select the Tables shortcut in the Database window. -
Drag the Types table from the Database window and drop it into the top pane of the query design window. This adds the Types table to the query. Figure 7.16 shows the query at this point. Note that Access automatically displays the relationships you have specified between the tables. Figure 7.16. Multiple tables in query design view. 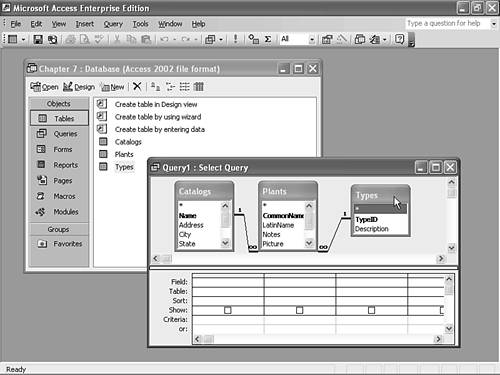 -
Add the Name and Country fields from the Catalogs table, the CommonName and LatinName fields from the Plants table, and the Description field from the Types table to the lower pane of the query. -
Clear the Show check box for the Country field. -
Specify USA as the filter for the Country field. -
Specify Medicinal as the filter for the Description field. Be sure both filters are on the same row of the grid. -
Specify Ascending as the sort for the CommonName field. Figure 7.17 shows the final query in design view. Figure 7.17. Designing a complex query.  -
Switch to datasheet view to see the results of the query. -
Save the query as USAMedicinals . -
Close the query. Tip | | To filter on a field without displaying the contents of the field, just uncheck the Show box, as you did in this example. |
The Absolute Minimum In this chapter, you learned about Access queries. You'll find as you work with Access that queries provide you with a simple and flexible way to extract just the data you want from your database. -
Queries provide a flexible way to display data from a database. You can combine data from multiple tables or display only the data of interest by using queries. -
The Simple Query Wizard provides a quick way to build up queries that return records from one or more tables. -
Query design view is a more flexible alternative to the Simple Query Wizard. With query design view, you can control the sorting order of the displayed records and set up complex filters to limit the amount of data returned by a query. | |