Managing the Hardware
The Fedora installation process automatically tries to detect the available hardware and configure it for use in the desktop. However, sometimes this hardware configuration needs to be fine- tuned , or the auto-detection of hardware during the installation process doesn t work as planned. In such cases, it is necessary to know how to adjust the desktop s hardware configuration manually.
| Note | Many of the programs shown in this section are executable only by users with administrative privileges. Therefore, you are able to perform the various operations shown in this section only if you have access to the root account of your system. |
| Note | In fact, this is a security feature of the Linux platform ”and you will see it often over the course of this book. If you are using the terminal emulator for executing the command, you can switch to a root shell by using the following command: $ su - When prompted, you ll need to enter the root password. For safety and security reasons, it is advisable to avoid using the root account except when you need to perform administrative tasks . We ll discuss this further when we talk about user accounts in Chapter 8. As mentioned earlier in the section, if you attempt to perform a privileged operation from a GUI, an authentication window prompts you for the root password (as shown in Figure 2-28); this is the same as specifying the password on the command line in response to the su command. 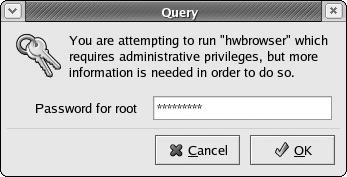 Figure 2-28 |
Finding the Existing Hardware
You can find out the current major hardware configuration of the system by using the hardware browser . To launch the hardware browser, select Main Menu>System Tools>Hardware Browser, or type hwbrowser at a command line. The hardware browser searches for the hardware on the system and displays results, as shown in Figure 2-29.
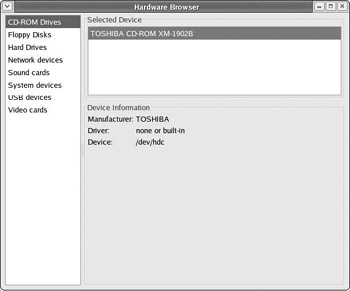
Figure 2-29
While the depth of information in this program is not great, it is a good indication of whether a particular device has been detected correctly.
Fedora uses the kudzu program to detect new hardware automatically. However, this adds to the amount of time it takes for the system to boot up. Users may choose to disable the checking by running chkconfig kudzu off . At a later time, when new hardware is added, they can turn on the checking by running chkconfig kudzu on .
You can gather more information about the hardware by working from the terminal itself. The remainder of this section explains how you can gather information about your system using the CLI. The following table lists the major areas covered in this section.
| Area | Description |
|---|---|
| CPU | The type of CPU and the amount of processing load |
| Memory | The amount of memory installed on the system and its usage pattern |
| Hard disk, CD-ROM, | The disk capacities and their usage status and floppy drives |
| Network cards | The network devices that are operational and their usage statistics |
| Mouse | The kind of mouse being used by the system |
| Keyboard | The kind of keyboard being used by the system |
| Display | The display card detected by the system and its current usage status |
| Various PCI and USB devices | The various devices detected by the system |
| Sound | The sound card detected and used by the system |
You can find much of the information by using special files that are maintained dynamically by the operating system. You can find these files by looking in the /proc directory. The files are special because they are generated on demand by the operating system, and do not actually exist on the filesystem except when requested (for example, by the ls /proc command).
You can view the contents of these files by using the cat command (which prints to the screen the contents of any file whose name is passed as a parameter to it, as shown in the next few examples). Alternatively, you could use a text editor such as gedit .
CPU-Related Information
You can find the CPU information detected by the operating system by displaying the contents of the file /proc/ cpuinfo (see Figure 2-30).
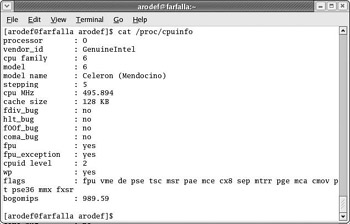
Figure 2-30
The bogomips value given at the bottom of the display is a rough calculation of the processor s speed, made by the operating system. This figure can be used to get a rough comparison of the relative speeds of two different computers running different processors.
Memory-Related Information
To find information about the total amount of RAM in the system, the amount of swap memory, and their respective uses, you can look at the System Monitor dialog box (as previously shown in the section on CPU usage). A quick alternative for finding out the status of RAM and swap is to display the contents of the file /proc/meminfo , as shown in Figure 2-31.
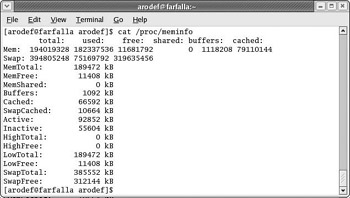
Figure 2-31
The memory usage can also be examined with the System Monitor or the top program, as shown previously in the section on CPU usage.
Information About the Filesystem Devices
To find information on the mounted file system in the computer, you can use the graphical interface offered by the System Monitor. However, there is also a quick CLI-based way to find similar information; this involves the df program. Figure 2-32 shows a typical usage of the df program.
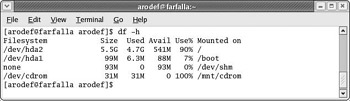
Figure 2-32
Here, the -h option displays the output in a more readable format (indicating size in megabytes and gigabytes, rather than bytes).
It is important to know the list of devices that are mounted and their mount points and filesystem types. You can find this information by invoking the mount command itself, without any arguments, as shown in Figure 2-33.
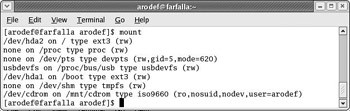
Figure 2-33
If you are using a hard disk with multiple partitions and multiple operating systems, it s handy to be able to check the partition structure of your hard disk and the various partition types existing on it. You can do this with the fdisk program, with the -l option. Figure 2-34 shows how to use this program.
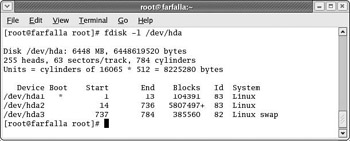
Figure 2-34
| Note | Note that you need root permissions to access some of this information, so log in as root using this command: $ su As you ll recall, the super user mode is indicated by the change in the prompt ”the last character of the prompt changing from a dollar ($) sign to a pound (#) sign. |
Note that the -l option shown in the preceding screenshot is used to query the hard disk structure, and is quite safe. However, other fdisk options are designed for manipulating your hard disk partitions, and incorrect usage of these options can destroy your hard disk data.
| Caution | Use the fdisk program with caution. |
Information about the Network Devices
To display information about the network devices configured and running in the system, you can use the ifconfig utility, as shown in Figure 2-35.
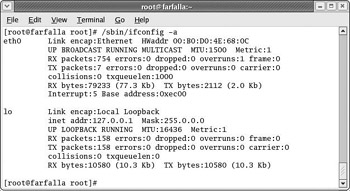
Figure 2-35
| Note | The ifconfig utility is contained in the /sbin directory. This directory is listed as part of the root user s $ PATH , but is not listed (by default) in the $PATH of normal user accounts. Therefore, to run ifconfig you need either to specify the full path, /sbin/ifconfi g (as done here), or switch to the root user s account and launch it from there (as we did with the preceding fdisk utility). |
As you can see, this command displays a lot of network configuration information about the network devices on the computer. Using the ifconfig program without any arguments shows the status of only the network devices that are up and running. Adding the -a argument shows all the devices, whether they are running or not.
You can use the output of this command to find out the exact status of these devices. In the preceding example, you see two network devices: eth0 and lo . The first is an Ethernet device, and the second is the local loopback network device. (The loopback device is always present, even when no real network devices exist in the system. This device is necessary for many network applications to work properly.)
So, you can check the network configuration of the devices via the ifconfig command. If you would like to find more information about the specific network card in use, you can use the Network Device Control program available from the System Tools section of the Red Hat menu.
You can find network details by using the netstat and the route programs. The route program displays the network routes active in the system, including the gateway through which this desktop sends and receives network traffic from the Internet. The netstat program shows the currently active network connections and networking services that are available on the machine. You take a look at netstat in Chapter 12, and you can learn more about route by typing man route at the terminal.
Information about the Mouse and the Keyboard
Fedora s tool for configuring the mouse is the program redhat-config-mouse ”you can run this tool from the command line or by selecting Main Menu>System Settings>Mouse. You have encountered this program already because it was run during the installation process. Figure 2-36 provides a reminder of what that dialog box looks like.
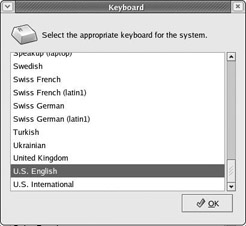
Figure 2-36
The dialog box shows the present mouse configuration in the system. In the preceding screenshot, the mouse is a PS/2-based wheelmouse. The program stores the configuration of the mouse at /etc/sysconfig/mouse , which it uses while starting the mouse driver (called gpm ) at system startup.
For configuring the keyboard layout, the GUI tool to use is the redhat-config-keyboard program. Executing this program brings up the dialog box shown in Figure 2-37, which shows your current keyboard layout.
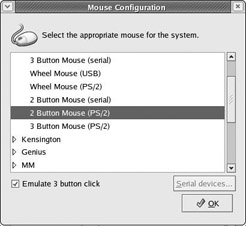
Figure 2-37
You can also change the keyboard layout from this dialog box. The program stores the keyboard s configuration in the file /etc/sysconfig/keyboard . The option that you choose here ensures that the appropriate keyboard map is loaded at boot time.
Information About the Display
Information about the display card on the system can be found using the lspci command (mentioned earlier). This generally reveals the actual video hardware on the system. In the lspci output (also shown earlier), the video hardware was revealed to be a S3 ProSavage card.
The X-Server software is responsible for the basic graphical display of the desktop. This server loads appropriate display drivers according to the video hardware. While recognized good video cards such as S3 have hardware-accelerated drivers, unrecognized video cards are put to use by loading generic display drivers that are low on performance. So, if you see choppiness in the display, it s possible that your video card has been detected incorrectly and that a generic display driver such as Vesa is loaded.
To check or modify the video card and monitor settings of the display, you can use the Red Hat configuration tool redhat-config-xfree86 (either by typing this command at the command line or by selecting Main Menu>System Settings>Display). Figure 2-38 shows the dialog box that you get when this tool is executed.
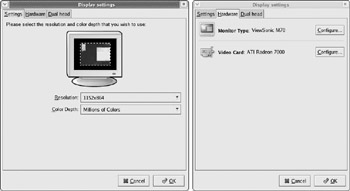
Figure 2-38
These dialog boxes show that the card has been detected correctly and the resolution and color depth are as expected. You can change these values if you want. The changes take effect only when the X server is restarted.
However, they also show that the monitor doesn t seem to be detected correctly. The model name of the monitor is set to a generic Monitor Model, indicating that manual configuration details given during installation are in effect. If you are happy with the display that is generated using these settings, you can just click OK and exit the program. If you want to adjust the settings to try to get something better, click the Configure button to select the precise configuration of the monitor and the video card (as you did to configure X server, during installation).
Information About the Sound Card
The sound card configuration tool is redhat-config-soundcard (again, you can run this tool from the command line, or from the menu shortcut Main Menu>System Settings>Soundcard Detection). This program displays a simple dialog box showing the sound card detected on the system and the kernel sound driver loaded, as shown in Figure 2-39.
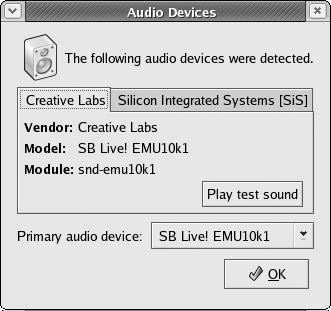
Figure 2-39
You can test the sound configuration by using the Play test sound button.
Information About Various PCI and USB Devices
Information about various other PCI and USB devices can be viewed using the lspci and the lsusb programs. You looked at the lspci program output in an earlier section. As a reminder, Figure 2-40 demonstrates the output you saw earlier.
This output allows you to confirm the PCI-based hardware in xour machine. For example, you can find out the audio controller card ( VT82C686 ), the Ethernet network controller card ( RTL-8139 ), the video capture card ( Bt878 ), and the graphics card ( S3 ProSavage ). These details are extremely useful when hardware auto-detection hasn t happened as planned and you need to tell the configuration program explicitly about the hardware that you want to configure.
The lsusb program output lists the characteristics of all the USB devices plugged into the computer. Its output is very verbose and might be too technical for the average user. However, when you hot-plug a USB device, the device characteristics can be verified from the lspci output.
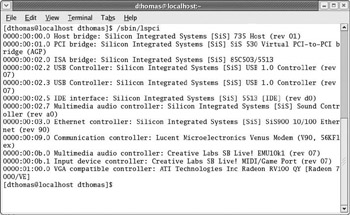
Figure 2-40
EAN: 2147483647
Pages: 170
- Integration Strategies and Tactics for Information Technology Governance
- A View on Knowledge Management: Utilizing a Balanced Scorecard Methodology for Analyzing Knowledge Metrics
- Measuring ROI in E-Commerce Applications: Analysis to Action
- Managing IT Functions
- Governance Structures for IT in the Health Care Industry