MIDI Recording Preferences
| [ LiB ] |
MIDI Recording Preferences
MIDI recording preferences play a role in Cubase's behavior during the recording process. These preferences are found in several sections of the Preferences option found in the File (PC)/Cubase (Mac) menu. After you set up these preferences, you won't have to change them again as they will remain there until you change the settings again and apply these changes.
Under the Editing section you should look at the following MIDI- related recording preferences:
-
Enable Record on Selected Track. This check box will automatically arm a track for recording as soon as you select it. When you select another track, it becomes unarmed for recording once again, while arming the next track. This is a convenient option when you want to record ideas quickly on a track without having to remember to arm it each time. Only record-enabled tracks will record events when you press the Record button on the Transport panel.
Under the MIDI section you should look at the following MIDI-related recording preferences:
-
Reset On Record End, Part End, and/or Stop. When either of these options is selected, Cubase sends a Reset message to all connected MIDI devices. This message sends an All Note Off message and a Reset All Controllers message. You can also send a Reset message to all your MIDI devices if ever an error occurs that causes a MIDI device to sound off a stuck note by using the Reset option found in the MIDI menu.
-
Length Adjustment. When this option is set to a value other than zero, Cubase adjusts the length of two consecutive notes playing on the same pitch and on the same channel to make sure there is a small space between these two MIDI events. The value you enter is the number of ticks found between these two similar notes.
-
Chase Events. The check boxes found in this section of the MIDI preferences refer to how Cubase deals with MIDI controller events that have been recorded. Will it look back to see if there has been a patch change since you've stopped , or will it simply play the notes, leaving the current patch on your MIDI device playing? If you check the box, it will not look or chase events that occurred before the project's current location. If the box is left unchecked, it will look back to see if such a change occurred and will send a patch change (for example) to set the patch value appropriately. Here's another exampleyou stop playback while the pitch bend value is not at zero. Then you decide to move a few bars back. If the chase events for the pitch bend are checked, the MIDI device will still be set at that pitch bend value and the note will sound out of tune. If the pitch bend is chased (the check box not selected), Cubase will look back to find the last value of pitch bend, which will probably be a zero, reset this value in the MIDI device, and play the pitch bend accurately.
Under the Record section you should look at the following MIDI-related recording preferences:
-
Snap Record Parts to Bars. When this option is selected, Cubase automatically extends a part to the closest bar before the part begins and after the part ends when you record on-the-fly from a location other than a bar's beginning. This makes it easier to move parts later on when you want to edit MIDI events on your track.
-
Solo Record in Editors. When you want to make sure the events you record go into the part you are editing (when a MIDI editor window is opened), you can enable this option. This Record option enables the edited track while preventing any other tracks from also recording new events for as long as the MIDI editor is opened.
-
MIDI Record Catch Range in ms. When you start recording from a specific point, sometimes you might play a note just a little too early for Cubase to include it in the recording. This results in a missing note at the beginning of a part. To avoid this, you can tell Cubase to catch events that are played slightly before the actual recording begins. The value represents the number of milliseconds Cubase uses as a catch range when a recording is activated.
-
Retrospective Record. Have you ever played a great MIDI part, only to realize that you forgot to play the Record button, or got inspired by something you were playing while Cubase was stopped? With the retrospective record feature, you can tell Cubase to remember MIDI events you play even if you are not recording them. As long as the Record Enable button is active for the MIDI track in question, the Retrospective Record option checked, and a sufficient buffer size in which Cubase stores these events is set (the default value should be fine for most cases), all the MIDI events you played can be restored to this track just as if you had pressed record in the first place.
Under the Record section you should look at the following MIDI-related recording preferences:
-
Returns the play line to the location from which it started when you click Play or Record rather than having it stay at its current stop location.
-
Deactivate Punch-in on Stop. Disables the otherwise enabled Punch-in button whenever you click the Stop button or press the spacebar on your keyboard.
-
Stop after Automatic Punch-out. Stops playing automatically right after it hits the punch-out location, or when the postroll time is played if this setting is also enabled. A preroll and postroll setting is enabled when you've entered a value for either of these fields in the Transport panel and when the Use Pre-/Post-Roll option is checked in the Transport menu.
MIDI Filtering
When recording MIDI events, you are recording many different types of MIDI messages. The most obvious type of MIDI message are the channel voice messages, which include Note On, Note Off, Program Change, and so on. You can decide to record all MIDI messages, or only specific MIDI messages, filtering any other messages from the recording. In other words, you can choose which MIDI events you want to record. This can be useful when you want to avoid recording lots of useless data that can bog down your MIDI output port when passing these events through an already crowded port. Also, some MIDI devices send events that might not be essential to your performance. Cubase allows you to filter out these messages.
How To
To filter MIDI events during recording or playback:
-
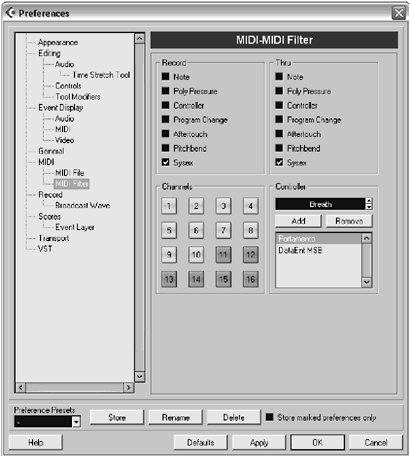
Select Preferences > MIDI Filter from the File(PC)/Cubase(Mac) menu (Figure 7.1).
Figure 7.1. The MIDI Filter area in Cubase's Preferences dialog box.
-
In the Record section of the MIDI Filter area, check all the types of events you do not want Cubase to record. Events that are already recorded will continue to play.
-
If you want to filter out events while you are playing as well, check the appropriate types of events in the Thru section. Once again, recorded events will play back, but checked event types in this section will be filtered out from the MIDI input.
-
In the Channels section, click the MIDI channels from which you do not want to record. In Figure 7.1, messages coming on Channels 11 through 16 will not be recorded.
-
Finally, if you want to add additional controller messages to the filtered list, use the Controller Selection field in the Controller section to scroll through the types of controller messages and click the Add button to add them to your filtered list.
-
Click Apply and then click OK when done.
As you've noticed in the previous steps, these settings are optional and in most cases, filtering the System Exclusive (SysEx) messages is all you need to do (which, by default is already filtered). On the other hand, you can deselect the SysEx filter if you want to save your external MIDI device's system exclusive information into a project.
System Exclusive messages are used to transmit parameter settings from and to a MIDI device that are not supported by any other type of MIDI message. In most cases, System Exclusive messages are device specific and are used to recall or store settings that are used by a device to produce a sound or program, such as a reverb type or cutoff frequency setting.
What you just did through the MIDI Filter area influences the general behavior of Cubase. In other words, it applies these settings on all MIDI tracks until you change these settings once again. You can, however, decide to filter out, or even convert, certain MIDI events into other MIDI events in a track as you are recording it. This is done through Cubase's Transformer.
The Transformer comes in two flavors: as a MIDI effect called MIDI Transformer and as a track input called Input Transformer . When used as an effect, it transforms events that are already recorded on a track. When it is used as an Input Transformer, it transforms the events before it records them. You can access the Input Transformer's panel through its appropriate button (described in Chapter 6) found in the MIDI settings section of the Inspector area.
NOTE
 USING THE INPUT TRANSFORMER
One very useful application of the input transformer consists of applying a filter to each MIDI track in order to transform the current Omni On Input mode of Cubase into an Omni Off Input mode.
Currently, you can choose the MIDI input port as the source of incoming MIDI events, but you can't select which MIDI channel triggers events on a specified MIDI track. In other words, it doesn't matter what channel your MIDI keyboard is set at, it will send MIDI into Cubase and Cubase will play any MIDI messages sent to all record enabled tracks at the same time. As long as a MIDI track's input and output ports are set up properly, you can't control the channel to which a MIDI track responds, only the port.
Although this is fine in most cases, you might need to have control over which MIDI track plays back MIDI events on specific channels, for example, if you are using another computer to record a MIDI sequence and use Cubase simply as a rack of VST instruments. Without the possibility of selecting the input's MIDI channel, you'd have to use one MIDI port per MIDI track in order to get Cubase to play more than one VSTi at a time.
By using the input transformer on each MIDI track, you can force a MIDI track to only respond to MIDI events with a specific MIDI channel, allowing you to control up to 16 VSTi per MIDI port instead of only one. You can find out more on the input transformer's control in Appendix C, which discusses the Logical Editor. Both the Logical Editor and Input Transformer use similar controls. You can also download a template file from the Wavedesigners download page (http://www.wavedesigners.com).
Setting Up Your Metronome
To help you keep the beat while you are recording, you can activate the Click button on the Transport panel. This enables the metronome. You can use either a MIDI device to generate the click produced by the metronome or your computer's speaker, or both, if you want.
How To
To configure your metronome settings:
- Ctrl(PC)/
 (Mac)-click the Click button on the Transport panel, or from the Transport menu, select the Metronome Setup option.
The Metronome Setup dialog box appears as shown in Figure 7.2.
Figure 7.2. The Metronome Setup dialog box.
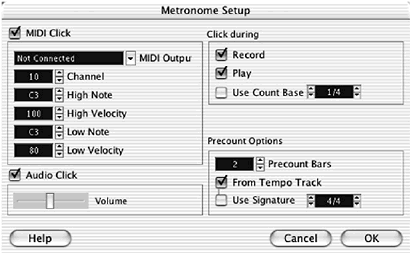
- Check the MIDI Click and/or the Audio Click check boxes, depending on which type of click you want to hear.
The MIDI click will send a MIDI Note On event through a MIDI port to get a MIDI device to play the click track, while an audio click is simply a click sound playing through your sound card.
-
If you've selected the MIDI Click check box, make sure to select a proper MIDI port connected to the device that will play the MIDI click and the proper MIDI channel (by default, this is set to Channel 10 because this channel is usually reserved for drum sounds and is appropriate for clicks). You may also change the MIDI note value of the high and low notes. High notes are played typically on the first beat of a bar, whereas low notes are played on the other beats. Finally, you can adjust the velocity of these notes in the same area.
-
For the audio click, it's a little simpler because you can only adjust the volume of the click produced by the computer's speaker. Note that you can enable both MIDI and audio clicks simultaneously if you'd like.
-
In the Click during area, the two first options determine if the metronome plays automatically only when you are in Record mode or Play mode, or both.
- If you want your metronome clicks on a different value than your signature setting, such as every eighth note rather than every quarter note in a 4/4 bar, you can check the Use Count Base option and set the value using the up and down arrows to the right of this check box in order to adjust the beat subdivision for your metronome's click.
The Precount options allow you to set up how the metronome will react when the Precount/Click button is enabled on the Transport panel. Typically, a precount will sound off a user -defined number of bars before starting playback. This is useful when you are not using the preroll value in the Transport bar.
-
In the Precount Bars field, enter the appropriate number of bars you want Cubase to sound off before it actually starts playing or recording. This will have no influence on the metronome if the Precount button is disabled in the Transport panel.
NOTE
 TIP
TIP When the Tempo track is not active, tempo changes will not be heard during playback of the project. If the From Tempo Track option is checked while the Tempo track is not active, the tempo of the metronome will not match the tempo of the project. It is therefore recommended that you uncheck this option when you want to work with a disabled Tempo track.
-
Check the Use Signature option if you want to use a signature that is different from CHAPTER 7 the project's tempo track signature. You can play your project at a different tempo setting when the Tempo track is disabled, but the signature setting is always active. For example, if your project switches from a 4/4 bar to a 3/4 bar, you want the metronome to correspond to this change as well. On the other hand, if you don't want to use the signature values found in the Tempo track, check this box.
-
When you have completed setting these options, click OK.
| [ LiB ] |
- Chapter V Consumer Complaint Behavior in the Online Environment
- Chapter VI Web Site Quality and Usability in E-Commerce
- Chapter X Converting Browsers to Buyers: Key Considerations in Designing Business-to-Consumer Web Sites
- Chapter XII Web Design and E-Commerce
- Chapter XIV Product Catalog and Shopping Cart Effective Design