Event Modifying Effects
| [ LiB ] |
Event Modifying Effects
MIDI effects in this category do not create any new MIDI events, but modify them in some way.
Compress
The Compress MIDI effect (shown in Figure B.10) compresses or expands the velocity values of events on a MIDI track by adding or reducing the Note On velocity of these events. The Compress effect has three controls: the Threshold level, the Ratio, and the Gain control. The Threshold level determines the velocity value needed to trigger the compress effect. The Ratio can act as an expander or a compressor depending on the value set in this field. A one-to-one ratio means there is no change in the velocity values. A ratio greater than one-to-one compresses the velocity values by that proportion, and a ratio that is less than one-to-one expands the velocity value by that same ratio. For example, if you have a ratio of 2:1, for every two values passing the threshold, only one is added to the final velocity. So, if you have a threshold of 80 and play a velocity of 100 with a ratio of 2:1, the end velocity result is 90. On the other hand, if you have a ratio of 1:2, playing a note with a velocity of 90 using the same threshold causes the velocity to move up to 100.
Figure Figure B.10. The Compress MIDI effect panel.
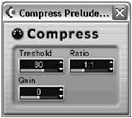
The Gain control determines a value that is added or removed to the velocity of MIDI events passing through this effect.
Unlike the previous MIDI effects described in this appendix, this effect does not generate new MIDI events, but simply modifies the events going through it.
How To
To use the Compress MIDI effect:
-
Adjust the Threshold value to the desired velocity value. Velocities below this threshold are not affected.
-
Adjust the ratio appropriately to expand or compress the velocity of events passing through the effect.
-
Adjust the Gain level to add or remove velocity values to all the events in this MIDI track.
Control
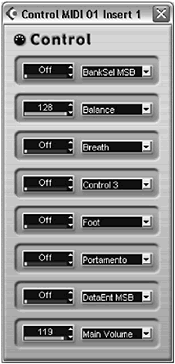
The Control MIDI effect controls up to eight MIDI control change parameters. As you can see in Figure B.11, the left column is used to set the value for a controller that is defined in the right column. You can select any available controller from the drop-down menu in this (right) column. You can use this to automate different control change parameters using MIDI automation as described in Chapter 13.
Figure Figure B.11. The Control MIDI effect panel.
MicroTuner
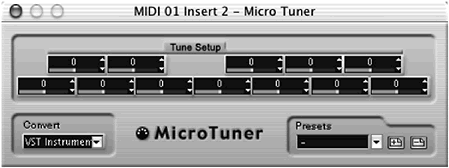
This effect simulates different types of tuning. It does so by giving you control over fine-tuning between each semitone in a chromatic scale and then applies these tuning modifications over the range of the keyboard. The best way to use this is to use one of the many available presets. Changing the tuning for one MIDI instrument playing strings, for example, might help make the overall sound a bit richer if this instrument were doubled by another string pad that is not microtuned.
The Micro Tuner panel (shown in Figure B.12) features 12 sliders, one for each semitone. Each one can be adjusted separately. You can also select the Convert method, which adjusts the microtuning method, depending if this is applied to a VSTi or external MIDI device using SysEx to alter the tuning of the device in question.
Figure Figure B.12. The Micro Tuner MIDI effect panel.
Note to Control Change Converter
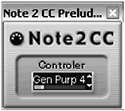
This MIDI effect (see Figure B.13) converts a MIDI note number into a value that you can assign to a MIDI Control Change message. For example, you can create a MIDI track, play notes, and then assign this MIDI effect to affect the pan. Whenever a note is played high in the keyboard range, the pan goes on one side and when a note is played low, the pan goes on the other side. All you need to do is select which MIDI Control Change message you want to use with the converted note number values.
Figure Figure B.13. The Note2CC MIDI effect panel.
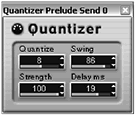
Quantizer
The Quantizer (shown in Figure B.14) offers the same effect as the main over quantize functions that were described in Chapter 7. In this case, you can assign to a track and change the quantize values dynamically by using automation. It offers the same parameters as the quantize setup; however, it does add a delay parameter that lets you assign a delay in milliseconds that can be added to each quantized note.
Figure Figure B.14. The Quantizer MIDI effect panel.
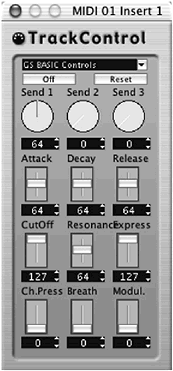
Track Control
The Track Control controls additional parameters provided by GS and XG compatible MIDI devices. Roland GS and Yamaha XG MIDI devices extend on the General MIDI (GM) standard by offering more sounds and better control over them. The Track Control effect provides a ready-made interface to control these devices when using such a device as your MIDI track output. If you don't have a GS or XG compatible device, this effect does not serve any purpose.
The panel itself (see Figure B.15) offers different controls of specific parameters displayed below the control. You can choose from the top drop-down menu which type of controls you want to see, depending on the GS or XG instrument you want to control.
Figure Figure B.15. The Track Control MIDI effect panel.
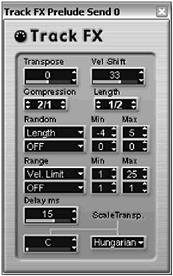
Track Effects
The Track Effects (see Figure B.16) offers essentially the same parameters as the Track Parameters section, with one addition: the Scale Transpose module. You can use this if you need to add random values to MIDI events and the two random generators in the Track Parameter are already used for something else, or when you want to use the Scale Transpose module.
Figure Figure B.16. The Track FX panel.
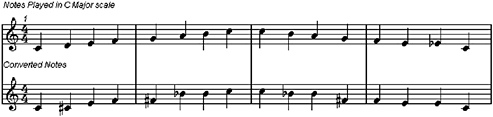
This module sets a scale and assigns a mode to your track, converting any recorded or played notes to notes found in the transpose scale and mode. If you take a look at Figure B.17, you will notice that a C major scale was recorded in the first staff. Using the Track Effect MIDI effect with the Scale Transpose set to an Oriental mode preset from the drop-down menu with a scale based on C, the notes in the original major scale are transformed to fit this new mode (lower staff in Figure B.17). In other words, you can quickly change the colors of harmonic and melodic content by using this feature in the Track Effects. Here's an example: If you use the default C scale and play in this scale as well, you can change the mode so that a C major scale becomes a C minor or C pentatonic scale instead. You can also change the scale itself to any other note in a 12-tone scale and all other notes will be changed appropriately.
Figure Figure B.17. Using the Track Effects effect to modify the scale mode of melodic or harmonic content.
Input Transformer
The Input Transformer offers a way to transform MIDI events going in using the same tools and menus described in the Logical Editor, which is described in Appendix C. The main difference is that the transformer acts as a MIDI effect assigned to a track, modifying events in real time, whereas the Logical Editor edits selected events as a process applied to MIDI events, changing these MIDI events rather than transforming them as they are being played. Please refer to Appendix C for more details. Note that you can use the Merge MIDI function as described earlier in Chapter 11 to convert the realtime processing applied by the Input Transformer into editable MIDI events inside the MIDI editing windows .
| [ LiB ] |