Route Summarization
|
In the chapter introduction, I briefly mentioned the concept of route summarization. So what is it, and why do you need it? On very large networks, there may be hundreds or even thousands of individual networks and subnetworks being advertised. All these routes can be very taxing on a router’s memory and processor.
In many cases, the router doesn’t even need specific routes to each and every subnet (e.g., 172.16.1.0/24). It would be just as happy if it knew how to get to the major network (e.g., 172.16.0.0/16) and let another router take it from there. A router’s ability to take a group of subnetworks and summarize them as one network (i.e., one advertisement) is called route summarization, as shown in Figure 7.18.
| Note | In some of the literature, you may find route summarization referred to as route aggregation or supernetting. |

Besides reducing the number of routing entries that a router must keep track of, route summarization can also help protect an external router from making multiple changes to its routing table due to instability within a particular subnet. For example, let’s say that you were working on a router that connected to 172.16.2.0/24. As you were working on the router, you rebooted it several times. If you were not summarizing your routes, an external router would see each time that 172.16.2.0/24 went away and came back. Each time, it would have to modify its own routing table. However, if your external router were receiving only a summary route (i.e., 172.16.0.0/16), then it wouldn’t have to be concerned with your work on one particular subnet.
Summarization is the process of combining networks to save routing table entries. For example, it is typically more efficient to advertise 172.16.0.0 instead of 254 subnets starting with 172.16.1.0 going to 172.16.254.0. Supernetting can save a lot of room in a routing table!
You can use supernetting in a variety of networks (typically those that are large), using all types of routers and routing protocols. This section shows you how to create a supernet and then how to apply it to Cisco routers running both EIGRP and OSPF, the routing protocols usually used in larger networks.
To create a summarized entry, you gather the networks you want to combine and then write them out in binary. Let’s combine the following in an effort to save routing table entries:
-
10.1.0.0 through 10.7.0.0
-
172.16.16.0 through 172.16.31.0
-
192.168.32.0 through 172.16.63.0
First, notice that the networks can easily be summarized because they are contiguous. An example of a range of networks that would be a poor choice for summarization is 172.16.10.0, 172.16.14.0, and 172.16.44.0. A noncontiguous range of networks makes for an inefficient summarization entry.
Supernetting 10.1.0.0 through 10.7.0.0
First, put everything into binary and then follow the bits, starting on the left and stopping when the bits do not line up. Notice where you stopped using boldface in the following:
10.1.0.0 00001010.00000001.00000000.00000000 10.2.0.0 00001010.00000010.00000000.00000000 10.3.0.0 00001010.00000011.00000000.00000000 10.4.0.0 00001010.00000100.00000000.00000000 10.5.0.0 00001010.00000101.00000000.00000000 10.6.0.0 00001010.00000110.00000000.00000000 10.7.0.0 00001010.00000111.00000000.00000000
Now, create a network number using only the boldface bits. Do not count the bits that are not in boldface. The second octet has no bits on (1s in the boldface section), so you get this:
10.0.0.0
To come up with the mask, now count all the boldface bits as 1s. Because 8 bits in the first octet and 5 bits in the second are boldface, you get this:
255.248.0.0
Supernetting 172.16.16.0 through 172.16.31.0
Let’s put the network addresses into binary and use boldface for the bits starting on the left and moving to the right until they stop lining up:
172.16.16.0 10101100.0001000.00010000.00000000 172.16.17.0 10101100.0001000.00010001.00000000 172.16.18.0 10101100.0001000.00010010.00000000 172.16.19.0 10101100.0001000.00010011.00000000 172.16.20.0 10101100.0001000.00010100.00000000 172.16.21.0 10101100.0001000.00010101.00000000 172.16.22.0 10101100.0001000.00010110.00000000 172.16.23.0 10101100.0001000.00010111.00000000 172.16.24.0 10101100.0001000.00011000.00000000 172.16.25.0 10101100.0001000.00011001.00000000 172.16.26.0 10101100.0001000.00011010.00000000 172.16.27.0 10101100.0001000.00011011.00000000 172.16.28.0 10101100.0001000.00011100.00000000 172.16.29.0 10101100.0001000.00011101.00000000 172.16.30.0 10101100.0001000.00011110.00000000 172.16.31.0 10101100.0001000.00011111.00000000
Count only the boldface bits and only the bits that are on (1s) to get the following network address:
172.16.16.0
Now, create the mask by counting all the bits that are in boldface up to the point where they stop lining up. You have 9 bits in the first octet, 8 bits in the second octet, and 4 bits in the third octet. That is a /20 or this:
255.255.240.0
Try this shortcut. Take the first number and the very last number and put them into binary:
172.16.16.0 10101100.0001000.00010000.00000000 172.16.31.0 10101100.0001000.00011111.00000000
Can you see that you actually came up with the same bit numbers lining up? This is a lot easier than writing out possibly dozens of addresses.
Supernetting 192.168.32.0 through 192.168.63.0
In this example, you’ll see how to summarize 192.168.32.0 through 192.168.63.0. By using only the first network number and the last, you’ll save a lot of time and come up with the same network address and subnet mask:
-
First number: 192.168.32.0 = 11000000.10101000.00100000.00000000
-
Last number: 192.168.63.0 = 11000000.10101000.00111111.00000000
-
Network address: 192.168.32.0
-
Subnet mask: 255.255.224.0
Design Considerations for Route Summarization
Keep the following information in mind when designing your network summarization points:
-
Only classless routing protocols support route summarization. Examples of classless routing protocols include RIPv2, EIGRP, and OSPF. Therefore, if you are working in a RIPv1 or IGRP environment, route summarization is not going to work for you.
-
Route summarization is most effective when the addresses have been organized in a hierarchy (i.e., hierarchical addressing). When we speak of addresses being hierarchical, we mean that the IP subnets at the bottom of the tree (i.e., the ones with the longest subnet masks) are subsets of the subnets at the top of the tree (i.e., the ones with the shortest subnet masks). Figure 7.19 will be used to illustrate hierarchical versus non-hierarchical addressing.
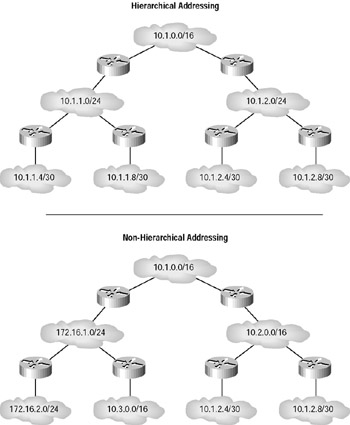
Figure 7.19: Discontiguous networking example
Great question. The answer is, of course, whenever you can. However, this is not an easy answer unless you are building your network from scratch and not trying to fix an already-been-installed-and-screwed-up mess.
Typically, your network will not have been configured in a hierarchical manner, so summarizing network boundaries will be difficult. Also, remember that EIGRP, IGRP, and RIP like to auto-summarize, so be careful how you create your discontiguous networks.
If you have buildings with multiple routes and they are created in a hierarchical and contiguous manner, then you are the lucky one and can perform summary boundaries between buildings. It’s a great feeling when you get this working.
In the VLSM section of this chapter, you learned how route summarization in discontiguous networks could cause some hosts to become unreachable. If both Router A and Router B are sending out advertisements to the WAN cloud advertising that they are the path to network 172.16.0.0/16, then devices in the WAN cloud do not know which advertisement to believe.
Remember that you can avoid this situation by proper address planning ahead of time. However, you may find yourself in a situation in which you are dealing with a legacy installation and you need to overcome this issue of discontiguous networks.
One solution is to turn off route summarization on the routers. To keep routing protocols such as RIPv2 and EIGRP from automatically summarizing routes, you can explicitly disable route summarization in the Cisco IOS. The following are examples of IOS configurations in which you are disabling automatic route summarization. As you may remember, OSPF does not automatically summarize.
To turn off auto-summarization for RIP version 2 routed networks, use the following router configuration:
router rip version 2 network 10.0.0.0 network 172.16.0.0 no auto-summary
To turn off auto-summarization for EIGRP routed networks, use the following router configuration:
router eigrp 100 network 10.0.0.0 network 172.16.0.0 no auto-summary
Another way to allow discontiguous networks to be interconnected over a serial link is to use Cisco’s IOS feature called IP unnumbered. We’ll explain this a bit later in the chapter.
Applying Supernets to Cisco Routers
You can use either EIGRP or OSPF, among others, to advertise a supernet, but EIGRP and OSPF are the most popular. IGRP and RIP (Routing Information Protocol), along with EIGRP, automatically summarize on classfull boundaries. If you have noncontiguous networks—a classfull network separated by another classfull network—you’ll need to turn off auto-summarization. Here’s how to do that:
RouterA(config)#router eigrp 1 RouterA(config-router)#no auto-summary
It’s not really difficult, but if you don’t type that in, your EIGRP routing process will not work. If you have a contiguous network and it is not separated by a discontiguous design, then EIGRP will auto-summarize and you’re done.
However, if you want to manually configure a summary router using EIGRP, you use an interface command:
RouterA(config)#int e0 RouterA(config-int)#ip summary-address eigrp 1 192.168.32.0 255.255.224.0
The EIGRP routing process now advertises networks 192.168.32.0 through 192.168.63.0 as available through interface Ethernet 0.
To configure a summary route advertised by OSPF, you use a routing process command:
RouterA(config)#router ospf 1 RouterA(config-router)#area 1 range 172.16.0.0 255.255.240.0
The OSPF routing process finds the interfaces assigned to this address range and advertises the summary route out those interfaces for area 1.
|
EAN: 2147483647
Pages: 201