| After you've created a stroke, you can use it in many ways. You can edit the stroke, or copy a brush to or from the stroke. You can also modify Paint Effects parameters to, for example, make a brush have smaller flowers or more branching. Selecting Strokes To modify a stroke, you need to select it first, which can be challenging in Shaded or Wireframe mode because the stroke is nearly always lying across a given object. It's easier to select strokes in the Outliner. If you want to delete a stroke, you can press the Delete key after selecting it in the Outliner. Creating a Paint Effects Stroke with a NURBS Curve You can attach a brush to any NURBS curve you've created (by projection, direct creation, or any other method) to create a new Paint Effects stroke. With the curve selected, open the Visor, select a brush, and in the Paint Effects panel, choose Paint Effects Curve Utilities Attach Brush to Curves. Copying and Pasting Brush Settings You can select any stroke you've already created and use its brush settings to continue painting or to paint other objects by choosing Paint Effects Get Settings from Selected Stroke. This action copies that stroke's brush settings into the template brush. You can then select other strokes and apply the same settings to their brushes. To do this, you select the strokes in the scene or in the Outliner, and then choose Paint Effects Apply Settings to Selected Strokes. Simplifying Curves and Strokes To make a stroke's underlying curve easier to animate and deal with, you can remove CVs from the curve to simplify it by choosing Paint Effects Curve Utilities Simplify Stroke Path Curves. If the stroke has a complex brush attached, however, it can slow down Maya's responsiveness. The solution is to lower the stroke's display quality (this lowers the density by reducing the numbers of tubes and segments in the stroke). With the stroke selected, choose Display Stroke Display Quality on Maya's main menu and select one of the following: 0/25/50/75/100%/Custom. It's best to select the Custom option and set a value around 5%20%. Usually, a percentage in this range is all you need to see where the stroke will appear and whether it's getting in the way of something else. Tutorial: Adjusting Paint Effects It's time to return to the scene file you've built progressively through this book. In this tutorial, you'll add a single stroke and then edit it to get the effect of dead grass blowing in the wind. -
Load the scene file, and enable Hardware Texturing in the Perspective view with Shading Hardware Texturing. If this drags down your graphics performance too much, you can work with Hardware Texturing disabledsimply toggle it off the same way you enabled it. Render a frame of the Perspective view, and you'll see that the lighting scheme is for a night scene, with the house casting soft shadows, to suit your spooky world (see Figure 13.8).   Figure 13.8. Hardware textured and rendered view of the scene. 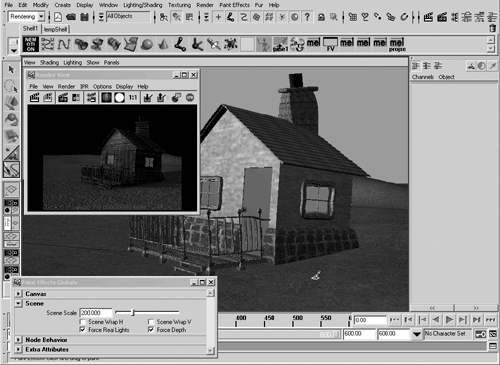 -
Open the Paint Effects Globals dialog box (Paint Effects Paint Effects Globals). Expand the Scene section, set the Scene Scale to 200 so that the default brush sizes are at the correct scale for the scene, as shown in Figure 13.8, and then close the dialog box. -
Select the ground and make it paintable (Paint Effects Make Paintable). Open the Visor (hotkey: Shift+V ) and choose the same Daisies brush you used in the previous tutorial. RMB-click in the shaded Perspective view, and you'll see the Paint Effects Tool cursor appear. Paint some daisies to check the brush size, and then undo (hotkey: z ). Because you were painting in a Perspective view (Model View mode), the daisies look less complex than they did when you painted them in Paint Scene mode in the previous tutorial. -
Switch to the Paint Effects panel (hotkey: 8 ). As before, if you see a white empty panel, RMB-click in the panel and choose Paint Scene. Return to the Visor, and in the Grasses category, select the grassDryBlowing.mel brush. Set the Paint Effects panel to Wireframe mode (for speedy response) by pressing 4. Orbit the view in the Paint Effects panel and zoom out until you can see most of the ground plane. Then paint a straight stroke of grass, starting from in front of the center of the porch, leading away from the house, and out to the edge of the ground plane. -
To edit the grass stroke, open the Attribute Editor (in the following figures, the Attribute Editor is displayed instead of the Channel Box by clicking the Show Attribute Editor button at the far right of the Status Line), and select the grassDryBlowing1 tab to see the settings for the grass brush you painted with. tip You can find the settings used in the following steps in the Channel Box, under Inputs, if you click on the grassDryBlowing1 entry. However, the values are displayed in one long list, making it difficult to find the ones you want to edit. The Attribute Editor categorizes the settings to make them easier to find. -
The grass is a bit short for the unkempt lawn the Spooky World should have, so set the Global Scale to 200 to create taller, wider grass blades. -
Next , you'll make a wider swath of grass for this stroke. Set the Brush Width under the Brush Profile section to 5.0 to make the blades spread out around the path. The number of blades has remained the same, however, so in the Attribute Editor, expand the Tubes section and then the Creation section. Set the Tubes Per Step setting to 60 to increase the grass density. Adjust your Perspective view to a position where you can gauge the size of the grass in relation to the house. If your display is lagging, lower the stroke's Display Percent in the Channel Box. You can also disable Stroke Refresh in the Paint Effects panel (Stroke Refresh Off), and then refresh the display when needed by clicking the Redraw Paint Effects View button. -
The grass is laying down, following the direction of the stroke. Although this does create a windswept grass effect, some of the grass should be standing up to create a more natural, random look. Under the Tubes section in the Attribute Editor, expand the Behavior section and then the Forces section, and then set the Path Follow attribute to . The grass should now be more vertical and randomly bent. To see the effect clearly, set the view to Textured mode on the Shading menu, and click the Redraw Paint Effects View button if necessary. Under the Tubes, Creation section in the Attribute Editor, set the Length Min to 0.3 and the Length Max to 0.6 to make the smallest grass blades taller, and the grass height will vary randomly between these two values. You can also reduce the Segments attribute to 6 to get a faster rendered result. Render the view to get an idea of what the grass looks like, as shown in Figure 13.9. Figure 13.9. The result of edits to the grass, previewed in the Paint Effects panel and rendered. 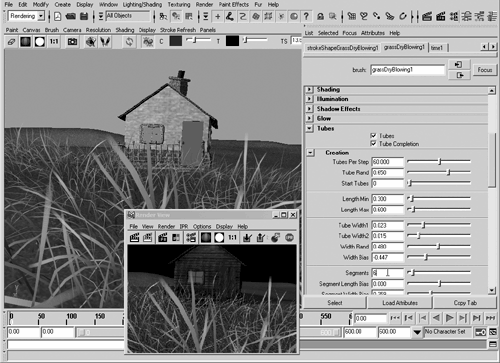 -
Next, you should take a look at how the grass is blowing around. To get the display to be responsive enough for a real-time preview of the wind effect, there are several steps you need to take. First, set the view to Perspective (Panels Perspective Persp). The paint effects will no longer be rendered and the grass will look like simple lines. Next, hide all but the currently selected object, the single grass paint stroke (hotkey: Alt+h , or Hotbox Display Hide Hide Unselected Objects). -
Then click the strokeShapeGrassDryBlowing1 tab in the Attribute Editor and set the Display Quality to 2 , so that only 2% of the grass blades appear. Now you can click the Play button and see the wind effect in real time. tip Rendering should take no more than a minute. If your render times are extremely long, check your Render Globals settings to make sure the resolution is at 320x240 and antialiasing is set to Preview Quality. note You can confirm your playback speed in the Preferences dialog box (open it by clicking the Animation Preferences button at the lower right of the interface). In the Playback Speed list box, select Real-time (30 fps). -
Leave the animation playing, return to the grassDryBlowing1 tab in the Attribute Editor, and expand the Tubes, Behavior, Turbulence section. Increase the Turbulence attribute to 0.05 to make the grass move more. Set the Frequency attribute to 0.3 to specify how coordinated the movement of the grass blades will be. If this value is set to , the grass blades move in "lock step," which doesn't look natural. Last, set Turbulence Speed to .4 , which slows down the motion to give the effect of a gentle but persistent wind. With each adjustment, you should see the result in the panel as the playback loops , as shown in Figure 13.10. Figure 13.10. Editing Turbulence settings during playback. 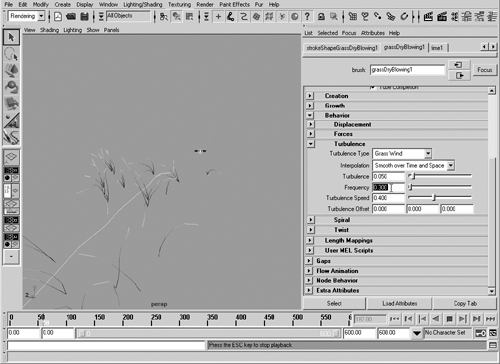 -
Click the Stop button to halt playback, and unhide all the hidden objects (hotkey: Ctrl+Shift+h ). Tap the spacebar to return to Four View mode, and configure the space on the interface's right side to display the Channel Box by clicking the button at the far right of the Status Line. You've created and customized one grass stroke. Next, you'll sod the landscape and use the grass settings you just set up for the rest of the grass strokes. See the file on the CD if you want to compare your progress.  Tutorial: More Paint Effects Now that you've got your grass stroke the way you want it, you can fill out the rest of the landscape. In this tutorial, you'll also paint in trees and fog to complete the spooky world. You'll test it with a Playblast, and then render the scene to a movie from the fly-in Camera view. You can continue from the previous tutorial, or load the scene file from the CD. -
If you've restarted Maya since the previous tutorial, you'll need to make the ground surface paintable again. To do that, select the ground and choose Paint Effects Make Paintable.  -
To increase the speed of interaction, lower the resolution of displayed NURBS objects by marquee-selecting all objects in a panel, and then pressing 1 to set the display quality to low. -
Next, you'll make a handy tool for creating the new grass that uses the settings from the perfected grass stroke. Open the Outliner (hotkey: Shift+O ) and select strokeGrassDryBlowing1. Then choose Paint Effects Get Settings from Selected Stroke to copy the settings you created. Next, choose Paint Effects Save Brush Preset. In the Save Brush Preset dialog box (see Figure 13.11), enter M4FgrassDryBlowing in the Label text box and drygrass in the Overlay Label text box. Leave the To Shelf radio button selected for the Save Preset setting, and this handy brush will appear in your Shelf. Click the Save Brush Preset button, and then click Close. The new brush icon will be displayed on the currently selected Shelf tab. If you need to get rid of some Shelf items, MMB-drag their icons to the trashcan at the far right of the Shelf. Figure 13.11. Adding the custom brush type to the Shelf. 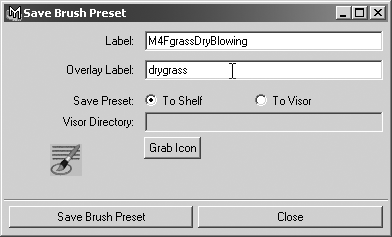 -
Switch to the Top view, full screen. Click the new Shelf icon, and you will be working in Paint Effects. Before you begin painting, however, you need to adjust the strokes so that they display only 2% of the blades in the view. To do that, you'll use the Paint Tool settings, which define many attributes of the stroke. The Paint Tool button (shown in Figure 13.11) is in the Tool Box below the Show Manipulator Tool button. Double-click it, and set the Display Quality to 2.0 . Close the Tool Settings window. -
Now you can sod the landscape in several long strokes. As you paint, you'll see all the blades appear, but as soon as you finish a stroke, it switches to the 2% display setting. Create three long strokes on each side of the house, one behind the house that continues the stroke made in the previous tutorial, and a few other grass patches scattered around the landscape, as shown in Figure 13.12. Keep in mind that how quickly or slowly you draw the strokes affects the grass density. Overlap the broad strokes to avoid getting gaps in the grass. Also, avoid painting grass too near to the house, or it could protrude through the house geometry. Figure 13.12. The grass strokes applied. 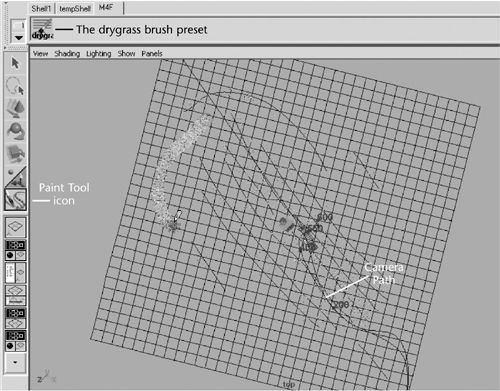 -
To make it easier to work in Maya, you can hide these grass strokes. Open the Outliner and select all the paint strokes, and then hide these selected objects (hotkey: Ctrl+h ). -
Next, you'll add some trees. Confirm that you still have your Scene Scale set to 200 in the Paint Effects Globals dialog box, as in Step 2 of the previous tutorial. In the Visor (hotkey: Shift+V ), select the Trees folder, and click the birchDead.mel brush. To avoid placing trees directly in the camera path, you'll draw strokes that go around it. To make the trees, double-click the Paint Tool icon in the Tool Box and set the Display Quality to 25 . Open the Brush Settings dialog box (hotkey: Ctrl+b ), and set the Global Scale to 10 . Now draw a looping path in the Top view that stays away from the camera path line, the camera's line of sight, and the house. -
In the Visor, select the treeBare1.mel brush. In the Brush Settings dialog box, set the Global Scale to 3 . Paint another loop of trees behind the first loop, curving around it. -
In the Visor, select the thorn.mel brush, and set its Global Scale to 8 . Paint another loop of trees behind and surrounding the one you painted in Step 8. -
In the Visor, select the treeBare3.mel brush, and set its Global Scale to 4 . Paint a shorter loop of trees, as shown in Figure 13.13. Figure 13.13. The tree strokes applied, out of the camera's path.  -
You should have a real forest developing now, particularly from the camera's point of view. Check it by changing the view to the camera with Panels Perspective Camera1. Set the frame to 270 and render a frame. -
You can increase the tree density easily by selecting the birchDead stroke in the Outliner, and then setting the Sample Density to 2 in the Channel Box under Shapes. The number of dead birch trees on the brush stroke will increase. -
With the birchDead stroke still selected, hide all the objects that aren't selected (hotkey: Alt+h ) to speed up the display. To add wind to the trees, open the Attribute Editor, and click the birchDead1 tab. Expand the Tubes, Behavior, Turbulence sections, and set the Turbulence Type to Tree Wind. Switch to the Front view, and zoom so that only a few trees are visible. Set the stroke's display quality higher so that you can see the trees in more detail (Display Stroke Display Quality 50%). Click the Play button. Set Turbulence, Turbulence Speed, and Frequency to 0.200 . You can see in the viewports that the trees move strongly in the wind. Stop playback, and unhide the last hidden objects (hotkey: Ctrl+Shift+h ). -
Repeat Step 13 for the other tree strokes, using the Outliner to select each one. If you are unsure of what's hidden and want to unhide all the scene geometry, use Display Show Show Geometry All to get your scene objects back. tip To make sure you don't accidentally adjust the render camera's settings, you might want to lock the transforms for it. Select the camera in the Outliner, drag over all the transform names in the Channel Box (the nine entries from Translate X to Scale Z) and then RMB-click on any of them to open a shortcut menu. Choose Lock Selected to make it impossible to orbit or otherwise rotate the camera. -
To get a preview of the camera path and all the moving trees and grass, you'll create a Playblast. First, switch back to the Camera1 view. Make sure you're in Shaded mode (hotkey: 5 ) and unhide all objects, including the grass strokes; you can also have Hardware Texturing enabled, if you like. Then choose Window Playblast option box. In the Playblast Options dialog box, select Custom in the Display Size list box, and set the size to 480x360. Select the Save to File check box to enable the Movie File text box, and enter the name camtest1 , as shown in Figure 13.14. Click the Playblast button, and take a coffee break. Depending on the power of your 3D video card, the Playblast can take a few minutes up to a few hours. You can see the Time Slider's frame indicator move to show progress. When you view the resulting movie, you'll have a clear idea of what the final animated results will be. Figure 13.14. The Playblast Options dialog box. 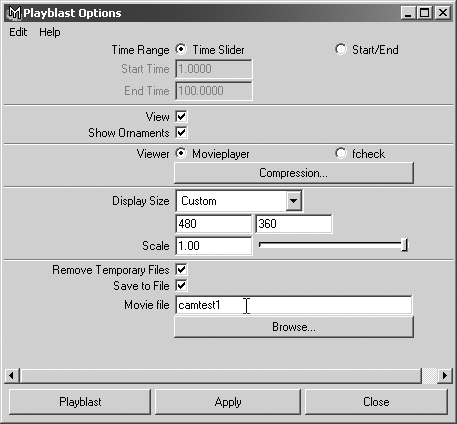 trap Playblast relies on your graphics card to build the 3D image for each frame. You can't obscure the Maya playback area with another window while the Playblast is being created, or your video card won't be doing any rendering, and Maya won't have a usable image for the frame. If you do cover the 3D view in Maya during Playblast recording, the movie freezes when playing back segments that were obscured during recording. To be on the safe side, find something else to do or use another machine while Maya is creating a Playblast.
tip If the Playblast is taking too long, press the Esc key at any point to quit; any progress you've made to that point will be saved. Then you can try lowering the resolution or turning off shading or textures to get faster results. With so many paint effects in the scene, the display quality has a major effect on Playblast speed. You can select strokes in the Outliner and adjust their display quality by clicking Display Stroke Display Quality and then choosing a percentage. Be aware that with the dense grass we've added to this scene, anything more than 3% or 4% will bring your display to a virtual halt.
Now that the animation is about right, you can add some vapor effects to help set the mood. If you want to compare your work to the sample scenes, load the file from the CD-ROM.  Tutorial: Steam and Fog Before you render the fly-through, you'll add some fog to the scene. The easy way is to apply Maya's layered fog effect. However, this fog is at a constant Z height and does not follow the contours of the landscape in a realistic way. So instead of painting on the surface, as you did with the trees and grass, you'll use the Paint Effects offset function to create a steamy fog effect that hovers in the air just above the ground plane. You'll use distance fog as well, just to blur the background. Paint Effects can create many types of effects that are otherwise difficult to simulate: rain, waterfalls, clouds, steam, fog, smoke, and so forth. -
First, hide all the existing brush strokes so that they don't slow you down. In the Outliner, select all the strokes, and then hide them (hotkey: Ctrl+h ).  -
Select the Perspective view (Panels Perspective Persp) and make it full screen. Select the ground object and make it paintable (Paint Effects Make Paintable) if you have restarted Maya since the previous tutorial. Switch to the Paint Effects panel (hotkey: 8 ), and make sure you're in Paint Scene mode. Set the Shading menu to Textured. Open the Visor (hotkey: Shift+V ), select the Clouds folder in the Paint Effects tab, and click the steamYellow.mel brush. -
Open the Tool Settings window by double-clicking the Paint Tool icon in the Tool Box (or choose Hotbox Paint Effects Paint Effects Tool option box). Set the Surface Offset to 120 . Open the Brush Settings dialog box (hotkey: Ctrl+b ), and set Global Scale to 12 . Expand the Brush Profile section, and set Brush Width to 0.2 and Flatness1 to 0.5 . Close both dialog boxes and move your mouse over the Paint Effects Shaded view landscape to see if the brush size looks right for your scene. Right-click the panel to activate it, if necessary. -
Paint a stroke of steam over the ground, following the low-lying areas of the ground. Add several more strokes, as shown in Figure 13.15. If you have a pressure-sensitive tablet, this is a great time to use it so that the steam trails vary in width and taper off gently at their start and finish. You can get acceptable results with a mouse, however. Try varying the brush size slightly (hotkey: b + LMB-drag left and right ) for different steam strokes. Figure 13.15. Painting in trails of steam, following the low-lying areas of the landscape.  -
Exit Paint Effects mode with Panels Perspective Camera1. Switch out of painting by selecting the cursor (hotkey: q ). Render a frame (for example, around frame 270) to check your work, if you like. -
To add some standard depth fog to the scene, open the Render Globals window. Expand the Render Options section, and click the checkered button for the Environment Fog attribute to create an environment fog. Next, select the Apply Fog in Post check box just below the EnvFogMaterial you created, so that it will render correctly with the Paint Effects. -
You can now edit the fog effect in Hypershade. The Environment Fog is automatically selected because you just created it. Close the Render Globals window. -
Open the Attribute Editor (hotkey: Ctrl+a ). At the top, set Fog Color to a dark gray (HSV: , , 0.15 ), and the Saturation Distance to 5000 . To affect how dense the fog remains at a distance, under the Clipping Planes section, select Fog Near/Far for the Distance Clip Planes, and set the Near Distance to 40 and the Far Distance to 10000 . Render the frame again to see the fog effect. Without the trees and grass, it should render rapidly . -
Unhide the trees and grass (Display Show Show Geometry All), and render the frame again. It will take a few minutes, but you can see one frame of the final composition (see Figure 13.16). It looks quite spooky, and the trees and grass blowing during the animation will add to the mood. Figure 13.16. The test rendering with the new glowing moon object combined with steam and fog. 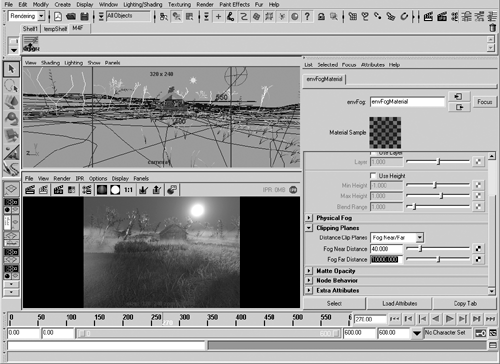 Prepare to render the movie. First, because the animation is 600 frames , you can estimate how long the render will take by multiplying your render time for one frame by 600. So if it took 3 minutes to render one frame, you can figure that it will take 1,800 minutes, or 30 hours, to render the entire animation. If you don't have 30 hours to let the computer crunch, you might want to save your scene to do it at another time. If you plan to increase the antialiasing quality or the resolution, you'll slow down the rendering speed, so you should test for a per-frame render time if you change these settings. -
Open the Render Globals window. Set the File Name Prefix to PFXtest , select AVI in the Image Format list box, and enter and 600 in the Start Frame and End Frame text boxes. Select camera1 in the Camera list box. If you like, you can raise the antialiasing quality level, but test it first for the impact it will have on rendering speed. -
At this point, you're ready to begin batch rendering. Close the Render Globals window, and choose Render Batch Render. If you have a multiple-processor computer, open the Batch Render Options dialog box, set it to use all available processors, and then click the Batch Render button. In either case, your computer is now creating the frames. In a few hours to a few days, you'll have your completed movie. If you like, compare your scene to the scene file noted below the CD icon.  Going Further Because the grass and trees are moving, try making the fog move, too (to do this, you need to animate the curves the fog strokes are attached to). Try creating some brushes of your own by experimenting with the settings that appear when you edit a brush. Explore the preset brushes, and figure out how some of the more esoteric styles have been created from the set of variables that control a brush's look. Try creating some landscapes of different types, and use a variety of the brush tools. Explore the brush animation options to see how you can create effects, such as lightning and fire, that have built-in animation. | A few closing notes about Paint Effects: Everything associated with creating, rendering, and animating Paint Effects is housed within the stroke and brush. Paint Effects have their own internal shading procedures, and you can't assign your own shaders to them. They have their own Dynamics simulations, so they won't interact with Maya's Dynamic fields that are discussed in the next chapter (although they can be affected by external "control curves" to simulate it, to a degree). Paint Effects are rendered separately as a post-procedure, and then are automatically composited into the rendered frame. You can see this during rendering, when Paint Effects don't appear during the normal rendering, and then pop up at the end of rendering after some delay.  |