| The process of creating a simple select query by using the Query wizard is almost identical to that of creating a form by using the Form wizard. Within the Query wizard, you can build a new query based on one or more fields from existing tables or queries. You can also create Crosstab, Find Duplicates, and Find Unmatched queries with the wizard. For Access to work effectively with multiple tables, it must understand the relationships between the fields in those tables. If these relationships don't already exist. See Also For more information about creating relationships, see the sidebar "Relationships" in Chapter 5, "Simplifying Data Entry by Using Forms."
In this exercise, you will use the Query wizard to create a query that combines information from two tables related through common fields. USE the 06_QueryWizard database. This practice file is located in the Chapter06 subfolder under SBS_Access2007. OPEN the 06_QueryWizard database.
1. | On the Create tab, in the Other group, click the Query Wizard button.
 The New Query dialog box opens.
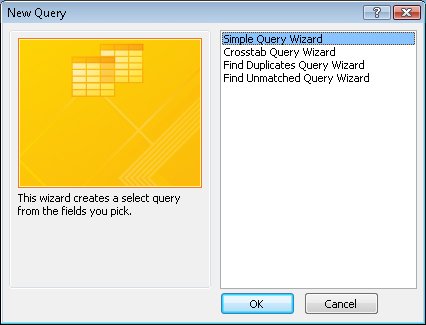 | 2. | With Simple Query Wizard selected in the list, click OK.
The Simple Query wizard starts.
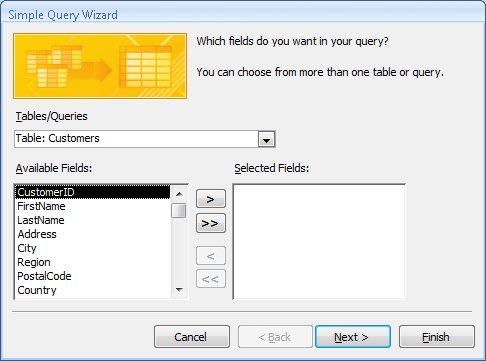 | 3. | In the Tables/Queries list, click Table: Orders. Then click the Move All button to move all the fields from the Available Fields list to the Selected Fields list.
Move All  | 4. | In the Tables/Queries list, click Table: Customers.
| 5. | In the Available Fields list, double-click the Address, City, Region, PostalCode, and Country fields to move them to the Selected Fields list, and then click Next.
Tip If the relationship between two tables hasn't already been established, you will be prompted to define it and then restart the wizard. 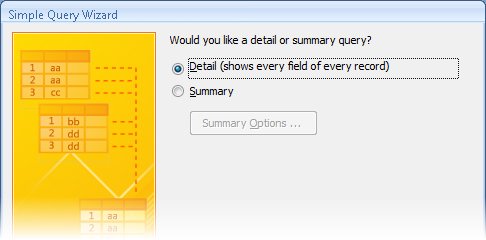 | 6. | With the Detail option selected, click Next.
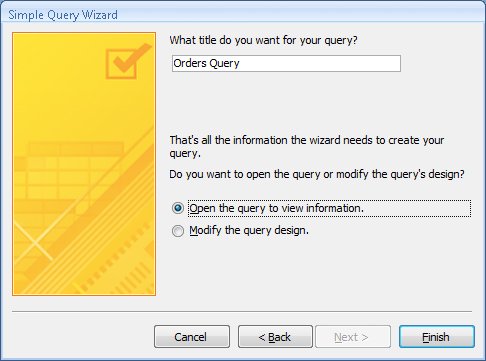 | 7. | With the Open the query to view information option selected, click Finish.
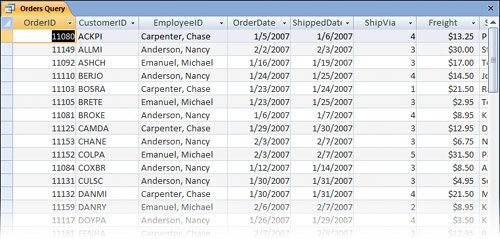
Access runs the query and displays the results in Datasheet view. You can scroll through the results and see that information is displayed for all the orders.
 | 8. | Switch to Design view.
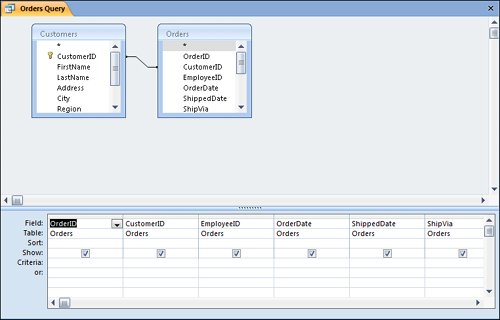 Notice that the Show check box is selected by default for each of the fields used in the query. If you want to use a field in a queryfor example, to sort on, to set criteria for, or in a calculationbut don't want to see the field in the results datasheet, you can clear its Show check box. Notice that the Show check box is selected by default for each of the fields used in the query. If you want to use a field in a queryfor example, to sort on, to set criteria for, or in a calculationbut don't want to see the field in the results datasheet, you can clear its Show check box.
| 9. | Clear the Show check box for OrderID, CustomerID, and EmployeeID, and then switch back to Datasheet view.
The three fields have been removed from the results datasheet.
| 10. | Switch to Design view.
This query returns all records in the Orders table. To have the query match the records for a range of dates, you will convert it to a parameter query, which requests the date range each time you run it.
| 11. | In the OrderDate column, type the following text in the Criteria cell, exactly as shown:
Between [Type the beginning date:] And [Type the ending date:]
| 12. | On the Design contextual tab, in the Results group, click the Run button to run the query.
 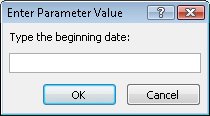 | 13. | Enter a beginning date of 1/1/07, and then press  . .
| 14. | Enter an ending date of 1/31/07, and then press .
Access redisplays the datasheet, this time listing only orders between the specified dates.
|
CLOSE the datasheet, saving the changes to the query, and then close the 06_QueryWizard database.
|