| When you create or open a database, it opens in a database window. The new Access database window interface is designed to more closely reflect the way people generally work with a database or database object. 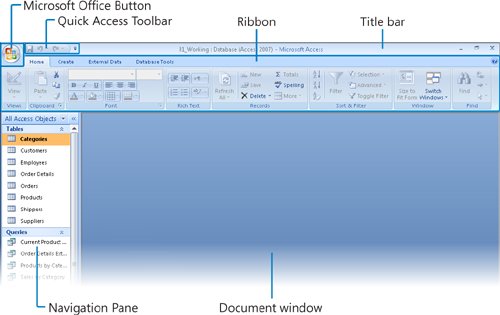 The interface includes the following elements: Commands related to managing databases (such as creating, saving, printing, backing up, and publishing) are available from the menu that appears when you click the Microsoft Office Button in the upper-left corner of the program window. This menu, which we refer to throughout this book as the Office menu, takes the place of the File menu that appeared in pre-vious versions of Access. Some commands are represented by buttons on the Quick Access Toolbar to the right of the Microsoft Office Button. By default, the database window Quick Access Toolbar displays the Save, Undo, and Redo buttons. You can add commands to the Quick Access Toolbar so that they are available regardless of which tab or object is currently active in the database window. See Also For information about customizing the Quick Access Toolbar commands and location, see "Making Favorite Access Commands Quickly Available" in Chapter 9, "Making Your Database Easy to Use."
The title bar displays the name of the active database object (if it is maximized). At the right end of the title bar are the three familiar buttons that have the same function in all Windows programs. You can temporarily hide the Access window by clicking the Minimize button, adjust the size of the window by clicking the Restore Down/Maximize button, and close the active window or quit Access by clicking the Close button. Below the title bar is the Ribbon, a new feature in many of the programs in the Office system. Commands are presented on the Ribbon rather than on the more-traditional menus or toolbars so that you can work most efficiently within the window. The Ribbon is organized into task-specific tabs, which are further divided into feature-specific or task-specific groups of commands. The buttons in each group change size depending on the width of the program window. They might be large, small, or wide, and might be labeled with the button name, icon, or both. Pointing to any button displays the button name in a ScreenTip that sometimes also describes the button's function. Some buttons have arrows, but not all arrows function the same way. If you point to a button that has an arrow is incorporated into the button body, clicking the button will display a list of options for you to choose from. If the arrow is separate from the button body, clicking the arrow will display a list of options and clicking the button will perform the currently selected action. Related but less common commands are not represented in a group as buttons. Instead they are available from a dialog box, which you can display by clicking the Dialog Box Launcher at the right end of the group title bar.
Dialog Box Launcher  The Microsoft Office Access Help button appears at the right end of the Ribbon. The Navigation Pane displays filtered lists of database objects. You can change the objects included in the list by clicking the list header and then clicking the category or group of objects you want to display.
The goal of the redesigned environment is to make working within an item window more intuitive. Commands for tasks you perform often are no longer hidden on menus and in dialog boxes, and features that you might not have discovered before are now plainly visible. By default, Access 2007 displays database objects as tabbed documents in the document window. If you prefer to display each object in a separate window rather than on a separate tab, you can do so by clicking Access Options on the Office menu, and then on the Current Database page, selecting the Overlapping Windows option. When displaying Tabbed Documents, a Close button for the active database object appears to the right of the document tabs. When displaying Overlapping Windows, in a maximized database object window, the Minimize, Maximize/Restore Down, and Close buttons for the object window appear on the right end of the Ribbon, and the Access icon appears to the left of the Home tab. Clicking the Access icon opens the control menu, displaying a list of commands related to managing the active object window: Restore, Move, Size, Minimize, Maximize, and Close. When not maximized, clicking the object icon at the left end of the object window title bar displays the control menu. In this exercise, you will take a tour of the command structure in an Access 2007 database window. USE the 01_Working database. This practice file is located in the Chapter01 subfolder under SBS_Access2007.
1. | On the Start menu, click Documents. Then in your Documents folder, browse to the MSP\SBS_Access2007\Chapter01 subfolder, and double-click the 01_Working database.
The database opens, with the Navigation Pane displaying the All Access Objects list. In the database window, the Ribbon includes four tabs:
Home Create External Data Database Tools
Tip Depending on what programs are installed on your computer, tabs and groups other than those described here might also appear on the Ribbon. The Home tab is active by default. Because no database object is currently open, only a few buttons on the Home tab are available.
| 2. | In the upper-left corner of the database window, click the Microsoft Office Button.
Microsoft Office Button  The Office menu opens.
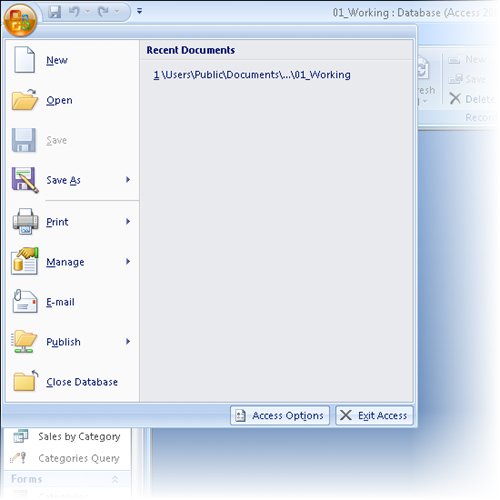 You can create a database, but not a database object, from this menu. We'll talk about the commands available from the Office menu in other chapters of this book. You can create a database, but not a database object, from this menu. We'll talk about the commands available from the Office menu in other chapters of this book.
| 3. | Click away from the Office menu to close it.
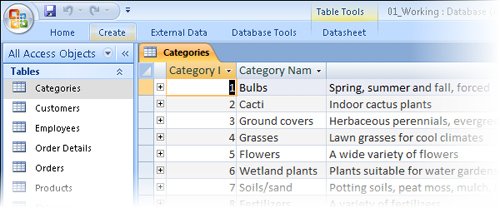
| 4. | In the Navigation Pane, under Tables, double-click Categories.
The Categories table opens, an associated Table Tools contextual tab (Datasheet) appears, and more of the Home tab becomes active.
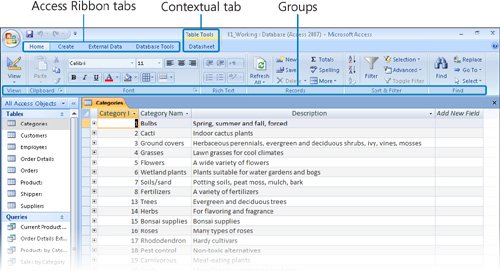 Buttons representing commands related to working with database content are organized on this tab in seven groups: Buttons representing commands related to working with database content are organized on this tab in seven groups:
Views Clipboard Font Rich Text Records Sort & Filter Find
Only the buttons for the commands that can be performed on the currently selected database object are active.
Important Depending on your screen resolution and the size of the database window, you might see more or fewer buttons in each of the groups, the buttons you see might be represented by larger or smaller icons than those shown, or the group might be represented by a button that you click to display the group's commands. Experiment with the size of the database window to understand the effect on the appearance of the tabs. | 5. | On the Home tab, click the Font Dialog Box Launcher.
Dialog Box Launcher The Datasheet Formatting dialog box opens.
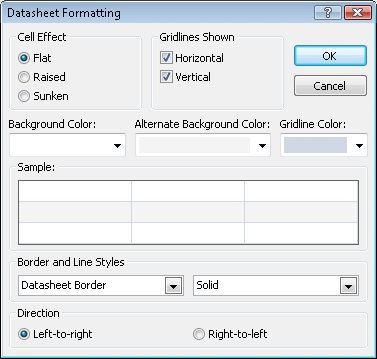 You can access certain settings not available from the Font group, such as Cell Effect and Border Styles, from this dialog box.
| 6. | In the Datasheet Formatting dialog box, click Cancel.
| 7. | Click the Create tab.
 Buttons representing commands related to creating database objects are organized on this tab in four groups: Buttons representing commands related to creating database objects are organized on this tab in four groups:
| 8. | Double-click the Create tab.
Double-clicking the active tab hides the Ribbon and provides more space for the active database object.
 | 9. | Click the External Data tab.
The Ribbon reappears, with the External Data tab active.
 Buttons representing commands related to moving information between a database and other sources are organized on this tab in four groups: Buttons representing commands related to moving information between a database and other sources are organized on this tab in four groups:
Import Export Collect Data SharePoint Lists
| 10. | Click anywhere in the open table.
The Ribbon hides again. When you hide the Ribbon, it remains hidden except when active, until you again double-click a tab.
| 11. | Double-click the Database Tools tab to display the tab and redisplay the Ribbon.
 Buttons representing commands related to managing, analyzing, and protecting information are organized on this tab in five groups: Buttons representing commands related to managing, analyzing, and protecting information are organized on this tab in five groups:
Macro Show/Hide Analyze Move Data Database Tools
|
CLOSE the 01_Working database.
|