Assembling the Movie Using the Video Post Module
|
| < Day Day Up > |
|
After all sequences are completed, assemble the final reel in a file of the AVI format. Below we describe how to do this using the Video Post module. Frankly, this technique is not convenient, so we advise you to use it only as a last resort. Instead, assemble your reel in any video editor, if you have one.
-
Adjust the frame change frequency in 3ds max; it should be 15 frames per second (this information will be used during the AVI file record):
-
Time control panel à Time Configuration
-
-
Open the window of the Video Post module:
-
Main menu à Rendering à Video Post
-
-
Load your sequences of files:
-
Video Post Toolbar à Add Image Input Event à Files
-
Select the first file of the sequence, check the Sequence flag, and press Open.
-
Press OK in all dialogs.
-
-
Repeat the operation for the rest of the sequences.
Note We will content ourselves with three tracks, but you should load all of your sequences; there should be five of them.
-
Butt the tracks (Fig. 8.14, a).
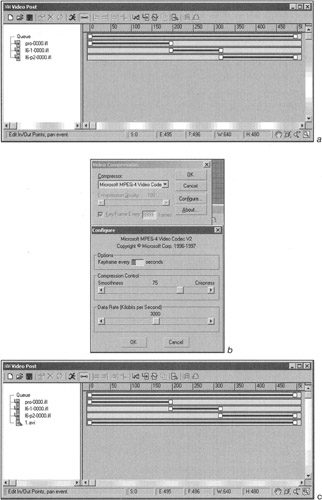
Figure 8.14, a-c: Project preparation in the Video Post module -
Add output (Output Event):
-
Video Post Toolbar à Add Image Output Event à Files
-
Enter a file name with an AVI extension.

-
-
Select the appropriate Codec in the settings and adjust it (Fig. 8.14, b).
Your Video Post window should look like the one in Fig. 8.14, c.
-
Start the rendering process:
-
Video Post Toolbar à Execute Sequence
-
Specify the parameters and press the Render button.

-
The Video Post module allows you to produce very interesting things. Its features are surpassed by few video-editing packages. But it is utterly inconvenient to use, so you need to have a video editor at your disposal. There are many choices, with the prices varying from thousands dollars (Combustion) to nil (VirtualDub).
|
| < Day Day Up > |
|
EAN: N/A
Pages: 136
- Understanding SQL Transactions and Transaction Logs
- Using Data Control Language (DCL) to Setup Database Security
- Using Keys and Constraints to Maintain Database Integrity
- Working with SQL JOIN Statements and Other Multiple-table Queries
- Writing External Applications to Query and Manipulate Database Data