Moving from Cell to Cell
Moving from Cell to CellTo enter data in the various cells that make up a worksheet, you must have a way to move from one cell to another. The most intuitive method is to point and click. Using your mouse, position the mouse pointer over the desired cell and click the left mouse button. The most intuitive method, however, is not always the fastest . As you type entries, your keyboard acts as a more efficient navigational instrument. Table 4.1 lists the various keys you can use to move around in a worksheet. Table 4.1. Keystrokes for Navigating a Worksheet
Tip
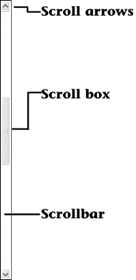
Using the ScrollbarsThe workbook window displays only a very small portion of the available columns and rows. If cells you want to see move off the screen, you can bring them back into view by using the scrollbars. The vertical scrollbar (on the right side of the workbook window) enables you to scroll up and down. The horizontal scrollbar (near the lower-left corner of the workbook window) enables you to scroll left and right. The following picture and list illustrate basic scrollbar moves:
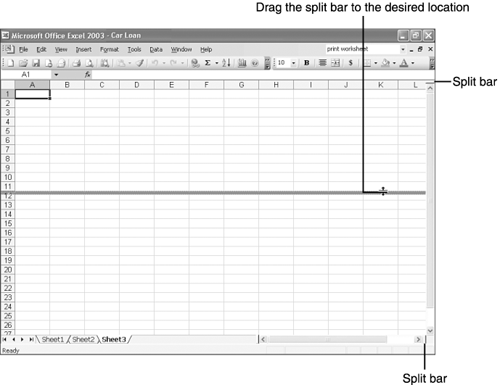
Splitting the Workbook WindowIn large worksheets, you may want to view two parts of the worksheet at the same time. If, for example, the worksheet has column headings that indicate the types of data you need to enter in each column, you may want those column headings to remain onscreen at all times. In other words, you don't want them to scroll off the screen. You can lock headings in place using the Freeze Panes feature, as explained in Chapter 5, "Controlling Rows, Columns, and Cells." Another way to lock headings in place or view two sections of a worksheet for other reasons is to use the split bars, as shown in Figure 4.1. Drag the vertical split bar down or drag the horizontal split bar to the left to create a two-paned window. Each pane has its own set of scrollbars, so you can scroll inside the pane independently of the other pane. To remove a split bar, drag the bar to the edge of the workbook window. Figure 4.1. Drag the split bar to the desired location to create a two-paned window. |
EAN: 2147483647
Pages: 189
- Challenging the Unpredictable: Changeable Order Management Systems
- Enterprise Application Integration: New Solutions for a Solved Problem or a Challenging Research Field?
- The Effects of an Enterprise Resource Planning System (ERP) Implementation on Job Characteristics – A Study using the Hackman and Oldham Job Characteristics Model
- Data Mining for Business Process Reengineering
- Healthcare Information: From Administrative to Practice Databases


