Tweaking the Workplace Switcher
It does not take long before you have a desktop with dozens of open windows. When this happens, no amount of Alt+Tab combinations will help you become organized. Fortunately, there is the Workplace Switcher. This applet gives you multiple desktops-you can put all work windows on one workplace, games on another, short projects on a third, and so on. By default, the Workplace Switcher is placed in the right corner of the bottom panel-I usually move mine to the top right so the Window List has more room. If you don't have the Workplace Switcher, you can add it by opening the Add to Panel… menu and dragging the applet to your panel.
Switching Workspaces with Ctrl+Alt+Arrows
The Workplace Switcher gives you a tiny view of each desktop (see Figure 8-4). Although you cannot see icons or window titles, you can see the general layout-there are gray boxes that represent each window on each desktop. To switch between desktops, you can either click on the Workspace Switcher or use the Ctrl+Alt+Arrow keys. For example, Ctrl+Alt+LeftArrow switches the workspace to the left; Ctrl+Alt+RightArrow moves to the workspace on the right.

Figure 8-4: The Workspace Switcher, showing four distinct desktops
| Tip | If you open the Workspace Switcher's Preferences, then you can add more desktops and change their layout. The default uses four desktops arranged in one row. If you add more rows, then you can use Ctrl+Alt+UpArrow and Ctrl+Alt+DownArrow to navigate between them. |
Managing Workspaces
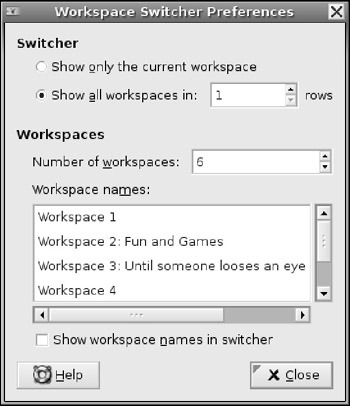
By default, there are four workspaces available. You can add additional workspaces by right- clicking the Workspace Switching and selecting Preferences (see Figure 8-5). From here, you can name workspaces, adjust the layout, or add more workspaces (you can also remove work- spaces, but who would want to do that?). For example, I usually name my middle workspace Games-I can always go to this workspace when the boss is not around. (And if he suddenly shows up, I can use Ctrl+Alt+LeftArrow to quickly hide my games and show real work-in- progress.)

Figure 8-5: The Workspace Switcher preferences window
Windows do not need to stay in one workspace. Your active window appears highlighted in the Workspace Switcher. You can drag an application's window onto any other desktop in the Workplace Switcher. I usually do this when one window becomes cluttered, or when popup windows come from a different application. For example, when the Evolution mailer pops up a To Do list alert, I'll drop it in the appropriate window. (There is no reason to have "Write Status Report" appear in the middle of my Games workspace.)
Some application windows are small and may be hard to grab in the Workspace Switcher. Another way to move windows is to click on the top right corner of any window. This will open a menu that displays options such as Move to Workspace Right and Move to Another Workspace ![]() Workspace 1. You can also pull up this menu by right-clicking any of the buttons in the Workspace List.
Workspace 1. You can also pull up this menu by right-clicking any of the buttons in the Workspace List.
Finally, some application windows may be very important. These are ones that you will want to appear on every workspace, and not just one workspace. In the window's top-left corner menu is an option titled, Always on Visible Workspace. If you select this, then the window will be visible regardless of the selected workspace. I find this option to be very handy for important online conversations (for example, IRC and Jabber), and when using xawtv (watching TV while working-see Chapter 3). This way, I won't miss any communications when I switch workspaces. Without this option, something may happen in a window and I won't notice it until I switch back to that workspace.
EAN: 2147483647
Pages: 124