| Here is the scenario: The GroupWise post office PO-X is being moved from FS1 to FS2. The file server housing PO-X isn't robust enough, so you must put the GroupWise post office on its own dedicated NetWare server. The PO-X post office communicates via TCP/IP to its owning domain, DOMAINX. All users access PO-X in client/server mode. Moving the Post Office and Creating Domain-to-PO Connectivity A few days before the post office move, let users know that the move of the post office will happen. If everything goes well, it should be rather seamless for most users. Unless you are using DNS names to identify where the POA is running, users who use GroupWise caching or remote mailboxes need to manually change the IP address to the POA under Accounts, Account Options, Properties, Advanced. Tip If when you rolled out your GroupWise clients, you defined the DefaultIPAddress and DefaultIPPort settings in the SETUP.CFG file to point to a DNS name of a post office, the cache and remote users will not need to reconfigure where their remote and cache clients attempt to connect to. The remote or cache client will attempt to connect to the old post office IP address. If this fails, and the Registry keys for DefaultIPAddress and DefaultIPPort are present on the machine, the remote or cache client will attempt to connect here before failing. This provides a great solution to your GroupWise remote and cache users. See Chapter 12 for more information on using the SETUP.CFG file with the DefaultIPAddress and DefaultIPPort parameters.
Here are the steps to follow: 1. | Install the GroupWise POA software to FS2.
You can do this by running the agent install program, INSTALL.EXE, found in the AGENTS subdirectory of your GroupWise CD or SDD.
Tip When you perform the agent install, you will be prompted to enter the domains or post offices you are installing the agents for. If you do not enter or define any domains or post offices for the agent install, the installation will only install the agent files. This is exactly what you want in this situation, because in the next step you will be copying the POA startup file. When you define the path to domains or post offices during the install routine of the agents, a new startup file is built by the install routine. | 2. | Copy the POA's startup file from \\FS1\SYS\SYSTEM to \\FS2\SYS\SYSTEM.
| 3. | Edit the POA's startup file and change the home switch to reflect the new UNC path for PO-X. Now you need to suspend connectivity from DOMAINA's MTA to PO-X.
| 4. | Go to the MTA's screen at the NetWare console, press F10, and select Configuration Status.
| 5. | Highlight the post office PO-X, press Enter, and select the Suspend option.
| 6. | Bring down the POA that services PO-X.
| 7. | Rename the WPHOST.DB file in \\FS1\EMAIL\PO to WPHOST.BAK.
Do not proceed until you have done the rename successfully. If you cannot rename the WPHOST.DB file, either there is another POA running against the post office (maybe an indexer POA), or there are users logged in via direct mode who have a connection to it. Check file/open lock activity from the NetWare server monitor to determine who has a connection to the database.
| 8. | Copy the contents and subdirectories of \\FS1\EMAIL\PO to \\FS2\EMAIL\PO, using one of the following options (in the preferred order):
Use a backup of the post office from FS1 and then restore it to FS2. Use Novell's GroupWise DBCOPY utility Use NCOPY /S /E. Use XCOPY /S /E. Copy the data using Windows Explorer.
| 9. | Load ConsoleOne and make sure you are connected to the WPDOMAIN.DB for DOMAINA.
| 10. | Edit the post office object in ConsoleOne and change the UNC path to the post office, as shown in Figure 21.3.
Figure 21.3. Changing the UNC path for the post office 
| 11. | Edit the POA for the PO-X post office and change the IP address in the Network Address tab to reflect the IP address for FS2.
Now you need to check the network links to PO-X to see whether the change to the IP address made it to the link table.
| 12. | Choose Tools, GroupWise Utilities, Link Configuration. Select DOMAINA, and then choose View, Post Office Links.
You need to double-click the post office link to PO-X to make sure that it has the correct IP address.
| 13. | Rebuild PO-X's WPHOST.DB file by highlighting the post office and choosing Tools, GroupWise Utilities, System Maintenance. Then select Rebuild Database and click Run.
| 14. | If your post office is configured for LDAP or SSL, and you have certificate and key files that you use for encryption, be sure to copy them over to the new server. For example, you may be copying the files from \\FS1\SYS:\SYSTEM to \\FS2\SYS:\SYSTEM.
| 15. | Bring down the MTA for DOMAINA, and bring it back up again.
| 16. | Bring up the POA for PO-X on FS2 to confirm that the POA can connect to the domain.
The POA for PO-X is configured for MTP, so to test connectivity you do the following:
Go to the POA at the NetWare console. Press F10 and then select Message Transfer Status. Confirm that the IP addresses are correct and that communication is established.
Now, you can confirm WebAccess and GWIA connectivity to the post office.
| 17. | Edit the WebAccess gateway object.
| 18. | Select the Post Office Links property page.
| 19. | Highlight the link to PO-X and edit it, making sure that the link reflects FS2's new information.
| 20. | Edit the GWIA gateway object.
| 21. | Select the Post Office Links property page.
| 22. | Highlight the link to PO-X and edit it, making sure that the link reflects the new information for FS2.
Finally, you can create client connectivity as explained in the next steps.
| 23. | Make sure that all users have browse, read, and compare eDirectory object rights to the post office and POA objects.
This way, if they are running the NetWare client and are in client/server-online mode, they will discover the location to the new POA. For users who do not have the NetWare client, you have hopefully set up the DefaultIPAddress and DefaultIPPort options in the SETUP.CFG file so that they will use a DNS name to locate their post offices. If not, you will have to push out the IP address to the users in some other way. For example, if you have a method of changing the user's Registry, like Novell ZENworks, you can modify the Registry at the following location to reflect the new TCP/IP address:
HKEY_CURRENT_USER\Software\Novell\GroupWise\Login Parameters \TCP/IP Address
| 24. | Remember also that if you have not used the DefaultIPAddress and DefaultIPPort settings, the GroupWise caching and remote clients might need to manually change the IP address to the POA. You do this from Accounts, Account Options, Properties, Advanced.
|
You might need to take additional steps related to the post office move, as explained in earlier sections. And then your post office move is complete. The next section is not required as part of a post office move. Moving a Post Office to a New OU As your eDirectory tree evolves and grows, you might need to move a GroupWise post office object to a new OU. The GroupWise software does not readily allow for this task, but this section shows you how to pull it off. To begin, you need to disable the ConsoleOne GroupWise snap-ins by doing the following: 1. | Get out of ConsoleOne.
| 2. | From Windows Explorer, move the GROUPWISE folder and its contents from the NOVELL\CONSOLEONE\VERSION\SNAPINS directory into C:\TEMP, or some other location, as long as it's not under the ConsoleOne path.
| 3. | Reconfirm that there is no longer a GROUPWISE folder in the SNAPINS folder.
When ConsoleOne is unsnapped from GroupWise, all GroupWise objects show up with an icon that looks like a question mark on the right side of a 3D box, as shown in Figure 21.4.
Figure 21.4. ConsoleOne without GroupWise snap-ins 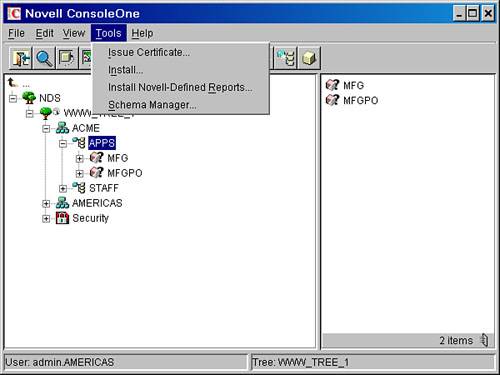
| 4. | Start ConsoleOne, and make sure that under the Tools menu there are no GroupWise menus, as shown in Figure 21.4.
| 5. | Delete the GroupWise POA object by highlighting and deleting the post office object, which appears to the right in Console View.
Figure 21.5 shows the POA object.
Figure 21.5. The POA object with ConsoleOne unsnapped from GroupWise 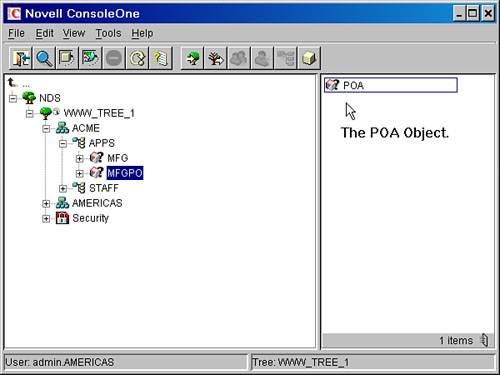
| 6. | Delete any GroupWise libraries that are associated with this post office.
GroupWise libraries will be in the same eDirectory context as the post office object, so highlight a library and delete the object.
| 7. | Delete the post office object from eDirectory (see Figure 21.6).
Figure 21.6. Deleting the GroupWise post office object 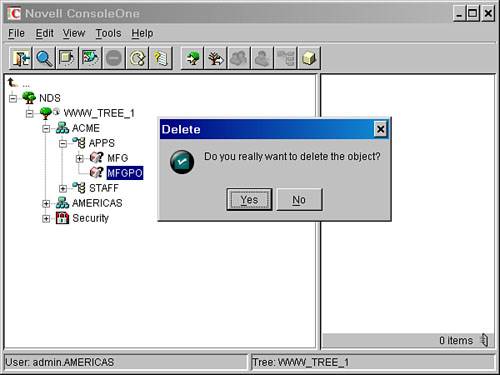
| 8. | Put the GroupWise snap-ins for ConsoleOne back into place by moving the GROUPWISE folder from the temporary location back to the NOVELL\CONSOLEONE\VERSION\SNAPINS directory.
| 9. | Launch ConsoleOne. The GroupWise snap-ins should now be reenabled.
| 10. | Be sure to connect the domain owning the post office you are moving.
| 11. | Go into the eDirectory browser view and highlight the eDirectory OU that you want to move the post office into.
| 12. | Choose Tools, GroupWise Utilities, GW/eDirectory Association, Graft GroupWise Objects.
| 13. | Select domains, post offices, and gateways.
| 14. | When prompted with the Select Domain window, select the domain that owns the post office you deleted from eDirectory.
| 15. | Proceed to the Post Office Context window, shown in Figure 21.7.
Figure 21.7. The Post Office Context window in the Graft utility 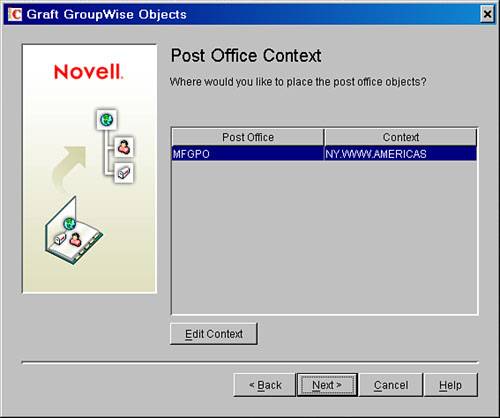
Notice that the Edit Context button will not be grayed out when you highlight the post office that was deleted.
| 16. | Edit the context and specify the new context for the post office object, if needed.
| 17. | Click Next and then Finish.
| 18. | After the graft is finished, get out of the Graft utility, and then get out of ConsoleOne. Relaunch ConsoleOne.
Tip Getting in and out of ConsoleOne gives ConsoleOne a chance to reread everything; otherwise, ConsoleOne can become confused after a procedure such as this. | 19. | Go to the eDirectory context that now houses your post office.
| 20. | Choose Tools, GroupWise Utilities, GW/eDirectory Association, Graft GroupWise Objects.
| 21. | When the graft utility comes up, graft the users associated with the relocated post office by selecting users, resources, and distribution lists from the first graft screen.
| 22. | Proceed through the Graft utility and follow the prompts, choosing the post office that you just moved to a new eDirectory OU as the post office for which the objects need to be grafted, as shown in Figure 21.8.
Figure 21.8. Selecting which objects associated with a post office to graft 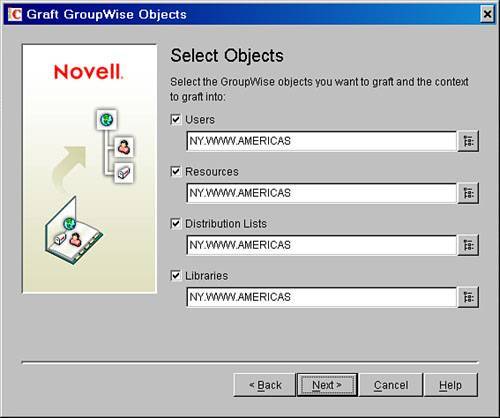
|
To determine whether your post office graft operation was successful, edit the post office object and look at the Membership page. If you see the users on the post office in the Membership page, you know that the graft was successful. |