| There are many ways to make your WebAccess Gateway redundant, but before we discuss these options, we need to discuss a basic install of a simple GroupWise WebAccess installation. This section includes some behind-the-scenes information you might find beneficial. Note WebAccess can run only on a functional web server, so you need to make sure that a suitable web server is installed and running on your server. The supported web servers are listed in the preceding section.
This example describes the simple installation of the WebAccess Agent and Application onto a single NetWare server. This is a very common scenario and the information provided is also useful for the installation of WebAccess on Windows or Linux. The section "Advanced Installation Options for WebAccess" contains additional information about installing the Agent and Application on different servers. For now, this section provides a good understanding of the install options for the Agents and Application. Starting the Installation of the GroupWise WebAccess Gateway To start the installation of the GroupWise WebAccess Gateway, follow these steps: 1. | Map a drive to the server that will run the WebAccess Agent, and also map a drive to the server that is running the web server.
| 2. | Launch the SETUP.EXE from the INTERNET\WEBACCES directory located in your GroupWise Software Distribution Directory or GroupWise CD.
Accept the license in the license screen and choose to install the WebAccess Agent and Application options, as shown in Figure 11.2. If you are using GroupWise Document Management (GroupWise Libraries) and either are currently using WebPublisher or want to add WebPublisher to your installation, choose that option as well.
Figure 11.2. Choosing which GroupWise WebAccess components to install 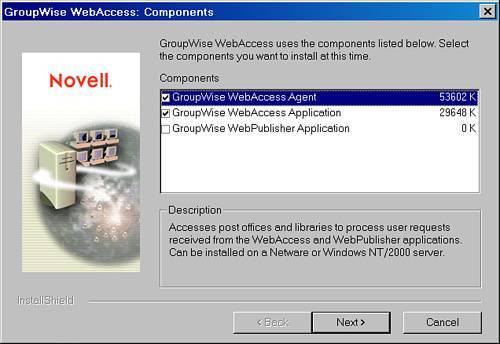
| 3. | The WebAccess Agent and Application were discussed earlier. The WebPublisher Application is used to access documents stored in GroupWise document management libraries. If you are using GroupWise document management, you might want to enable the WebPublisher Application. This example does not include installing the WebPublisher Application.
|
You have now successfully completed this part of the installation. Installing the GroupWise WebAccess Agent The next few steps will install the WebAccess Agent, in this case as part of a complete installation of WebAccess. The agent can also be installed as a separate module; just follow these same steps: 1. | Choose the platform and file location for your WebAccess Agent. You might want to use a drive-letter mapping, because a UNC path doesn't always work well. Click Next.
During this step, you've defined the path to the server where the WebAccess Agent will be installed. As mentioned before, the Agent can run on NetWare, a Windows 2000/2003 server, or a Linux server. This step also determines which code the install script will install. If you select NetWare as the platform, GWINTER.NLM is installed for the Agent. If select Windows, GWINTER.EXE is installed. There are, of course, additional files installed, but the GWINTER is the main workhorse for the Agent piece. The directory specified here can be eight characters or fewer.
| 2. | Choose the IP address or DNS name for the WebAccess Agent.
Y ou are now prompted to enter the IP address or DNS name of the server on which you are installing the Agent. The install script tries to auto-detect this information for you and displays it, as shown in Figure 11.3. Before this screen, though, the first thing the script does is query the server that you defined in the preceding step to verify whether any GroupWise modules are loaded. If they are, you are prompted to unload the GroupWise modules.
Figure 11.3. GroupWise WebAccess Agent server information includes a supplied IP address and related information 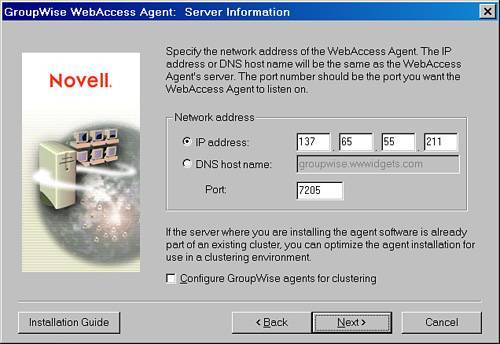
Tip On NetWare, the DNS hostname comes from the HOSTS file found in the SYS:\ETC directory. Before proceeding, make sure that the local HOSTS file on the web server contains the local IP address and a web server name. This information can appear anywhere in the HOSTS file. 137.65.55.211 groupwise.wwwidgets.com
If the DNS name is incorrect, the HOSTS file is where this information is coming from.
The information about the DNS name and IP address of the server is used to help create a binary file on the web server called COMMGR.CFG, which the WebAccess Application reads to determine on which server and port the WebAccess Agent is installed. This information is also placed into the GroupWise WPDOMAIN.DB to notify the WebAccess Agent which port it should listen on for connections coming from the WebAccess Application.
Tip Note the option to cluster-enable the WebAccess Agent. Checking this box simply changes the definition of the path to the WebAccess Agent when the Agent loads. You will see an example of what checking this cluster option does in the next section, which talks about how to load the WebAccess Agent. If you are installing this WebAccess Agent into a Novell cluster, you will want to check this box. If you do check the option to configure the GroupWise Agent for clustering and you are not running in a cluster environment, don't worry. The Agent will load just fine on a non-clustered server. | 3. | After confirming the server information for the server that will run WebAccess Agent, click Next. You will see the screen shown in Figure 11.4.
Figure 11.4. GroupWise WebAccess Agent gateway directory configuration 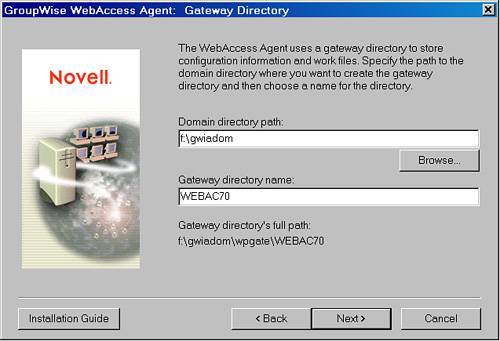
You are now prompted for the path to the domain. Once again, the install script tries to provide this information for you; however, it might not be correct. The path to the domain you see here comes from the workstation's Registry that you are running the install from. Notice that it gives you the full path of where the gateway directory will be. GroupWise stores all the gateway directory structures in DOMAIN\WPGATE\. Hence, you will see this in the gateway directory's full path information.
Tip Keep this directory within eight characters or fewer. The install script will check to make sure that the directory exists; if it does not, it will prompt you to create it. If it does exist, you might be asked whether you are sure you want to use this directory. | 4. | After specifying the gateway directory, click Next.
You are now asked what you want the WebAccess Agent gateway object to be called. This is the object you will see from ConsoleOne under the GroupWise domain defined earlier. For simplicity, it is best to keep these names the same.
The next step, shown in Figure 11.5, might have you wondering why this is necessary. You're queried for a username and password so that the gateway can access the WPDOMAIN.DB of the WebAccess Agent's domain. It's a good idea to place the domain and WebAccess Agent on the same server. Hence, a username and password are not necessarily required. However, the install requires you to enter a username and password here. The main reason for this is that if your domain is on FS1 and you are installing the WebAccess Agent on FS2, the Agent must be able to directly access the WPDOMAIN.DB to read some of its configuration information. Because of this, the Agent must log in to the FS1 server to access the domain database. Also, if the Agent must communicate to post offices via a direct link, it will use this username and password to authenticate to the post office server.
Figure 11.5. Username and password are required for the GroupWise WebAccess Agent 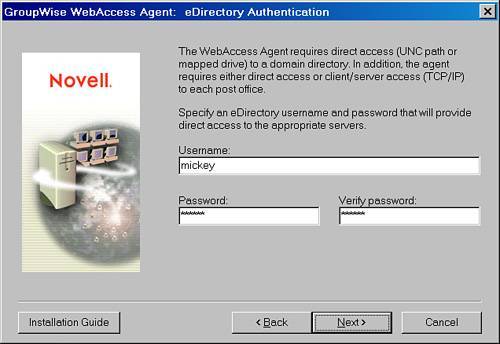
| 5. | After entering the username and password, click Next.
The next screen gives you the option to monitor the WebAccess Agent through a standard HTTP browser. This allows you to check in with your WebAccess Agent to see how it is running without having to actually look at the Agent console screen. However, you should of course not allow everybody to have access to this information, so you can protect it with a username and a password. This user does not have to be an eDirectory account; it can be just an arbitrary separate username and password.
| 6. | Check the Enable Web Console option and enter the details for the monitor account (see Figure 11.6). Click Next to proceed to the WebAccess Agent installation summary screen. Or you may want to consider not checking the Enable Web Console option, and entering the information from within ConsoleOne after the WebAccess Agent is installed. This is our preference.
Figure 11.6. Specify the username and password for monitoring the GroupWise WebAccess Agent via HTTP. This should not be an eDirectory or a GroupWise account 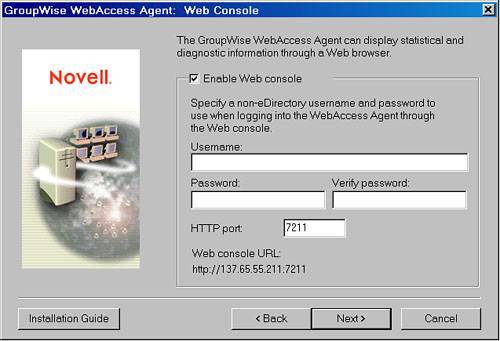
You will get one additional prompt about the WebAccess Agent supporting the WebPublisher. This example doesn't install WebPublisher. If you are installing WebPublisher, you would want to enable this check box.
| 7. | You now see a summary of the WebAccess Agent setup information. Verify that all information is entered correctly, and click the Next button.
|
This concludes the WebAccess Agent portion of the install. The wizard now takes you directly into the WebAccess Application wizard install. Installing the GroupWise WebAccess Application The next few steps will install the WebAccess Application on the web server, in this case as part of a complete installation of WebAccess. The applications can also be installed as a separate module; just follow these same steps. Note The WebAccess Application is the piece that runs as a servlet on a web server and communicates to the WebAccess Agent via TCP/IP.
The first thing you are prompted for in the WebAccess Application install process is what type of web server you will be installing the Application on. Follow these steps to complete the WebAccess Application install process: 1. | Select the web server platform, verify that the path to the root of the web server is correct, as shown in Figure 11.7, and then click Next.
Figure 11.7. The first choice of the WebAccess Application install asks which web server to install the application to 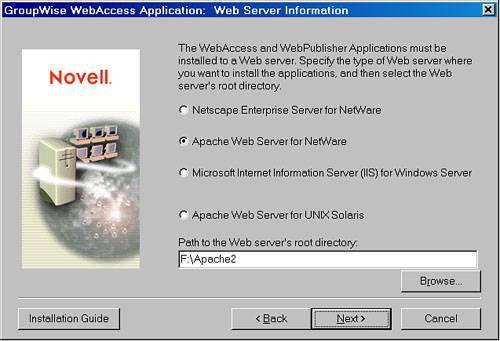
| 2. | Configure the IP address or DNS server name, as shown in Figure 11.8, and then click Next.
Figure 11.8. Specify the DNS name or IP address of the WebAccess Application 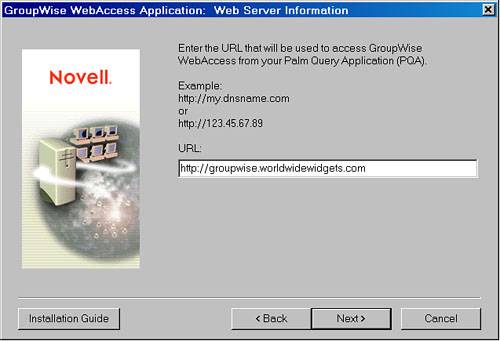
Tip WebAccess no longer uses the novell.html file that earlier versions of GroupWise installed in your web server's HTDOCS directory. If users have been accessing the WebAccess client by displaying the novell.html file, the links in that file no longer work. You should remove the obsolete novell.html file from the HTDOCS directory and use the new URL to access the WebAccess client. If you have customized the novell.html file, you can transfer your changes to the index.html file in the sys:tomcat/4/webapps/gw directory. | 3. | Select the web server default web page option you prefer, and click Next.
You are then prompted as to where you want the configuration files for the WebAccess Application to be located. This defaults to the <\\SERVER NAME\SYS\NOVELL directory for NetWare, as shown in Figure 11.9. The install creates a WebAccess directory under the specified directory where the configuration files are actually placed. These configuration files should exist on the same server as the web server.
Figure 11.9. Confirm the directory for the WebAccess Configuration files 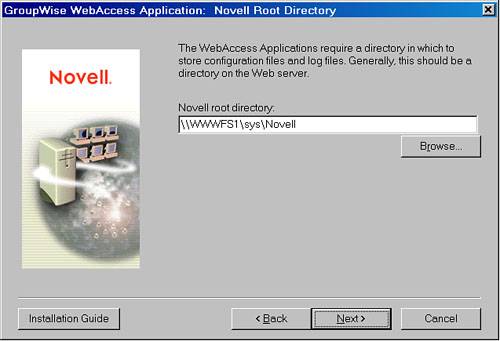
Note If this directory does not exist, you will be prompted to create it. | 4. | Enter the path for the configuration files and click Next.
You are prompted as to which Java servlet gateway you will be using (see Figure 11.10). Take the default, unless you must use a different Java servlet gateway.
Figure 11.10. The Java servlet gateway runs the WebAccess Application 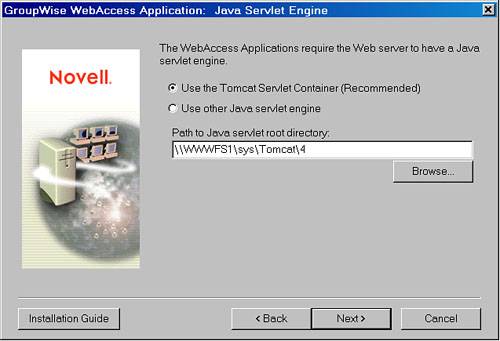
| 5. | Select the servlet gateway and then click Next.
| 6. | Select the default language and click Next.
The next option (see Figure 11.11) asks in what context of your eDirectory tree the application objects should be created. These application objects consist of the GroupWise WebAccess object, the GroupWiseProvider object, the LDAPProvider object, and the NovellSpeller object. These objects, and the services they perform, are discussed more in the section "Configuring the GroupWise WebAccess Gateway." The default context is the context of the domain object. This is usually sufficient, as these objects should exist close to the domain for administration purposes.
Figure 11.11. Choosing an eDirectory context for WebAccess Application's objects 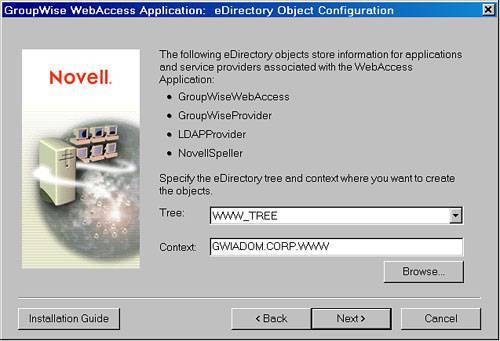
Note It might be a bit confusing to see the name of the GroupWise domain listed at the beginning of the context. Even though a GroupWise domain object is not considered an eDirectory organization or organization unit, which are your traditional container objects that would contain eDirectory leaf objects, the domain's eDirectory object has an attribute that defines it as a container object. Because of this, you can actually create some objects under the domainyou can create GroupWise gateways, service providers, and application objects. Therefore, it makes sense to have the context listed as the domain object. This makes it nice because in eDirectory you can then simply click the domain eDirectory object to view all the associated objects. | 7. | Verify that the context is correct and click Next.
| 8. | You will see a summary of the WebAccess Application information that you entered. Verify this information and click Next.
| 9. | If prompted to unload Java, do so manually rather than allowing the installation to do so.
To unload Java manually from the NetWare console prompt, enter the following commands:
java -killall java exit
| 10. | The install will then proceed to install the WebAccess Agent and Application. You might be prompted to overwrite older files. If so, you will want to keep the newest file.
The last thing you see is a summary screen with information on how to load the components that were just installed.
|
In the next section, you'll learn how to put on the final touches to the WebAccess Agent installation. If you leave the last options checked, the Install Wizard launches the WebAccess Agent and restarts the web server for you. This gives you a functioning WebAccess system. Important GroupWise WebAccess Agent Configuration Steps There are just a couple of settings you should make on the WebAccess Agent so that it will function correctly immediately. Here are the steps for configuring the last few essential WebAccess Agent settings: 1. | In ConsoleOne, edit the properties of the WebAccess Agent.
| 2. | Select the Post Office Links property page. Make sure that all links are client/server only and all the IP addresses of the POAs are filled in.
| 3. | Next, go to the GroupWise tab, and select the Log Settings property page.
| 4. | Change the logging level to verbose.
| 5. | Specify a log file path on the server that houses the WebAccess Agent. The default path is DOMAIN\WPGATE\WEBACCESS\000.PRC.
| 6. | Increase the max log disk space; for example, to 50000.
|
The reason you must specify a log file path is that the WebAccess Agent will not create a log file on the disk, unless you specifically indicate the path to create log files. This is a quirk with the WebAccess Agent that other GroupWise Agents do not have. See Figure 11.12 for example of a configured Log Settings page. Figure 11.12. WebAccess Agent log settings are important if you need to troubleshoot your GroupWise WebAccess Agent 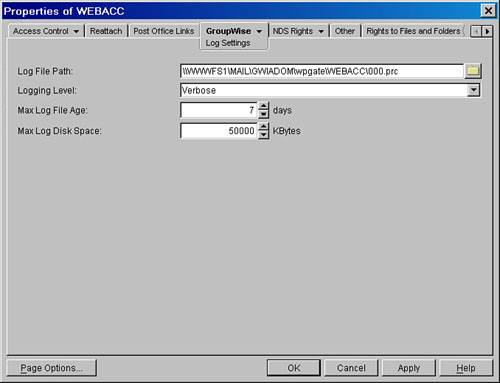
|